Canon 9685A001AA Software Starter Guide Ver. 20 - Page 87
Starting the ArcSoft Camera Suite Software, Manual for the ArcSoft Camera Suite
 |
UPC - 013803043457
View all Canon 9685A001AA manuals
Add to My Manuals
Save this manual to your list of manuals |
Page 87 highlights
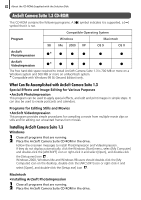
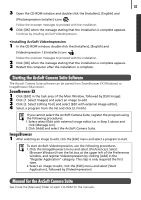
83 3 Open the CD-ROM window and double-click the [Installers], [English] and [PhotoImpression Installer] icons . Follow the onscreen messages to proceed with the installation. 4 Click [OK] when the message stating that the installation is complete appears. Continue by installing ArcSoft VideoImpression. •Installing ArcSoft VideoImpression 1 In the CD-ROM window, double-click the [Installers], [English] and [VideoImpression 1.6 Installer] icons . Follow the onscreen messages to proceed with the installation. 2 Click [OK] when the message stating that the installation is complete appears. 3 Restart the computer after the installation is complete. Starting the ArcSoft Camera Suite Software The Arcsoft Camera Suite software can be started from ZoomBrowser EX (Windows) or ImageBrowser (Macintosh). ZoomBrowser EX 12 34 Click [Edit] in the task area of the Main Window, followed by [Edit Image]. Click [1. Select Images] and select an image to edit. Click [2. Select Editing Tool] and select [Edit with external image editor]. Select a program from the list and click [3. Finish]. If you cannot select the ArcSoft Camera Suite, register the program using the following procedures. 1. Select select [Edit with external image editor] as in Step 3 above and click [Manage List]. 2. Click [Add] and select the ArcSoft Camera Suite. ImageBrowser 1 After selecting an image to edit, click the [Edit] menu and select a program to start. To start ArcSoft VideoImpression, use the following procedures. 1. Click the [ImageBrowser] menu and select [Preferences]. Select [Browser Window] from the list box at the upper left of the Preferences window, and register VideoImpression by clicking [Add] in the "Register Application" category. This step is only required the first time. 2. Select an image to edit, click the [Edit] menu and select [Start Application], followed by [VideoImpression]. Manual for the ArcSoft Camera Suite See inside the [Manuals] folder on each CD-ROM for the manuals.
-
 1
1 -
2
-
3
-
4
-
5
-
6
-
7
-
8
-
9
-
10
-
11
-
12
-
13
-
14
-
15
-
16
-
17
-
18
-
19
-
20
-
21
-
22
-
23
-
24
-
25
-
26
-
27
-
28
-
29
-
30
-
31
-
32
-
33
-
34
-
35
-
36
-
37
-
38
-
39
-
40
-
41
-
42
-
43
-
44
-
45
-
46
-
47
-
48
-
49
-
50
-
51
-
52
-
53
-
54
-
55
-
56
-
57
-
58
-
59
-
60
-
61
-
62
-
63
-
64
-
65
-
66
-
67
-
68
-
69
-
70
-
71
-
72
-
73
-
74
-
75
-
76
-
77
-
78
-
79
-
80
-
81
-
 82
82 -
 83
83 -
 84
84 -
 85
85 -
 86
86 -
 87
87 -
 88
88 -
 89
89 -
 90
90 -
 91
91 -
 92
92 -
93
-
94
-
95
-
96
-
97
-
98
-
99
-
100
-
101
-
102
-
103
-
104
-
105
-
106
 |
 |