Canon D320 imageCLASS D320/D340 Basic Guide - Page 44
Reserve Copy
 |
UPC - 013803016468
View all Canon D320 manuals
Add to My Manuals
Save this manual to your list of manuals |
Page 44 highlights
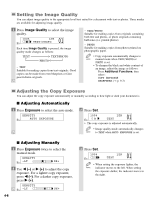
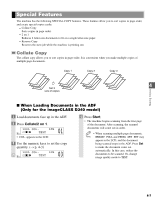
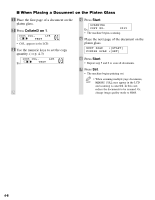
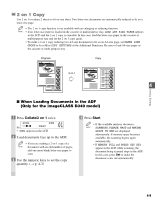
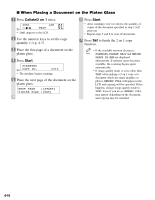
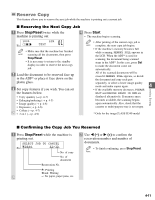
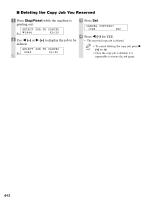
Reserve Copy This feature allows you to reserve the next job while the machine is printing out a current job. I Reserving the Next Copy Job 1 Press Stop/Reset twice while the machine is printing out. 4 Press Start. • The machine begins scanning. 100% Ex: 01 LTR TEXT • Make sure that the machine has finished NOTE scanning all the documents, then press Stop/Reset. • It is necessary to return to the standby display in order to reserve the next copy job. 2 Load the document to be reserved face up in the ADF* or place it face down on the platen glass. 3 Set copy features if you wish. You can set the features below. • Copy quantity (→ p. 4-3) • Enlarging/reducing (→ p. 4-5) • Image quality (→ p. 4-6) • Exposure (→ p. 4-6) • Collate (→ p. 4-7) • 2 on 1 (→ p. 4-9) • After printing of the current copy job is NOTE complete, the next copy job begins. • If the machine's memory becomes full while scanning, MEMORY FULL appears in the LCD. When the ADF* is used for scanning, the document being scanned stops in the ADF*. In this case, press Set to make the document come out automatically. All of the scanned documents will be erased if MEMORY FULL appears, so divide the document and copy each part separately, or select a lower image quality mode and make copies again. 4 Making Copies • If the available memory decreases, PLEASE WAIT and MAKING SPACE IN MEM are displayed alternatively. If memory space becomes available, the scanning begins again automatically. Also, check that the cassette or multi-purpose tray is not empty. * Only for the imageCLASS D340 model I Confirming the Copy Job You Reserved 1 Press Stop/Reset while the machine is printing out. SELECT JOB TO CANCEL Ex: A0044 02 × 30 No. of copy No. of document Reservation No. A: Printing Blank: Waiting -: No paper, paper jams, etc. 2 Use 4 (-) or e (+) to confirm the reservation number and number of documents. • To finish confirming, press Stop/Reset. NOTE 4-11
-
 1
1 -
2
-
3
-
4
-
5
-
6
-
7
-
8
-
9
-
10
-
11
-
12
-
13
-
14
-
15
-
16
-
17
-
18
-
19
-
20
-
21
-
22
-
23
-
24
-
25
-
26
-
27
-
28
-
29
-
30
-
31
-
32
-
33
-
34
-
35
-
36
-
37
-
38
-
 39
39 -
 40
40 -
 41
41 -
 42
42 -
 43
43 -
 44
44 -
 45
45 -
 46
46 -
 47
47 -
 48
48 -
 49
49 -
50
-
51
-
52
-
53
-
54
-
55
-
56
-
57
-
58
-
59
-
60
-
61
-
62
-
63
-
64
-
65
-
66
-
67
-
68
-
69
-
70
-
71
-
72
-
73
-
74
-
75
-
76
-
77
-
78
-
79
-
80
-
81
-
82
-
83
-
84
-
85
-
86
 |
 |
