Canon EF 200-400mm f/4L IS USM Extender 1.4X User Manual - Page 6
Mounting and Detaching the Lens, Attaching the strap - cost
 |
View all Canon EF 200-400mm f/4L IS USM Extender 1.4X manuals
Add to My Manuals
Save this manual to your list of manuals |
Page 6 highlights
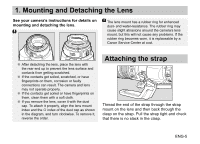
1. Mounting and Detaching the Lens See your camera's instructions for details on mounting and detaching the lens. The lens mount has a rubber ring for enhanced dust- and water-resistance. The rubber ring may cause slight abrasions around the camera's lens mount, but this will not cause any problems. If the rubber ring becomes worn, it is replaceable by a Canon Service Center at cost. ●● After detaching the lens, place the lens with the rear end up to prevent the lens surface and contacts from getting scratched. ●● If the contacts get soiled, scratched, or have fingerprints on them, corrosion or faulty connections can result. The camera and lens may not operate properly. ●● If the contacts get soiled or have fingerprints on them, clean them with a soft cloth. ●● If you remove the lens, cover it with the dust cap. To attach it properly, align the lens mount index and the index of the dust cap as shown in the diagram, and turn clockwise. To remove it, reverse the order. Attaching the strap Thread the end of the strap through the strap mount on the lens and then back through the clasp on the strap. Pull the strap tight and check that there is no slack in the clasp. ENG-5
-
 1
1 -
 2
2 -
 3
3 -
 4
4 -
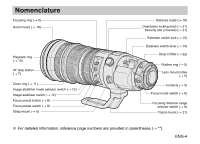 5
5 -
 6
6 -
 7
7 -
 8
8 -
 9
9 -
 10
10 -
 11
11 -
 12
12 -
13
-
14
-
15
-
16
-
17
-
18
-
19
-
20
-
21
-
22
-
23
-
24
-
25
-
26
-
27
-
28
-
29
 |
 |
