Canon EOS 40D Picture Style Editor Windows - Page 11
Using a Downloaded Picture Style File, Effective for the Scene, Setting Color Tone, Color Saturation
 |
UPC - 689076803281
View all Canon EOS 40D manuals
Add to My Manuals
Save this manual to your list of manuals |
Page 11 highlights
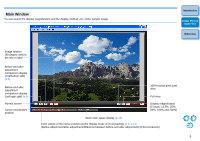
Using a Downloaded Picture Style File Effective for the Scene 1 Click the [ ] button. ¿ The [Open] window appears. 2 Select a Picture Style file to be registered and click the [Open] button. ¿ The selected Picture Style file is applied to the image. Setting Color Tone, Color Saturation, Contrast and Sharpness You can specify [Color Tone], [Color saturation], [Contrast] and [Sharpness]. 1 Click the [Advanced] button. Introduction Create Picture Style Files Reference ¿ The [Advanced Picture Style Settings] window appears. 2 Drag each slider and then click the [OK] button. Drag the sliders left or right ¿ The settings are applied to the image. O Original Picture Style files created with PSE (p.15) can also be registered and used by following the procedure above. O Picture Style files compatible with PSE are files with the ".PF2" extension. 10
-
 1
1 -
2
-
3
-
4
-
5
-
 6
6 -
 7
7 -
 8
8 -
 9
9 -
 10
10 -
 11
11 -
 12
12 -
 13
13 -
 14
14 -
 15
15 -
 16
16 -
17
-
18
-
19
-
20
 |
 |
