Canon EOS C700 GS PL EOS C700 EOS C700 PL EOS C700 GS PL EOS C700 FF EOS C700 - Page 3
Applying a LUT to Video Output
 |
View all Canon EOS C700 GS PL manuals
Add to My Manuals
Save this manual to your list of manuals |
Page 3 highlights
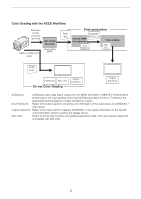
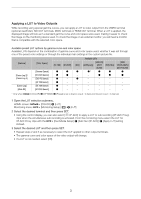
Applying a LUT to Video Outputs While recording using special gamma curves, you can apply a LUT to video output from the VIDEO terminal (optional viewfinder), SDI OUT terminals, MON. terminals or HDMI OUT terminal. When a LUT is applied, the displayed image will look as if a standard gamma curve and color space were used, making it easier to check the image on the monitoring device used. To check the image on an external monitor, you will need a monitor that is compatible with the selected color space. Available preset LUT options by gamma curve and color space Available LUTs depend on the combination of gamma curve and color space used, whether it was set through one of the preset color settings or through the individual main settings in the custom picture file. [Gamma] [Canon Log 2]/ [Canon Log 3] [Canon Log] [Wide DR] [Color Space] [Cinema Gamut] [BT.2020 Gamut] [DCI-P3 Gamut] [BT.709 Gamut] [BT.709 Gamut] [BT.2020 Gamut] Available LUTs [HDR-PQ] [HDR [BT.709] [BT.2020] [DCI] [ACESproxy] (OOTF [HDR-HLG] 1600%/400%] On/Off) (OOTF On/Off) Ü Ü Ü Ü* Ü Ü Ü Ü Ü - - Ü Ü Ü Ü - Ü - - - - Ü - - - - - - Ü - - - - - - Ü - - - - - - * Only when [COLOR] > [CP MAIN] > [Preset] is set to [Canon Log 2 : C.Gamut] or [Canon Log 3 : C.Gamut]. 1 Open the LUT selection submenu. HOME screen: [COLOR] > [LUT] Monitoring menu: [Monitoring Setup] (¢) > [LUT] 2 Select the desired terminal and then press SET. • Using the control display, you can also select [8 XF-AVC] to apply a LUT to sub recording (XF-AVC Proxy) clips when the simultaneous sub recording is activated. From the monitoring menu select the LUT for XF-AVC Proxy clips with the [Rec/Media Setup] > [Sub Rec (XF-AVC)] > [Apply LUT] setting instead. 3 Select the desired LUT and then press SET. • Repeat steps 2 and 3 as necessary to select the LUT applied to other output terminals. • The gamma curve and color space of the video output will change. • If a LUT is not needed, select [Off]. 3
-
 1
1 -
 2
2 -
 3
3 -
 4
4
 |
 |
