Canon EOS Rebel T3 Black EF-S 18-55mm IS II Lens Kit Refurbished EOS REBEL T3 - Page 27
Setting the Date and Time
 |
View all Canon EOS Rebel T3 Black EF-S 18-55mm IS II Lens Kit Refurbished manuals
Add to My Manuals
Save this manual to your list of manuals |
Page 27 highlights
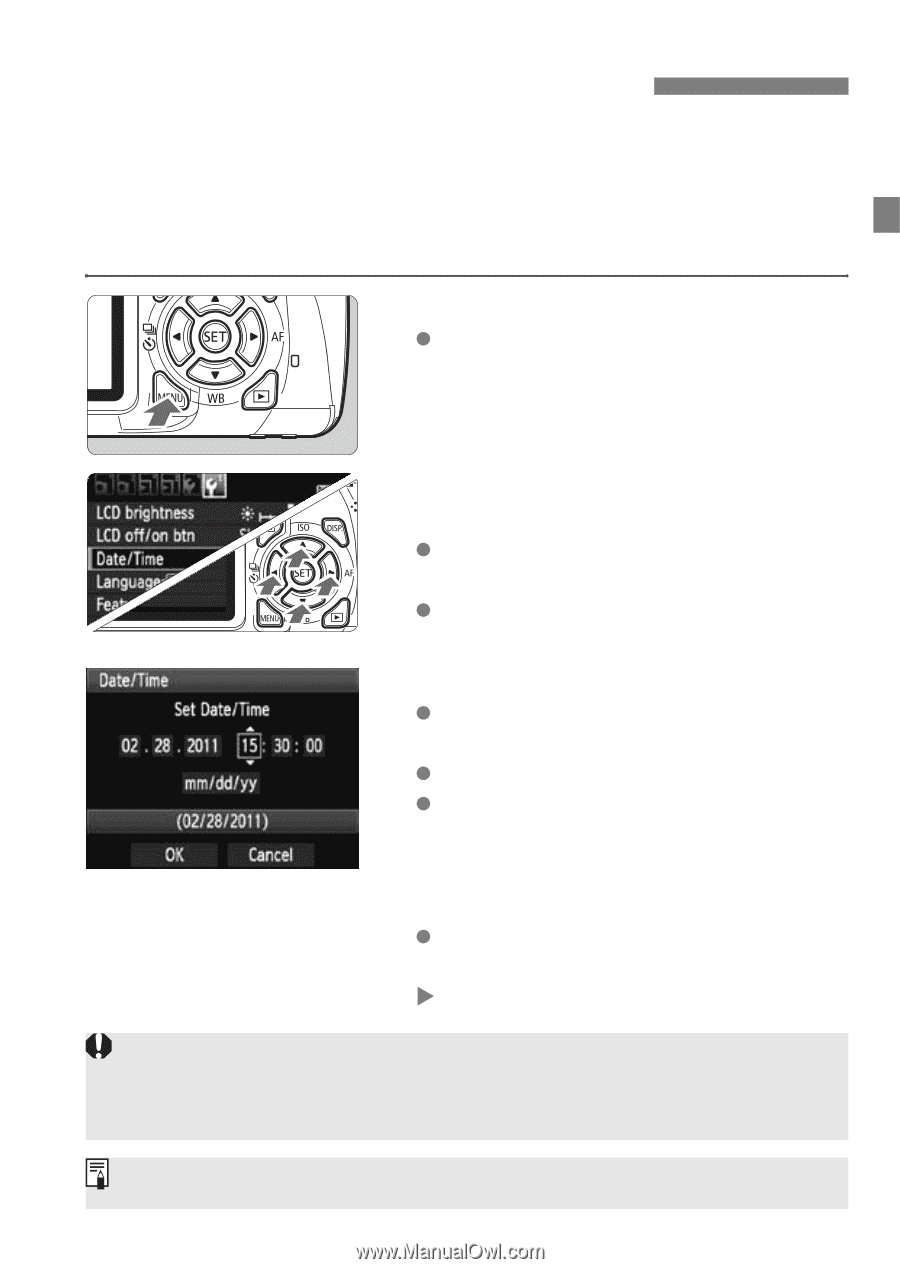
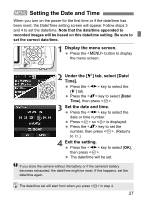
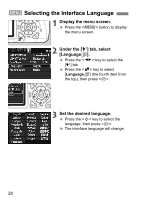
3 Setting the Date and Time When you turn on the power for the first time or if the date/time has been reset, the Date/Time setting screen will appear. Follow steps 3 and 4 to set the date/time. Note that the date/time appended to recorded images will be based on this date/time setting. Be sure to set the correct date/time. 1 Display the menu screen. Press the button to display the menu screen. 2 Under the [6] tab, select [Date/ Time]. Press the key to select the [6] tab. Press the key to select [Date/ Time], then press . 3 Set the date and time. Press the key to select the date or time number. Press so is displayed. Press the key to set the number, then press . (Returns to b.) 4 Exit the setting. Press the key to select [OK], then press . X The date/time will be set. If you store the camera without the battery or if the camera's battery becomes exhausted, the date/time might be reset. If this happens, set the date/time again. The date/time set will start from when you press in step 4. 27
-
 1
1 -
2
-
3
-
4
-
5
-
6
-
7
-
8
-
9
-
10
-
11
-
12
-
13
-
14
-
15
-
16
-
17
-
18
-
19
-
20
-
21
-
 22
22 -
 23
23 -
 24
24 -
 25
25 -
 26
26 -
 27
27 -
 28
28 -
 29
29 -
 30
30 -
 31
31 -
 32
32 -
33
-
34
-
35
-
36
-
37
-
38
-
39
-
40
-
41
-
42
-
43
-
44
-
45
-
46
-
47
-
48
-
49
-
50
-
51
-
52
-
53
-
54
-
55
-
56
-
57
-
58
-
59
-
60
-
61
-
62
-
63
-
64
-
65
-
66
-
67
-
68
-
69
-
70
-
71
-
72
-
73
-
74
-
75
-
76
-
77
-
78
-
79
-
80
-
81
-
82
-
83
-
84
 |
 |