Canon FAX-JX210P Easy Setup Instructions - Page 2
Setting Receive Mode, Examples of Connecting the Machine, Software Installation - instruction manual
 |
View all Canon FAX-JX210P manuals
Add to My Manuals
Save this manual to your list of manuals |
Page 2 highlights
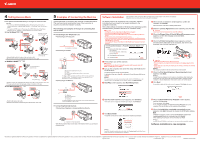
4 Setting Receive Mode Press [Receive Mode/Resolution] to change the receive mode. Note • For details on ANS.MACHINE MODE, refer to "Receiving Documents with an Answering Machine: " in "Receiving Faxes" of the User's Guide. • For details on DRPD, refer to "Receiving with a DRPD (Distinctive Ring Pattern Detection) service: " in "Receiving Faxes" of the User's Guide. ● Fax/Tel Mode Receives documents automatically. Pick up the Handset to answer the call. Automatically switches between fax and voice calls. Receives documents automatically and rings for voice calls. ● MANUAL MODE Pick up the Handset to answer the call. Press [Start/Copy]. Rings for every call, regardless of whether the call is a fax call or a voice call. For a fax call, you have to manually activate reception of the fax. ● FAX ONLY MODE Answers all calls as fax calls. Receives documents automatically and disconnects voice calls. 5 Examples of Connecting the Machine Typical examples of connecting the machine are described below. The machine cannot send/receive faxes if the connection is incorrect. Connect the machine correctly. The following are examples of the type of connecting that can be made. ● Connecting to the Telephone Line ● Connecting to an Analog Line (A) (A) Telephone line (analog) ● Connecting to an ADSL (C) (B) (D) (E) (B) Asymmetric Digital Subscriber Line (C) Splitter (D) ADSL modem (splitter may be built-in to the modem) (E) Computer For details on ADSL connection and settings, see the manual supplied with your ADSL modem. The illustrated connection is an example and is not guaranteed to suit every connecting condition. ● Connecting to an ISDN Line (G) (H) (F) (I) (F) ISDN line (G) Terminal adapter, etc. (H) Analog port (I) Computer For details on ISDN connection and settings, see the manuals supplied with your terminal adapter or dial-up router. ● Connecting External Devices ● Connecting a Telephone or Answering Machine Directly (J) (J) Telephone or Answering machine Take off the protective tape on the back of the machine when you connect an external device. Software Installation The appearance of the screen may differ depending on the country/region of use and on your language. Follow the on-screen instructions to proceed with the installation. To use the machine by connecting it to a computer, software including the drivers needs to be copied (installed) to the computer's hard disk. The screens below are based on Windows Vista operating system Ultimate Edition (hereafter referred to as "Windows Vista"). Important • The machine is not compatible with Macintosh computers. • Quit all running applications before installation. • You need to log on as the administrator (or a member of the Administrators group). • Do not switch users during the installation process. • It may be necessary to restart your computer during the installation process. Follow the on-screen instructions and click OK, and do not remove the Setup CD-ROM during restarting. The installation resumes from where it left off when your computer has been restarted. If the Found New Hardware or Found New Hardware Wizard screen appears: (1) Remove the USB cable connected to your computer. The screen may close. In this case, proceed from a. (2) Click Cancel to quit the screen. (3) Proceed from a. a Press [ON] to turn off the machine. Important Operating noise continues for about 40 seconds until the power turns off. Make sure that [ON] stops flashing. b Turn on the computer, then insert the Setup CD-ROM into the CD-ROM drive. The setup program should run automatically. In Windows Vista, go to Step c. In Windows XP and Windows 2000, go to Step e. Note If the program does not start automatically, double-click the CD-ROM icon on the computer. When the CD-ROM contents appear, double-click MSETUP4.EXE. c AutoPlay screen appears, click Run Msetup4.exe. f When the list of software to install appears, confirm the contents, click Install. Move the cursor over items to display explanations. g Read the License Agreement screen carefully, and click Yes. Important Follow any on-screen instructions to install the software. h When the Please Allow All Install Wizard Processes screen appears, confirm the message, and click Next. Installation starts. i When the Printer Connection screen appears, connect one end of the USB cable to the computer, the other to the machine, then turn the machine on. USB ← To Computer Important • It takes about 60 seconds for [ON] to light green. • When the machine is recognized by the computer, a message appears on the screen. • If you cannot go to the next procedure after 10 minutes, click Help and confirm the message. Note The USB port is located on the right side of the back of the machine. j When the Print Head Alignment Recommended screen appears, click Next. Note If straight lines are misaligned or print quality is not satisfactory after installing the printer driver, you may need to align the Print Head. Refer to "Aligning the FINE Cartridge" in "Routine Maintenance" of the User's Guide or On-screen Manual. k Click Next. It may take a while for the next screen to appear. Click Next only once. d User Account Control screen appears, click Continue. If the same screen reappears in subsequent steps, click Continue. e Click Easy Install. The printer driver and On-screen Manual are installed automatically. l When the Extended Survey Program screen appears, confirm the message. If you can agree, click Agree. If you click Do not agree, the Extended Survey Program will not be installed. (This has no effect on the machine's functionality.) m When the Installation completed successfully screen appears, click Exit. Remove the Setup CD-ROM after clicking Exit. If Restart is displayed, make sure that the Restart the system now (recommended) check box is selected, then click Restart. After restarting the computer, remove the Setup CD-ROM. Note Keep the Setup CD-ROM in a safe place in case you need to reinstall the software. Software installation is now complete. Note If you want to select particular items to install, click Custom Install and follow the onscreen instructions to proceed with the installation. Microsoft is a registered trademark of Microsoft Corporation. Windows is a trademark or registered trademark of Microsoft Corporation in the U.S. and/or other countries. Windows Vista is a trademark or registered trademark of Microsoft Corporation in the U.S. and/or other countries. Macintosh is a trademark of Apple Inc., registered in the U.S. and other countries. QT5-2219-V03 XXXXXXXX © CANON INC. 2009 PRINTED IN THAILAND
-
 1
1 -
 2
2
 |
 |