Canon I9100 i9100 Quick Start Guide - Page 7
Installing the Ink Tanks - printer parts head
 |
View all Canon I9100 manuals
Add to My Manuals
Save this manual to your list of manuals |
Page 7 highlights
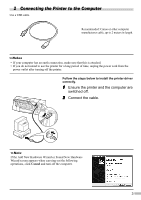
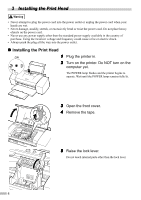
print head print head holder 6 Remove the protective cap from the print head. • Do not touch the print head nozzles or electrical contacts. • Do not attempt to reattach the protective cap once it has been removed. electrical contacts print head nozzles 7 Place the print head in the holder. Be careful not to touch any parts inside the printer. 8 Lock the print head into place by lowering the lever. Do not touch the lock lever once the print head has been installed. „ Installing the Ink Tanks • For safety reasons, store ink tanks out of the reach of small children. • Do not drop or shake ink tanks. 1 Take out the yellow ink tank. 2 Pull the orange tape in the direction of the arrow and remove the clear film. 5
-
 1
1 -
 2
2 -
 3
3 -
 4
4 -
 5
5 -
 6
6 -
 7
7 -
 8
8 -
 9
9 -
 10
10 -
 11
11 -
 12
12 -
13
-
14
-
15
-
16
-
17
-
18
-
19
-
20
-
21
-
22
-
23
-
24
-
25
-
26
-
27
-
28
 |
 |

5
6
Remove the protective cap from the
print head.
7
Place the print head in the holder.
8
Lock the print head into place by
lowering the lever.
Do not touch the lock lever once the print head has been
installed.
Installing the Ink Tanks
•
For safety reasons, store ink tanks out of the reach of small children.
•
Do not drop or shake ink tanks.
1
Take out the yellow ink tank.
2
Pull the orange tape in the direction of
the arrow and remove the clear film.
•
Do not touch the print
head nozzles or
electrical contacts.
•
Do not attempt to
reattach the protective
cap once it has been
removed.
Be careful not to touch any parts inside the printer.
electrical
contacts
print head
nozzles
print head
print head holder