Canon PIXMA MX892 MX892 Getting Started - Page 1
Canon PIXMA MX892 Manual
 |
View all Canon PIXMA MX892 manuals
Add to My Manuals
Save this manual to your list of manuals |
Page 1 highlights
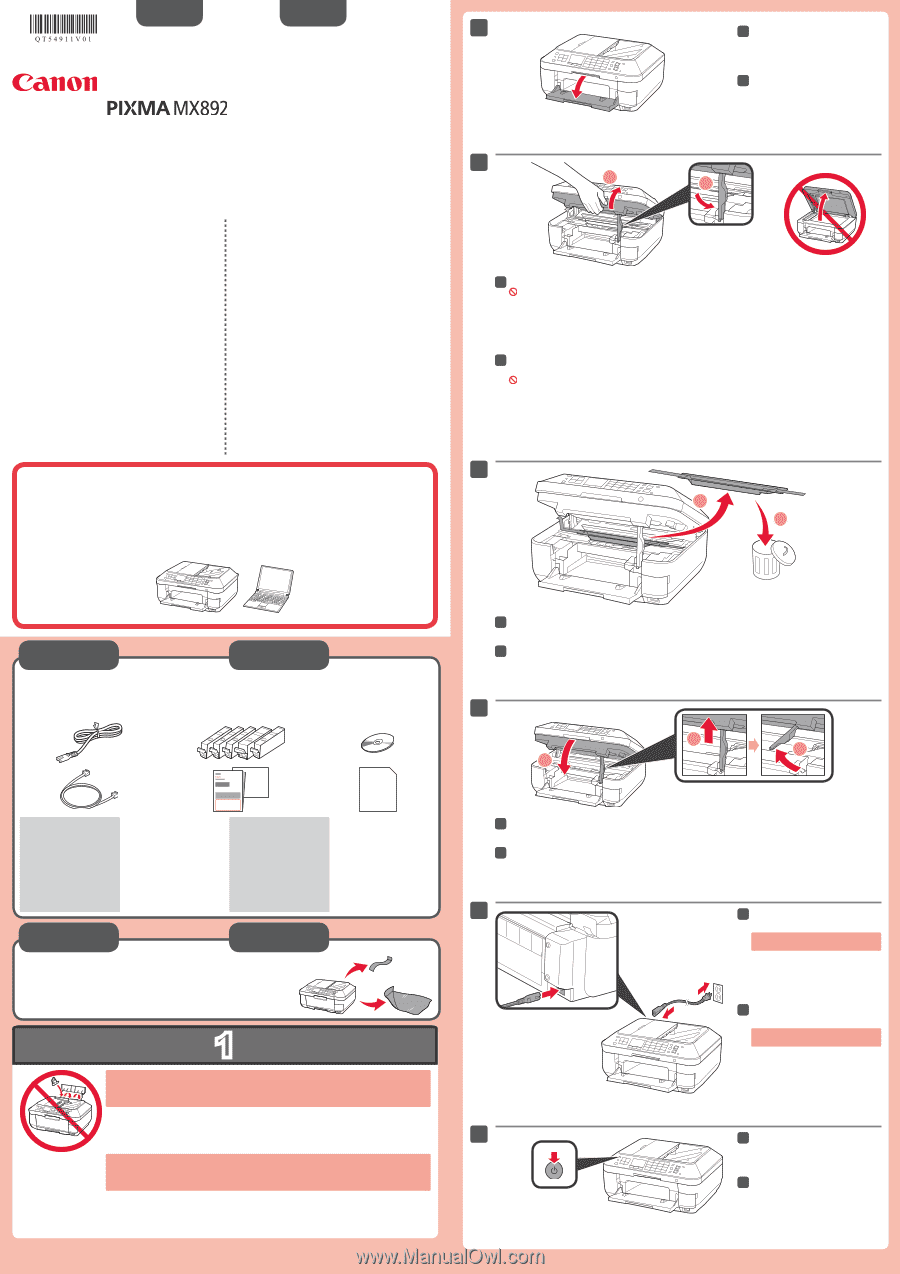
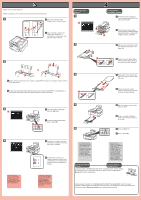
ENGLISH ESPAÑOL 1 1 Open the Paper Output Tray. Canon Inkjet Office All-In-One Equipo multifunción para oficina Canon Inkjet series Getting Started Guía de inicio Read me first! Keep me handy for future reference. ¡Léame en primer lugar! Consérvelo a mano para utilizarlo como referencia en el futuro. Getting Help from Canon Email Tech Support - www.usa.canon.com/support Toll-Free Tech Support- 1-800-OK-CANON This option provides live telephone technical support, free of service charges, Monday-Friday (excluding holidays), during the warranty period. Telephone Device for the Deaf (TDD) support is available at 1-866-251-3752. Ayuda de Canon Asistencia técnica por correo electrónico: www.usa.canon.com/support Asistencia técnica gratuita: 1-800-OK-CANON Esta opción proporciona asistencia telefónica técnica personal, sin cargo por servicio, de lunes a viernes (excepto festivos), durante el periodo de garantía. Se dispone de un dispositivo telefónico auxiliar para sordos (TDD) en 1-866-251-3752. 1 Abra la bandeja de salida del papel (Paper Output Tray). 2 1 2 2 Lift the Scanning Unit / Cover, then fix it with the Scanning Unit Support. Document Cover must be closed to lift Scanning Unit / Cover! • Windows is a trademark or registered trademark of Microsoft Corporation in the U.S. and/or other countries. • Windows Vista is a trademark or registered trademark of Microsoft Corporation in the U.S. and/or other countries. • Macintosh, Mac, Mac OS, AirPort and Bonjour are trademarks of Apple Inc., registered in the U.S. and other countries. • Windows es una marca comercial o una marca comercial registrada de Microsoft Corporation en EE. UU. y/u otros países. • Windows Vista es una marca comercial o una marca comercial registrada de Microsoft Corporation en EE. UU. y/u otros países. • Macintosh, Mac, Mac OS, AirPort y Bonjour son marcas registradas de Apple Inc., registradas en EE. UU. y otros países. 2 Levante la cubierta/unidad de escaneado (Scanning Unit / Cover), y sujétela con el soporte de la unidad de escaneado (Scanning Unit Support). ¡La cubierta de documentos (Document Cover) debe estar cerrada para levantar la cubierta/unidad de escaneado (Scanning Unit / Cover)! Model Number: K10376 (MX892) Número de modelo: K10376 (MX892) 3 To perform setup, place the machine near the access point* and computer. (* Required for wireless LAN) Para llevar a cabo la instalación, coloque el equipo cerca del punto de acceso* y del ordenador. (* necesario para LAN inalámbrica) 1 2 Included Items Check the included items. Elementos suministrados Compruebe que se le han suministrado los siguientes elementos. 3 Remove the orange tape and protective material. 3 Retire las hojas y la cinta naranja (orange tape) y el material de protección (protective material). 4 3 1 2 Network connection: Prepare the Ethernet cable or network devices such as a router or an access point as necessary. USB connection: A USB cable (not included) is required. Conexión de red: prepare el cable Ethernet o los dispositivos de red, como el router o el punto de acceso, según convenga. Conexión USB: es necesario un cable USB (no suministrado). Preparation Preparativos Remove the protective sheets and tape. Retire las hojas protectoras (protective sheets) y la cinta (tape). 1 • Do not allow objects to fall inside the machine. These could cause malfunction. • The Paper Output Tray opens automatically as printing starts. Keep the front of the tray clear of any obstacles. • Evite que caigan objetos dentro del equipo. Podrían provocar fallos en el funcionamiento. • La bandeja de salida del papel (Paper Output Tray) se abre automáticamente al comenzar la impresión. Mantenga la parte frontal de la bandeja libre de obstáculos. 4 Close the Scanning Unit / Cover. 4 Cierre la cubierta/unidad de escaneado (Scanning Unit / Cover). 5 5 Connect the power cord. Do not connect the USB or Ethernet cable yet. 5 Conecte el cable de alimentación. No conecte aún el cable USB o Ethernet. 6 6 Press the ON button. 6 Pulse el botón ACTIVADO (ON). QT5-4911-V01 XXXXXXXX ©CANON INC.2012 PRINTED IN XXXXXXXX
-
 1
1 -
 2
2 -
 3
3 -
 4
4
 |
 |