Canon PowerShot A1200 Silver PowerShot A1200 Camera User Guide - Page 44
Indicators
 |
View all Canon PowerShot A1200 Silver manuals
Add to My Manuals
Save this manual to your list of manuals |
Page 44 highlights
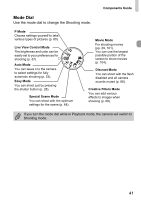
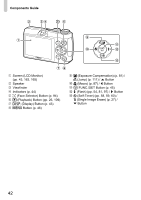
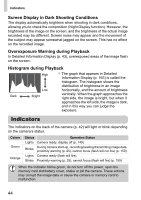
Indicators Screen Display in Dark Shooting Conditions The display automatically brightens when shooting in dark conditions, allowing you to check the composition (Night Display function). However, the brightness of the image on the screen, and the brightness of the actual image recorded may be different. Screen noise may appear and the movement of the subject may appear somewhat jagged on the screen. This has no effect on the recorded image. Overexposure Warning during Playback In Detailed Information Display (p. 43), overexposed areas of the image flash on the screen. Histogram during Playback High z The graph that appears in Detailed Information Display (p. 165) is called the histogram. The histogram shows the distribution of brightness in an image Low horizontally, and the amount of brightness Dark Bright vertically. When the graph approaches the right side, the image is bright, but when it approaches the left side, the image is dark, and in this way you can judge the exposure. Indicators The indicators on the back of the camera (p. 42) will light or blink depending on the camera's status. Colors Green Orange Status Operation Status Lights Camera ready, display off (p. 149) Blinks During camera start-up, recording/reading/transmitting image data, proximity warning (p. 25), cannot focus (flash will not fire) (p. 159) Lights Camera ready (flash will fire) Blinks Proximity warning (p. 25), cannot focus (flash will fire) (p. 159) When the indicator blinks green, do not turn off the power, open the memory card slot/battery cover, shake or jolt the camera. These actions may corrupt the image data or cause the camera or memory card to malfunction. 44
-
 1
1 -
2
-
3
-
4
-
5
-
6
-
7
-
8
-
9
-
10
-
11
-
12
-
13
-
14
-
15
-
16
-
17
-
18
-
19
-
20
-
21
-
22
-
23
-
24
-
25
-
26
-
27
-
28
-
29
-
30
-
31
-
32
-
33
-
34
-
35
-
36
-
37
-
38
-
 39
39 -
 40
40 -
 41
41 -
 42
42 -
 43
43 -
 44
44 -
 45
45 -
 46
46 -
 47
47 -
 48
48 -
 49
49 -
50
-
51
-
52
-
53
-
54
-
55
-
56
-
57
-
58
-
59
-
60
-
61
-
62
-
63
-
64
-
65
-
66
-
67
-
68
-
69
-
70
-
71
-
72
-
73
-
74
-
75
-
76
-
77
-
78
-
79
-
80
-
81
-
82
-
83
-
84
-
85
-
86
-
87
-
88
-
89
-
90
-
91
-
92
-
93
-
94
-
95
-
96
-
97
-
98
-
99
-
100
-
101
-
102
-
103
-
104
-
105
-
106
-
107
-
108
-
109
-
110
-
111
-
112
-
113
-
114
-
115
-
116
-
117
-
118
-
119
-
120
-
121
-
122
-
123
-
124
-
125
-
126
-
127
-
128
-
129
-
130
-
131
-
132
-
133
-
134
-
135
-
136
-
137
-
138
-
139
-
140
-
141
-
142
-
143
-
144
-
145
-
146
-
147
-
148
-
149
-
150
-
151
-
152
-
153
-
154
-
155
-
156
-
157
-
158
-
159
-
160
-
161
-
162
-
163
-
164
-
165
-
166
-
167
-
168
-
169
-
170
-
171
-
172
-
173
-
174
-
175
-
176
-
177
-
178
-
179
-
180
-
181
-
182
-
183
-
184
-
185
-
186
-
187
-
188
-
189
-
190
-
191
-
192
-
193
-
194
-
195
-
196
 |
 |
