Canon PowerShot A1200 PowerShot A1200 Camera User Guide - Page 134
Making Print Settings
 |
View all Canon PowerShot A1200 manuals
Add to My Manuals
Save this manual to your list of manuals |
Page 134 highlights
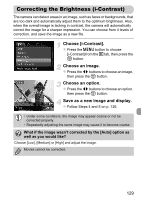
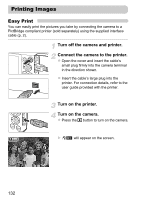
Printing Images Making Print Settings Connect the camera to the printer. z Follow Steps 1 - 5 on p. 132 to display the screen on the left. Choose a menu option. z Press the op buttons to choose an option. Choose the option settings. z Press the qr buttons to choose the option setting. Default Follows the printer's settings. Date Prints the date. File No. Prints the file number. Both Prints both the date and file no. Off - Default Follows the printer's settings. Off - On Uses shooting information to optimize print settings. Red-Eye1 Corrects red-eye. Red-Eye2* Vivid* Uses [NR], [Face ] and [Red-Eye1] to correct the image. Greens in trees, and blues in the sky and ocean are enhanced to be more vivid. NR* Reduces image noise. Vivid+NR* Uses both [Vivid] and [NR] to correct the image. Face * Corrects brightness for dark faces,such as in backlit shots. No. of Copies Choose the number of copies. Trimming - Choose the area for printing. Paper Settings - Sets the paper size and layout. * Only appears when connected to a PIXMA series printer. 134
-
 1
1 -
2
-
3
-
4
-
5
-
6
-
7
-
8
-
9
-
10
-
11
-
12
-
13
-
14
-
15
-
16
-
17
-
18
-
19
-
20
-
21
-
22
-
23
-
24
-
25
-
26
-
27
-
28
-
29
-
30
-
31
-
32
-
33
-
34
-
35
-
36
-
37
-
38
-
39
-
40
-
41
-
42
-
43
-
44
-
45
-
46
-
47
-
48
-
49
-
50
-
51
-
52
-
53
-
54
-
55
-
56
-
57
-
58
-
59
-
60
-
61
-
62
-
63
-
64
-
65
-
66
-
67
-
68
-
69
-
70
-
71
-
72
-
73
-
74
-
75
-
76
-
77
-
78
-
79
-
80
-
81
-
82
-
83
-
84
-
85
-
86
-
87
-
88
-
89
-
90
-
91
-
92
-
93
-
94
-
95
-
96
-
97
-
98
-
99
-
100
-
101
-
102
-
103
-
104
-
105
-
106
-
107
-
108
-
109
-
110
-
111
-
112
-
113
-
114
-
115
-
116
-
117
-
118
-
119
-
120
-
121
-
122
-
123
-
124
-
125
-
126
-
127
-
128
-
 129
129 -
 130
130 -
 131
131 -
 132
132 -
 133
133 -
 134
134 -
 135
135 -
 136
136 -
 137
137 -
 138
138 -
 139
139 -
140
-
141
-
142
-
143
-
144
-
145
-
146
-
147
-
148
-
149
-
150
-
151
-
152
-
153
-
154
-
155
-
156
-
157
-
158
-
159
-
160
-
161
-
162
-
163
-
164
-
165
-
166
-
167
-
168
-
169
-
170
-
171
-
172
-
173
-
174
-
175
-
176
-
177
-
178
-
179
-
180
-
181
-
182
-
183
-
184
-
185
-
186
-
187
-
188
-
189
-
190
-
191
-
192
-
193
-
194
-
195
-
196
 |
 |
