Canon PowerShot A630 Software Starter Guide For the Canon Digital Camera Solut - Page 53
Using the Software on the Macintosh Platform, Advanced Techniques
 |
View all Canon PowerShot A630 manuals
Add to My Manuals
Save this manual to your list of manuals |
Page 53 highlights
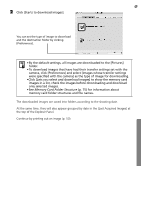
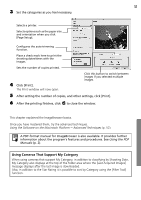
51 3 Set the categories as you feel necessary. Selects a printer. Selects options such as the paper size and orientation when you click [Page Setup]. Configures the auto trimming function. Place a check mark here to print the shooting dates/times with the images. Sets the number of copies printed. 4 Click [Print]. The Print window will now open. Click this button to switch between images if you selected multiple images. 5 After setting the number of copies, and other settings, click [Print]. 6 After the printing finishes, click to close the window. This chapter explained the ImageBrowser basics. Once you have mastered them, try the advanced techniques. Using the Software on the Macintosh Platform - Advanced Techniques (p. 52). A PDF-format manual for ImageBrowser is also available. It provides further information about the program's features and procedures. See Using the PDF Manuals (p. 2). Using Cameras That Support My Category When using cameras that support My Category, in addition to classifying by Shooting Date, My Category also displays at the top of the folder area where the [Last Acquired Images] message displays after the last image is downloaded. Also, in addition to the Star Rating it is possible to sort by Category using the [Filter Tool] function.
-
 1
1 -
2
-
3
-
4
-
5
-
6
-
7
-
8
-
9
-
10
-
11
-
12
-
13
-
14
-
15
-
16
-
17
-
18
-
19
-
20
-
21
-
22
-
23
-
24
-
25
-
26
-
27
-
28
-
29
-
30
-
31
-
32
-
33
-
34
-
35
-
36
-
37
-
38
-
39
-
40
-
41
-
42
-
43
-
44
-
45
-
46
-
47
-
 48
48 -
 49
49 -
 50
50 -
 51
51 -
 52
52 -
 53
53 -
 54
54 -
 55
55 -
 56
56 -
 57
57 -
 58
58 -
59
-
60
-
61
-
62
-
63
-
64
-
65
-
66
-
67
-
68
-
69
-
70
-
71
-
72
-
73
-
74
-
75
-
76
-
77
-
78
-
79
-
80
-
81
-
82
-
83
-
84
-
85
-
86
-
87
-
88
-
89
-
90
 |
 |
