Canon PowerShot SD800 IS PowerShot SD800 IS / DIGITAL IXUS 850 IS Camera User - Page 69
Checking for Focus Right After Shooting
 |
View all Canon PowerShot SD800 IS manuals
Add to My Manuals
Save this manual to your list of manuals |
Page 69 highlights
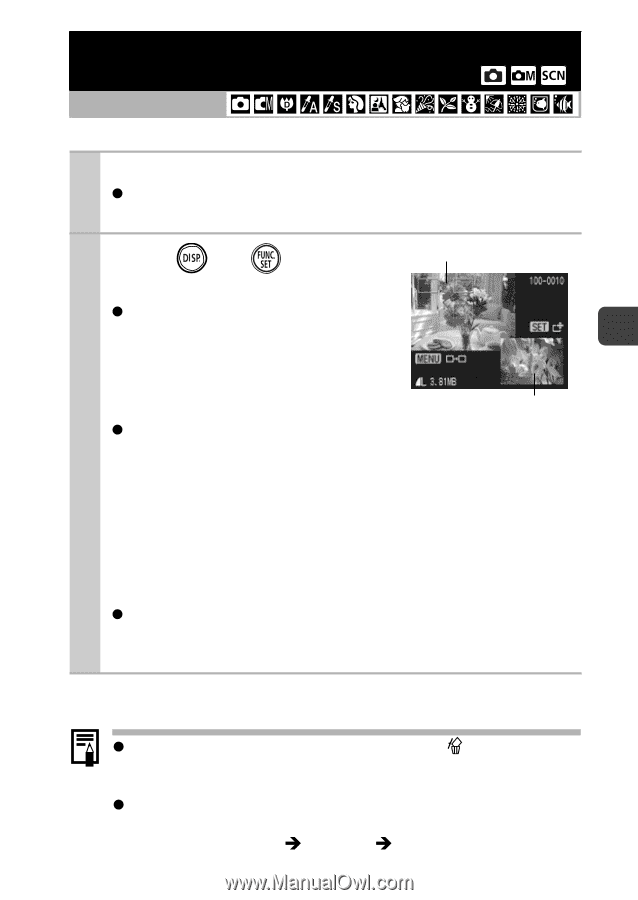
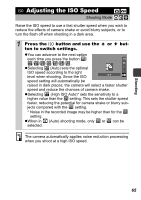
Checking for Focus Right After Shooting Shooting Shooting Mode You can check whether the image is in focus right after it is recorded. 1 Shoot. zThe recorded image displays for about 2 seconds (or the interval set with the Review function p.24). 2 Press (or ) while the Recorded Image image is displayed. zThe number of times the DISP. but- ton is pressed depends upon the display settings for the LCD monitor (See below). Press the DISP. button repeatedly until the screen at the right appears. Orange frame contents zDisplays as follows. - Camera is focused: AF frame for the image that has been shot displays in white, and an orange frame appears within the focused frame. - Camera is not focused: Image that has been shot displays, and an orange frame displays at the center of the image. - Contents of the orange frame can be confirmed at the bot- tom right. - Zoom can also be used (p. 73). zYou can switch between AF frames and change the display position (p. 68) using the MENU button or the FUNC./SET button. To Cancel Checking the Focus Press the shutter button halfway. z You can delete an image by pressing the button while the image is displayed, except in the display position change mode (See Basic Guide, p.19). z Pressing the DISP. button will change the display on the LCD monitor as follows. Focus Confirmation Î Detailed Î No Information 67
-
 1
1 -
2
-
3
-
4
-
5
-
6
-
7
-
8
-
9
-
10
-
11
-
12
-
13
-
14
-
15
-
16
-
17
-
18
-
19
-
20
-
21
-
22
-
23
-
24
-
25
-
26
-
27
-
28
-
29
-
30
-
31
-
32
-
33
-
34
-
35
-
36
-
37
-
38
-
39
-
40
-
41
-
42
-
43
-
44
-
45
-
46
-
47
-
48
-
49
-
50
-
51
-
52
-
53
-
54
-
55
-
56
-
57
-
58
-
59
-
60
-
61
-
62
-
63
-
 64
64 -
 65
65 -
 66
66 -
 67
67 -
 68
68 -
 69
69 -
 70
70 -
 71
71 -
 72
72 -
 73
73 -
 74
74 -
75
-
76
-
77
-
78
-
79
-
80
-
81
-
82
-
83
-
84
-
85
-
86
-
87
-
88
-
89
-
90
-
91
-
92
-
93
-
94
-
95
-
96
-
97
-
98
-
99
-
100
-
101
-
102
-
103
-
104
-
105
-
106
-
107
-
108
-
109
-
110
-
111
-
112
-
113
-
114
-
115
-
116
-
117
-
118
-
119
-
120
-
121
-
122
-
123
-
124
-
125
-
126
-
127
-
128
-
129
-
130
-
131
-
132
-
133
-
134
-
135
-
136
-
137
-
138
-
139
-
140
-
141
-
142
-
143
-
144
-
145
-
146
-
147
 |
 |