Canon S9000 Photo Application Guide(Mac) - Page 78
Clipping, Print
 |
View all Canon S9000 manuals
Add to My Manuals
Save this manual to your list of manuals |
Page 78 highlights
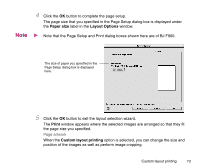
3 In the Clipping window, drag the mouse to select the clipping area. Clipping area 4 Click the close box at the upper left corner of the window to close the Clipping window. The image after cropping is displayed in the Print window. Image after cropping Refer to Cropping an image for more information on the Clipping window and how to crop an image. Custom layout printing 78
-
 1
1 -
2
-
3
-
4
-
5
-
6
-
7
-
8
-
9
-
10
-
11
-
12
-
13
-
14
-
15
-
16
-
17
-
18
-
19
-
20
-
21
-
22
-
23
-
24
-
25
-
26
-
27
-
28
-
29
-
30
-
31
-
32
-
33
-
34
-
35
-
36
-
37
-
38
-
39
-
40
-
41
-
42
-
43
-
44
-
45
-
46
-
47
-
48
-
49
-
50
-
51
-
52
-
53
-
54
-
55
-
56
-
57
-
58
-
59
-
60
-
61
-
62
-
63
-
64
-
65
-
66
-
67
-
68
-
69
-
70
-
71
-
72
-
 73
73 -
 74
74 -
 75
75 -
 76
76 -
 77
77 -
 78
78 -
 79
79 -
 80
80 -
 81
81 -
 82
82 -
 83
83 -
84
-
85
-
86
-
87
-
88
-
89
-
90
-
91
-
92
-
93
-
94
-
95
-
96
-
97
-
98
-
99
-
100
-
101
-
102
-
103
-
104
-
105
-
106
-
107
-
108
-
109
-
110
-
111
-
112
-
113
-
114
-
115
-
116
-
117
-
118
-
119
-
120
-
121
-
122
-
123
-
124
-
125
-
126
-
127
-
128
-
129
-
130
-
131
-
132
-
133
-
134
-
135
-
136
-
137
-
138
-
139
-
140
 |
 |

Custom layout printing
78
3
In the
Clipping
window, drag the mouse to select the clipping
area.
4
Click the close box at the upper left corner of the window to close
the
Clipping
window.
The image after cropping is displayed in the
Print
window.
Refer to Cropping an image for more information on the
Clipping
window and how
to crop an image.
Clipping area
Image after cropping