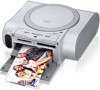
Canon SELPHY DS700 DS700 Photo Print Guide
Canon SELPHY DS700 Manual
 |
View all Canon SELPHY DS700 manuals
Add to My Manuals
Save this manual to your list of manuals |
Canon SELPHY DS700 manual content summary:
- Canon SELPHY DS700 | DS700 Photo Print Guide - Page 1
Photo Printing Guide - Canon SELPHY DS700 | DS700 Photo Print Guide - Page 2
of Canon Inc. • BJ and SELPHY are trademarks of Canon Inc. • Microsoft® and Windows® are registered trademarks of Microsoft Corporation in the U.S. and other countries. • Apple, Mac, Macintosh are trademarks of Apple Computer, Inc., registered in the U.S. and other countries. • Compact Flash - Canon SELPHY DS700 | DS700 Photo Print Guide - Page 3
Phone 44 Setting the Media Type, Page Size, and Layout 44 Performing Infrared Printing 46 Printing with the computer 49 Installing the Printer Driver 49 How to View the User's Guide 54 Printing Maintenance 55 When Printing Becomes Faint or Colors are Incorrect 55 Replacing an Ink Tank 60 1 - Canon SELPHY DS700 | DS700 Photo Print Guide - Page 4
Camera 73 Cannot Install the Printer Driver 75 Appendix ...76 Specifications ...76 Safety Precautions...78 Regulatory Information 80 Introduction This Photo Printing Guide uses the following symbols to indicate important information. Always observe the instructions indicated by these symbols - Canon SELPHY DS700 | DS700 Photo Print Guide - Page 5
damaged, contact a Canon service representative. Power Cord Video Cable (RCA) Documentation and Setup Software & User's Guide CD-ROM Ink Tank BCI-16 Color Printer Remote Control Lithium coin cell battery Print Head note See "Using the Remote Control" on page 9 for instructions on setting the - Canon SELPHY DS700 | DS700 Photo Print Guide - Page 6
The printer will initialize. Warning • Never attempt to plug the power cord into the power outlet or unplug the power cord when your hands are wet. • Never damage, modify, stretch, or excessively bend or twist the power cord. Do not place heavy objects on the power cord. • Never use any power supply - Canon SELPHY DS700 | DS700 Photo Print Guide - Page 7
Easy Setup Instructions Installing the Print Head 1 Slide the cover open switch toward the right to open the cover. The print head holder moves to the center. 2 Press the - Canon SELPHY DS700 | DS700 Photo Print Guide - Page 8
Easy Setup Instructions 5 Lock the print head into place by lowering the lever. Press down the lock button until it clicks. Do not touch the lock lever once the print head has been installed. Installing an Ink Tank Caution • For safety reasons, store an ink tank out of the reach of small children - Canon SELPHY DS700 | DS700 Photo Print Guide - Page 9
card. Direct Print Port Connects the printer to a digital camera or digital video camcorder. For instructions, See "Printing Photographs Directly from a Digital Camera" on page 39. Paper Guide Paper Output Tray The printed paper will be ejected. Paper Support Open and pull out before printing to - Canon SELPHY DS700 | DS700 Photo Print Guide - Page 10
Their Function „ Rear View Power Cord Connection Connector used to connect the supplied power cord. „ Inside the Printer Print Head Holder Install the print head here. USB Port Connects the printer to a computer through a USB interface. Video Out Terminal Connects the printer to TV via the supplied - Canon SELPHY DS700 | DS700 Photo Print Guide - Page 11
(10) Zoom Button Press to enlarge or reduce the photo being displayed. (11) Cancel Button Press to cancel the settings you have made. If this button is pressed during printing, the printer aborts printing. (12) Print Button Press to start printing according to the settings displayed on TV. „ Using - Canon SELPHY DS700 | DS700 Photo Print Guide - Page 12
Printer facing up. 4 Replace the cover. note Using the Remote Control • The remote control may operate note Using a Battery • The lithium coin cell battery CR2025 is available for this remote control. • Do not use it will not be used for a long period of time. • See "Safety Precautions" - Canon SELPHY DS700 | DS700 Photo Print Guide - Page 13
can be selected when a memory card is inserted in the memory card slot and the printer and the TV are connected. You can select the following functions in each menu. Photo Gallery Photo Print View each photo and print. Select photos and specify the number of copies You can automatically display - Canon SELPHY DS700 | DS700 Photo Print Guide - Page 14
tank is replaced. See "Resetting the Ink Counter" on page 62. Date display format Changes the format of date printing. See "Setting the Date Display Format" on page 36. Color adjust Adjusts the brightness, contrast and color hue of the photo at printing. See "When the color is different from what is - Canon SELPHY DS700 | DS700 Photo Print Guide - Page 15
and the TV are turned off. • A battery is installed in the remote control. See "Using the Remote Control" on page 9. • Print head and ink tank are installed in the printer. See "Easy Setup Instructions" on page 3. 2 Connect TV to the printer. (1) Ensure that the printer is turned off and connect the - Canon SELPHY DS700 | DS700 Photo Print Guide - Page 16
The menu screen appears on the TV screen. See "Viewing Each Photo on TV and Printing-Photo Gallery" on page 21 for the instruction on selecting among menus and displaying a photo stored in a memory card. note • You can turn the printer on by pressing the POWER button on the remote control. • If the - Canon SELPHY DS700 | DS700 Photo Print Guide - Page 17
compliant), and DPOF (Ver. 1.00 compliant). • Photos stored in a memory card not supported by the digital camera may fail in loading or be damaged. For types of memory cards supported by the digital camera, refer to your digital camera user's manual. • Use the digital camera to format a memory card - Canon SELPHY DS700 | DS700 Photo Print Guide - Page 18
Using the Printer with the TV „ Inserting a Memory Card Important Insert only a single type of memory card. • If you use a Compact Flash (CF) card or Microdrive Insert it as far as it will go into the slot on the right as shown. Turn on * For xD-Picture Card, use the compliant adapter. • If you use - Canon SELPHY DS700 | DS700 Photo Print Guide - Page 19
„ Removing a Memory Card Preparation When Using the Printer with the TV note If you use the printer connected to your computer, follow the instructions for removal of the memory card from the computer. For the procedure, refer to the on-screen User's Guide. 1 Ensure that the Indicator lamp is not - Canon SELPHY DS700 | DS700 Photo Print Guide - Page 20
lb) * non-Canon branded paper • Picture postcards • Postcards with an affixed photo or sticker „ Loading the Print Media note Refer to "Media Types for Card Direct Printing" on page 20 for compatible paper. 1 Turn on the printer. (1) Press the POWER button. (2) Open the paper support. 2 Flatten the - Canon SELPHY DS700 | DS700 Photo Print Guide - Page 21
support and insert the paper until it is fully inserted. • 101.6 × 152.4mm/ 4"×6" paper • Photo stickers Shorter margin note • Do not stack more than 10 sheets in the paper output tray. • Do not touch the printed surface until the ink dries. For specific drying times, refer to the instructions - Canon SELPHY DS700 | DS700 Photo Print Guide - Page 22
When Using the Printer with the TV „ Media Types for Card Direct Printing Media Type Paper support Load Limit Page size Media type Photo Paper Pro 101.6×152.4 mm/ [101.6×152.4 mm]/ [Photo Paper Pro] 4"×6": up to 20 sheets [4"×6"] Photo Paper Plus 101.6×152.4 mm/ [101.6×152.4 mm]/ [Photo Paper - Canon SELPHY DS700 | DS700 Photo Print Guide - Page 23
note The Menu screen is displayed when TV and the printer are connected and turned on. Change the language displayed on the Menu screen. * See "Changing the Language Displayed" on page 37. 3 Loading the Paper. See "Loading Paper" on page 18. 4 Install the memory card in the card slot. See "Inserting - Canon SELPHY DS700 | DS700 Photo Print Guide - Page 24
is inserted into the printer card slot. Press the Menu button to display the Menu screen if the other screen is displayed. • The menu displayed when the power is on. • The menu displayed when a memory card is set. 5 Select Photo Gallery. (1) Use the WX buttons to select Photo Gallery. The number - Canon SELPHY DS700 | DS700 Photo Print Guide - Page 25
. (2) Press the Copies +/Copies - buttons to specify the number of copies to print. 8 Start printing. (1) Ensure that the paper is loaded in the print confirmation screen. (2) Press the Print button. note Displaying Photos Automatically at the Full TV Screen-Slide Show You can automatically display - Canon SELPHY DS700 | DS700 Photo Print Guide - Page 26
screen at a time and specify the number of copies to print for each photo. 1 Prepare to print. (1) Connect TV to the printer and turn them on. See "Connect TV to the printer." on page 13. (2) Load the paper See "Loading Paper" on page 18. (3) Insert the memory card into the card slot. See "Inserting - Canon SELPHY DS700 | DS700 Photo Print Guide - Page 27
the previous page if more than 10 photos are stored in the memory card. Next >> Display the next page if more than 10 photos are stored in the memory card. • When many photos are stored in a memory card, it is convenient to search for photos to display or print using the shooting date as the search - Canon SELPHY DS700 | DS700 Photo Print Guide - Page 28
photos using one of the following layout options: Borderless or Bordered (×2/×4/×8/half). Photo×2 Photo×4 Photo×8 Half Borderless Bordered 1 Prepare to print. (1) Connect TV to the printer and turn them on. See "Connect TV to the printer." on page 13. (2) Load the paper. See "Loading Paper - Canon SELPHY DS700 | DS700 Photo Print Guide - Page 29
the button. The screen for specifying the paste method is displayed. 4 Select the paste method. (1) Use the and buttons to select the paste method, and then press the button. Paste all All the photos in the memory card are pasted automatically in the selected layout. Print confirmation screen is - Canon SELPHY DS700 | DS700 Photo Print Guide - Page 30
on more than one page. Start printing once you have pasted photos on one page. 6 Start Printing. (1) Confirm the Page size and Media type. To change any of the settings, press the (Settings button). See "Specifying the Paper and Other Settings" on page 33. (2) Press the print. (Copies +/Copies - Canon SELPHY DS700 | DS700 Photo Print Guide - Page 31
The screen for specifying the layout is displayed. (4) When printing on the Canon Photo Stickers, select Stickers x 16. The screen for specifying the photo to print is displayed. (1) Use the buttons to select the photo you wish to print. (2) Press the button. The print confirmation screen is - Canon SELPHY DS700 | DS700 Photo Print Guide - Page 32
without Connecting to TV You can print all photos saved in the memory card without connecting TV and the printer with the key operation on the printer. 1 Turning on the printer. 2 Load paper. See "Loading Paper" on page 18. * Adjust to the paper size you loaded, and print borderless on the whole - Canon SELPHY DS700 | DS700 Photo Print Guide - Page 33
Enjoy Photos on TV and Printing -Advanced- 3 Install the memory card on the printer. See "Inserting a Memory Card" on page 16. 4 Press the Print all button on the printer. See "Operation Panel" on page 7. Printing is started in order of the recent shooting date. * Press the Print All button on the - Canon SELPHY DS700 | DS700 Photo Print Guide - Page 34
information is not saved on the installed memory card. For instructions on setting DPOF, refer to the user's manual for your digital camera. (1) Confirm the Page size and Media type. To change any of the settings, press the (Settings button). See "Specifying the Paper and Other Settings" on page 33 - Canon SELPHY DS700 | DS700 Photo Print Guide - Page 35
the (Settings button) and the (Search button), used at each printing operation and the common operations, such as to change the language displayed or to set the date display format. • "Specifying the Paper and Other Settings" on page 33 • "Searching for Photos with the Shooting Date-Search" on page - Canon SELPHY DS700 | DS700 Photo Print Guide - Page 36
paper without a border. Bordered ...........Prints with a border. • Date print On Prints the date the photo was taken. Off Does not print the date the photo Photo Optimizer PRO function (automatically corrects the image brightness and color) is used together. Face brightener...Activates Photo - Canon SELPHY DS700 | DS700 Photo Print Guide - Page 37
display the Search screen from any screen by pressing the (Search button). For example, you can display the Search screen even if you are pasting photos during the layout print operation. See "Specifying the Layout" on page 26. (1) Press the and button to specify the earliest shooting date in Start - Canon SELPHY DS700 | DS700 Photo Print Guide - Page 38
and then press the button. The Date display format screen is displayed. 2 Select Date format. (1) Use the buttons to select date format. YYYY/MM/DD Prints the date the photo was taken in the format YYYY/MM/DD (2004/10/22). MM/DD/YYYY Prints the date in the format MM/DD/YYYY - Canon SELPHY DS700 | DS700 Photo Print Guide - Page 39
Enjoy Photos on TV and Printing -Advanced- „ Changing the Language Displayed You can change the language displayed on TV. 1 Select Tool Box from the menu. (1) Use the buttons to select Tool Box from the menu screen. (2) Press the button. (3) Use the button to select languages and then press - Canon SELPHY DS700 | DS700 Photo Print Guide - Page 40
Enjoy Photos on TV and Printing -Advanced- „ Resetting All Settings You can reset all settings other than the display language and the print head position to the initial state. 1 Select Tool Box from the menu. (1) Use the buttons to select Tool Box from the menu screen. (2) Press the button. - Canon SELPHY DS700 | DS700 Photo Print Guide - Page 41
a digital still cameras or camcorders* without the need to use a computer. • This printer supports Canon Bubble Jet Direct. It allows you to print photos from a Canon Bubble Jet Direct compatible (PictBridge incompatible) digital camera or digital camcorder without a computer by simply connecting - Canon SELPHY DS700 | DS700 Photo Print Guide - Page 42
select a mode of printing photos in compliance with PictBridge before connecting the camera. • You may also have to turn on the camera or select Play mode manually after connecting the camera to the printer. Perform necessary operations according to the Instruction Manual supplied with your camera - Canon SELPHY DS700 | DS700 Photo Print Guide - Page 43
size" and "Paper type". "Paper size" setting 10×15 cm / 4"×6" "Paper type" setting Photo Fast Photo Photo Paper loaded in printer Photo Paper Plus Glossy Photo Paper Pro Photo Paper Plus Semi-gloss Glossy Photo Paper Photo Stickers 5.4×8.6 cm / Credit Card Photo Glossy Photo Paper Credit Card - Canon SELPHY DS700 | DS700 Photo Print Guide - Page 44
, and layout for the Photo Stickers provided by Canon. Paper size: 10×15cm/4"×6" Paper type: Photo layout: 16-up For instructions on how to load Photo Stickers, see "Loading Paper" on page 18. About "Image optimize" When "Default setting" (selections based on the printer setting) is selected, the - Canon SELPHY DS700 | DS700 Photo Print Guide - Page 45
.4 mm Photo Paper Plus Glossy 4"×6" / 101.6×152.4 mm Photo Paper Plus Semi-gloss 4"×6" / 101.6×152.4 mm Glossy Photo Paper 4"×6" / 101.6×152.4 mm Not supported Not supported Not supported note • For the digital camera operation method and troubleshooting, refer to your digital camera manual. • For - Canon SELPHY DS700 | DS700 Photo Print Guide - Page 46
Printing Photos with Infrared Compatible Mobile Phones Using this printer, you can print a photo taken with support IrMC ver. 1.1. - Only JPEG images are supported. note • Following limitations apply on transmittable data: - It does not support printing downloaded photos or other content or a photo - Canon SELPHY DS700 | DS700 Photo Print Guide - Page 47
Printing" on page 20. • Layout Specify the number of copies to print the same photo on one page. note Printing on Photo Stickers Specify the Page size, Media type, and layout for the Canon Photo Stickers. Page size: Sticker Media Type: Photo Paper Plus Glossy or Photo Paper Pro Layout: Photo ×16 45 - Canon SELPHY DS700 | DS700 Photo Print Guide - Page 48
depends on the mobile phone you use. For this distance, refer to your mobile phone manual. Infrared port of printer Less than 7.9 inch (20 cm) (Do not block with any obstacle.) Effective angle (in both vertical and horizontal direction): About 10° (2) Select the photo you want to print and send - Canon SELPHY DS700 | DS700 Photo Print Guide - Page 49
before printing. 1 Prepare to print. (1) Connect TV to the printer and turn them on. See "Connect TV to the printer." on page 13. (2) Load the paper. See "Loading Paper" on page 18. 2 Display a photo taken with a mobile phone on TV. (1) Use the buttons to select Tool Box. (2) Press the button - Canon SELPHY DS700 | DS700 Photo Print Guide - Page 50
the number of copies to (4) Press the (Print button). The photo from the mobile phone is printed. note • When printing from a mobile phone, refer to your mobile phone manual. • Do not place anything between the infrared port on the printer and the infrared port on the mobile phone. It may cause - Canon SELPHY DS700 | DS700 Photo Print Guide - Page 51
Setup Instructions" on page 3. 2 Ensure that the printer and computer are turned off. OFF 3 Turn on the computer and start Windows. If any applications automatically run, quit them. Disable any anti-virus programs. Do NOT turn the printer on at this stage. 4 Place the Setup Software & User's Guide - Canon SELPHY DS700 | DS700 Photo Print Guide - Page 52
Easy Install in order to install application software, electronic manuals and printer driver. Select Custom Install in order to choose the options you would like to install. 6 When the list of applications to install appears, verify the contents, click Install, and then follow the instructions on - Canon SELPHY DS700 | DS700 Photo Print Guide - Page 53
the application folder, then double-click the EasyPhotoPrint folder, and Installer. • The steps described in this section are for installing in Mac OS X v.10.3.x. 1 Turn on the Mac. 2 Place the Setup Software & User's Guide CD-ROM in the CD-ROM drive. 3 Double-click the Printer Driver folder. 51 - Canon SELPHY DS700 | DS700 Photo Print Guide - Page 54
to where you want to install the printer driver, and click Continue. 8 Click Install. 9 Enter an administrator name and a password, then click OK. note If you have forgotten the administrator name and/or password, click and follow the instructions in Mac Help. 10 A message asking for your - Canon SELPHY DS700 | DS700 Photo Print Guide - Page 55
, click mark and follow the instructions in Mac Help. 19 A message asking for your confirmation to restart your computer is displayed on the screen. Read the message, then click Continue Installation. Software installation will start. 20Software installation is complete. Restart your computer - Canon SELPHY DS700 | DS700 Photo Print Guide - Page 56
(or Programs), Canon SELPHY DS700 Manual and User's Guide. • To uninstall the User's Guide or Photo Application Guide, click Start and select All Programs (or Programs), SELPHY DS700 Guide and Uninstall. It uninstalls all the document you installed. „ How to View the User's Guide-Macintosh 1 Load - Canon SELPHY DS700 | DS700 Photo Print Guide - Page 57
"Replacing an Ink Tank" on page 60 note • If the print quality is poor, adjust the print head position. It may solve the problem. See "Aligning the Print Head" on page 59. • If ink tank replacement does not resolve the problem, the print head may be worn out. Contact a Canon service representative - Canon SELPHY DS700 | DS700 Photo Print Guide - Page 58
the color is incorrect. 1 Prepare to print. (1) Connect TV to the printer and turn them on. See "Connect TV to the printer." on page 13. (2) Load the supplied paper or Canon 4"×6"/ 101.6×152.4mm paper into the paper support. See "Loading Paper" on page 18. 2 Print the Nozzle Check Pattern. (1) Use - Canon SELPHY DS700 | DS700 Photo Print Guide - Page 59
ink, so perform Print Head Cleaning only when necessary. 1 Connect TV to the printer and turn them on. See "Connect TV to the printer." on page 13. 2 Start Print Head Cleaning. (1) Use page 56. note If the problem remains after performing print head cleaning three times, try print head deep cleaning. - Canon SELPHY DS700 | DS700 Photo Print Guide - Page 60
print head nozzles are clean. See "Printing the Nozzle Check Pattern" on page 56. If the problem remains, replace the ink tank. See "Replacing an Ink Tank" on page 60. If ink tank replacement does not resolve the problem, the print head may be worn out. Contact a Canon service representative. 58 - Canon SELPHY DS700 | DS700 Photo Print Guide - Page 61
may solve the problem. 1 Prepare to print. (1) Connect TV to the printer and turn them on. See "Connect TV to the printer." on page 13. (2) Load the supplied paper or Canon 4"×6"/ 101.6×152.4mm paper into the paper support. See "Loading Paper" on page 18. 2 Print the Pattern. (1) Use the buttons - Canon SELPHY DS700 | DS700 Photo Print Guide - Page 62
the current setting of the print head position 1 Connect TV to the printer and turn them on. See "Connect TV to the printer." on page 13. 2 Load the supplied paper or Canon 4"×6"/101.6 x 152.4mm Size paper into the paper support. 3 Select Tool Box and then press the button. 4 Select Head alignment - Canon SELPHY DS700 | DS700 Photo Print Guide - Page 63
protective cap once you have removed it. • Once the protective cap is removed, do not touch the open ink port. (1) Insert a new ink tank with it slightly slanted. (2) Push down on the on the ink tank until it clicks into place. 5 Close the cover. The print head holder moves to the right. 61 - Canon SELPHY DS700 | DS700 Photo Print Guide - Page 64
is reinstalled. • Color ink is consumed in the head cleaning and deep cleaning, which are necessary to maintain the printer's capabilities. • When an ink tank runs out of ink, replace the ink tank with a new one immediately. • If printing is continued with no ink in the ink tank, a problem may occur - Canon SELPHY DS700 | DS700 Photo Print Guide - Page 65
every time you install a new ink tank. The ink counter cannot work correctly unless you synchronize it with the actual ink level. The ink counter can only be adjusted when it is reset at the time a new ink tank is installed. Do not reset the ink counter of an ink tank in use. Synchronization of the - Canon SELPHY DS700 | DS700 Photo Print Guide - Page 66
or Ink Blots" on page 70 • "Printer Does Not Start or Printer Stops During Print Jobs" on page 72 • "Cannot Print Properly from the Digital Camera" on page 73 • "Cannot Install the Printer Driver" on page 75 Nothing is Displayed on TV/Image is Poor Possible Cause Try This The power cord/video - Canon SELPHY DS700 | DS700 Photo Print Guide - Page 67
in the ink tank. A new ink tank (BCI-16 Color) should be prepared. Waste ink absorber* almost full. Press the RESUME/CANCEL button to recover from the error. You can print photos for a while but you cannot print any more photos when the waste ink absorber becomes full. Contact a Canon service - Canon SELPHY DS700 | DS700 Photo Print Guide - Page 68
from the printer, and then turn the printer off and unplug the printer from the power supply. After waiting 10 minutes, plug the power cord back in and turn on the printer. If the same error persists, contact a Canon service representative. * The waste ink absorber absorbs ink used at cleaning - Canon SELPHY DS700 | DS700 Photo Print Guide - Page 69
print head is already installed, press the POWER button to turn off the printer, and press the POWER button again to turn on the printer. If the same error occurs, the print head may be defective. Contact a Canon service representative. Eight flashes Waste ink absorber* The printer has a built-in - Canon SELPHY DS700 | DS700 Photo Print Guide - Page 70
waiting 10 minutes, plug the power cord back in and turn on the printer. If the problem remains, contact a Canon service representative. Paper Does Not Feed Properly Possible Cause Try This Inappropriate paper type Check to see if the paper you are printing on is too thin or curled. used See - Canon SELPHY DS700 | DS700 Photo Print Guide - Page 71
the problem, ink tank may run out of ink. Replace the vacant ink tank. See "Replacing an Ink Tank" on page 60. Check that your paper is loaded with the correct print side facing up. note Follow the instructions packaged with your specialty media for loading and handling. note When the color is - Canon SELPHY DS700 | DS700 Photo Print Guide - Page 72
starting with step 1. If the problem remains, contact a Canon service representative. Important Check that your paper is loaded with the correct print side facing up. Inappropriate paper type Check to see if the paper you are printing on is too thick or curled. used See "Print Media to Avoid - Canon SELPHY DS700 | DS700 Photo Print Guide - Page 73
Possible Cause Curled paper used Troubleshooting Try This If all four corners or the printing surface of the paper is curled, the paper may become dirty or the paper may not feed properly. Use the paper after correcting paper curl as follows. (1)Face up the printing surface*1, and cover it with - Canon SELPHY DS700 | DS700 Photo Print Guide - Page 74
Troubleshooting Printer Does Not Start or Printer Stops During Print Jobs Possible Cause Try This Print head has overheated due to long periods of continuous printing Stop printing and turn the printer off for at least 15 minutes to allow the print head to cool down. The print head tends to - Canon SELPHY DS700 | DS700 Photo Print Guide - Page 75
even if the appropriate media type is used, set the paper thickness lever on the left. See "Printing Maintenance" on page 55. • For the errors indicated on the camera and their solution, also refer to the user's manual of the camera. For other troubles on the digital camera, contact the manufacturer - Canon SELPHY DS700 | DS700 Photo Print Guide - Page 76
been installed, press the POWER button to turn off the printer, and press the POWER button again to turn on the printer. If the same error occurs, the print head may be defective. Contact a Canon service representative. The printer has a built-in waste ink absorber to hold the ink used during - Canon SELPHY DS700 | DS700 Photo Print Guide - Page 77
Software & User's working properly Guide CD-ROM. Use Windows Explorer to ensure that the CD-ROM can be read. Ensure that the CD-ROM icon is displayed on the desktop. If there is any problem with the CD-ROM, contact a Canon service representative. Installation procedure Install the printer driver - Canon SELPHY DS700 | DS700 Photo Print Guide - Page 78
Color (BCI-16 Color) approx. 75 *1 *1 Based on printing continuously Canon 24 standard images taken with the digital camera on 4"×6"/101.6×152.4mm paper with borderless print. Capacity (pages) may vary according to conditions of use such as print mode and image. Supported recording media: Compact - Canon SELPHY DS700 | DS700 Photo Print Guide - Page 79
space for printer driver installation (including temporary files) installation:100 MB :50MB (including the capacity for the electric • The following functions are not supported when manual) using Mac OS X v.10.2.1 to v.10.3.x USB operation can only be guaranteed on a PC with - Photo Optimizer - Canon SELPHY DS700 | DS700 Photo Print Guide - Page 80
or 3-way adapter, etc.). Never use the printer if the power cord is bundled or knotted. If you detect smoke, unusual smells or strange noises around the printer, immediately unplug the printer at the power supply and call for service. Periodically, unplug the printer and use a dry cloth to wipe off - Canon SELPHY DS700 | DS700 Photo Print Guide - Page 81
place metal objects (paper clips, staples, etc.) or containers of flammable solvents (alcohol, thinners, etc.) on top of the printer. If any foreign object (metal or liquid) fall into the printer, unplug the power cord and call for service. For safety reasons store print heads and ink tanks out of - Canon SELPHY DS700 | DS700 Photo Print Guide - Page 82
Information „ Color Printer Model: K10248 (DS700) This device installed and used in accordance with the instruction manual, may cause harmful interference to radio communications. Operation of this equipment in a residential area is likely to cause harmful interference in which case the user - Canon SELPHY DS700 | DS700 Photo Print Guide - Page 83
installation. This equipment generates, uses and can radiate radio frequency energy and, if not installed and used in accordance with the instructions any changes or modifications to the equipment unless otherwise specified in the manual. If such changes of modifications should be made, you could be - Canon SELPHY DS700 | DS700 Photo Print Guide - Page 84
.6 × 152.4mm/ 4"×6" paper 19 A A Message is Displayed on TV 65 Accompanied by ink tank icon with 66 Additional Systems Requirements for Electronic User's Guide 77 Aligning the Print Head 59 B Back Button 8 Basic settings 34 BCI-16 Color 60 BJ Printer Driver Systems Requirements ........ 77 - Canon SELPHY DS700 | DS700 Photo Print Guide - Page 85
wait time 12, 71 Ink tank 6, 60 Ink Tank BCI-16 Color 3, 60 Inserting a Memory Card 16 Installing an Ink Tank 6 Installing the Print Head 5 Installing the Printer Driver- Macintosh ....... 51 Installing the Printer Driver- Windows ......... 49 IrDA 44 L Languages 12, 37 Layout (Infrared - Canon SELPHY DS700 | DS700 Photo Print Guide - Page 86
14 U Unpack the Printer 3 USB Port 8 User's Guide Table of Contents 54 Using a Memory Card 15 V Video Cable (RCA 3 Video Out Terminal 8 Viewing Each Photo on TV and Printing ..........21 Vivid Photo 34 W Waste ink absorber 67 When Printing Becomes Faint or Colors are Incorrect 55 X xD - Canon SELPHY DS700 | DS700 Photo Print Guide - Page 87
The following ink tank is compatible with DS700. For details on ink tank replacement, refer to "Replacing an Ink Tank" in this guide. QA7-3336-V01 XXXXXX ©CANON INC.2004 PRINTED IN THAILAND
-
 1
1 -
 2
2 -
 3
3 -
 4
4 -
 5
5 -
 6
6 -
 7
7 -
8
-
9
-
10
-
11
-
12
-
13
-
14
-
15
-
16
-
17
-
18
-
19
-
20
-
21
-
22
-
23
-
24
-
25
-
26
-
27
-
28
-
29
-
30
-
31
-
32
-
33
-
34
-
35
-
36
-
37
-
38
-
39
-
40
-
41
-
42
-
43
-
44
-
45
-
46
-
47
-
48
-
49
-
50
-
51
-
52
-
53
-
54
-
55
-
56
-
57
-
58
-
59
-
60
-
61
-
62
-
63
-
64
-
65
-
66
-
67
-
68
-
69
-
70
-
71
-
72
-
73
-
74
-
75
-
76
-
77
-
78
-
79
-
80
-
81
-
82
-
83
-
84
-
85
-
86
-
87
 |
 |

Photo Printing Guide