Canon SELPHY DS700 DS700 Photo Print Guide - Page 63
Remove the empty ink tank., Prepare a replacement ink tank., Insert the ink tank., Close the cover.
 |
View all Canon SELPHY DS700 manuals
Add to My Manuals
Save this manual to your list of manuals |
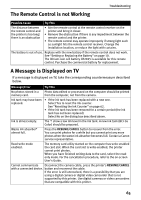
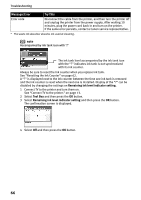
Page 63 highlights
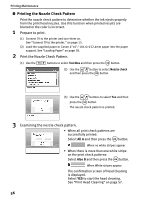
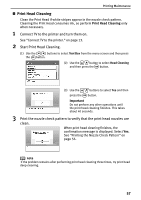
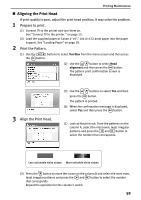
2 Remove the empty ink tank. Printing Maintenance (1) Push the tab. (2) Remove the ink tank. Important • Handle ink tanks carefully to avoid staining clothing or the surrounding area. • Discard empty ink tanks according to the local laws and regulations regarding disposal of consumables. 3 Prepare a replacement ink tank. 4 Insert the ink tank. (1) Unpack a new ink tank and remove the orange protective cap. Important • Do not re-attach the protective cap once you have removed it. • Once the protective cap is removed, do not touch the open ink port. (1) Insert a new ink tank with it slightly slanted. (2) Push down on the on the ink tank until it clicks into place. 5 Close the cover. The print head holder moves to the right. 61
-
 1
1 -
2
-
3
-
4
-
5
-
6
-
7
-
8
-
9
-
10
-
11
-
12
-
13
-
14
-
15
-
16
-
17
-
18
-
19
-
20
-
21
-
22
-
23
-
24
-
25
-
26
-
27
-
28
-
29
-
30
-
31
-
32
-
33
-
34
-
35
-
36
-
37
-
38
-
39
-
40
-
41
-
42
-
43
-
44
-
45
-
46
-
47
-
48
-
49
-
50
-
51
-
52
-
53
-
54
-
55
-
56
-
57
-
 58
58 -
 59
59 -
 60
60 -
 61
61 -
 62
62 -
 63
63 -
 64
64 -
 65
65 -
 66
66 -
 67
67 -
 68
68 -
69
-
70
-
71
-
72
-
73
-
74
-
75
-
76
-
77
-
78
-
79
-
80
-
81
-
82
-
83
-
84
-
85
-
86
-
87
 |
 |

Printing Maintenance
61
2
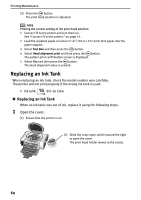
Remove the empty ink tank.
3
Prepare a replacement ink tank.
4
Insert the ink tank.
5
Close the cover.
The print head holder moves to the right.
(1)
Push the tab.
(2)
Remove the ink tank.
Important
•
Handle ink tanks carefully to avoid staining clothing or the surrounding area.
•
Discard empty ink tanks according to the local laws and regulations regarding
disposal of consumables.
(1)
Unpack a new ink tank and remove the orange
protective cap.
Important
•
Do not re-attach the protective cap once you have
removed it.
•
Once the protective cap is removed, do not touch
the open ink port.
(1)
Insert a new ink tank with it slightly
slanted.
(2)
Push down on the
on the ink
tank until it clicks into place.