Canon SELPHY DS700 DS700 Photo Print Guide - Page 61
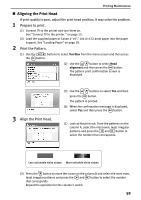
Aligning the Print Head
 |
View all Canon SELPHY DS700 manuals
Add to My Manuals
Save this manual to your list of manuals |
Page 61 highlights
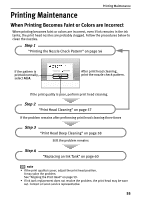
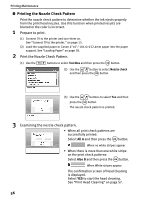
Printing Maintenance „ Aligning the Print Head If print quality is poor, adjust the print head position. It may solve the problem. 1 Prepare to print. (1) Connect TV to the printer and turn them on. See "Connect TV to the printer." on page 13. (2) Load the supplied paper or Canon 4"×6"/ 101.6×152.4mm paper into the paper support. See "Loading Paper" on page 18. 2 Print the Pattern. (1) Use the buttons to select Tool Box from the menu screen and then press the button. (2) Use the button to select Head alignment and then press the button. The pattern print confirmation screen is displayed. 3 Align the Print Head. (3) Use the buttons to select Yes and then press the button. The pattern is printed. (4) When the confirmation message is displayed, select Yes and then press the button. (1) Look at the print out. From the patterns on the column A, select the most even, least irregular patterns and press the and button to select the number that corresponds. (2) Press the button to move the cursor on the column B and select the most even, least irregular patterns and press the and button to select the number that corresponds. Repeat the operation for the column C and D. 59
-
 1
1 -
2
-
3
-
4
-
5
-
6
-
7
-
8
-
9
-
10
-
11
-
12
-
13
-
14
-
15
-
16
-
17
-
18
-
19
-
20
-
21
-
22
-
23
-
24
-
25
-
26
-
27
-
28
-
29
-
30
-
31
-
32
-
33
-
34
-
35
-
36
-
37
-
38
-
39
-
40
-
41
-
42
-
43
-
44
-
45
-
46
-
47
-
48
-
49
-
50
-
51
-
52
-
53
-
54
-
55
-
 56
56 -
 57
57 -
 58
58 -
 59
59 -
 60
60 -
 61
61 -
 62
62 -
 63
63 -
 64
64 -
 65
65 -
 66
66 -
67
-
68
-
69
-
70
-
71
-
72
-
73
-
74
-
75
-
76
-
77
-
78
-
79
-
80
-
81
-
82
-
83
-
84
-
85
-
86
-
87
 |
 |
