Canon imageFORMULA DR-2010M Workgroup Scanner Reference Guide
Canon imageFORMULA DR-2010M Workgroup Scanner Manual
 |
View all Canon imageFORMULA DR-2010M Workgroup Scanner manuals
Add to My Manuals
Save this manual to your list of manuals |
Canon imageFORMULA DR-2010M Workgroup Scanner manual content summary:
- Canon imageFORMULA DR-2010M Workgroup Scanner | Reference Guide - Page 1
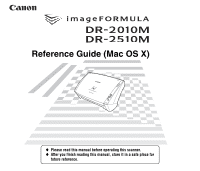
Reference Guide (Mac OS X) ♦ Please read this manual before operating this scanner. ♦ After you finish reading this manual, store it in a safe place for future reference. - Canon imageFORMULA DR-2010M Workgroup Scanner | Reference Guide - Page 2
maintaining or helping you to use the SOFTWARE. No updates, fixes or support will be made available for the SOFTWARE. 4. LIMITED WARRANTY AND DISCLAIMER OF INDEMNITY: Canon, Canon's affiliate, their distributor or dealer will not guarantee uninterrupted service, or absence or correction of errors - Canon imageFORMULA DR-2010M Workgroup Scanner | Reference Guide - Page 3
this manual uses the DR-2510M in the descriptions, DR-2010M operations are identical. If you are using the DR-2010M, please read "DR-2010M" in place of "DR-2510M." Checking the Accessories If any of the items listed below are missing or damaged, contact your local authorized Canon dealer or service - Canon imageFORMULA DR-2010M Workgroup Scanner | Reference Guide - Page 4
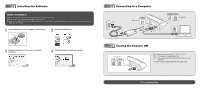
installing the software. ● When using CaptureOnTouch with a Windows driver, refer to the Reference Guide (Windows) and User Manual that are stored on the Setup disc as PDF files. 1 Insert the Setup Disc into the computer's CD-ROM drive. 2 Click [DR-2510M Installer]. 3 Follow the instructions on - Canon imageFORMULA DR-2010M Workgroup Scanner | Reference Guide - Page 5
of the DR-2010M/DR-2510M Document Scanner 6 Names and Functions of Parts 8 Documents 9 Placing Documents 10 Supplied Software 12 Scanning with CaptureOnTouch 13 What is CaptureOnTouch 13 Starting CaptureOnTouch 14 Scan First 15 Select Scan Job 19 Troubleshooting 23 Common Problems and - Canon imageFORMULA DR-2010M Workgroup Scanner | Reference Guide - Page 6
Introduction Thank you for purchasing the Canon DR-2010M/DR-2510M Document Scanner. Please read this manual thoroughly before using the scanner to familiarize yourself with its capabilities, and to make the most of its many functions. After reading this manual, store it in a safe place for future - Canon imageFORMULA DR-2010M Workgroup Scanner | Reference Guide - Page 7
°F to 90.5 °F) Humidity: 20% to 80% RH ● Avoid installing the scanner near equipment that generates a magnetic field (e.g. speakers, televisions, or radios.) AC Adapter ● Connect only to a power outlet of the rated voltage and power supply frequency (120 V, 60 Hz or 220-240 V, 50/60 Hz depending on - Canon imageFORMULA DR-2010M Workgroup Scanner | Reference Guide - Page 8
contact your local authorized Canon dealer or service representative to have the unit serviced. ■ Before moving the scanner, be sure to the scanner. Such objects may tip or fall over, resulting in personal injury. ■ Connect only to a power outlet of the rated voltage and power supply frequency (120 - Canon imageFORMULA DR-2010M Workgroup Scanner | Reference Guide - Page 9
used for an extended period of time, such as during consecutive holidays. ■ Do not wear loose clothing or jewelry that may get caught in the scanner while you are using it. This may result in personal injury. Be extra careful of neckties and long hair. If anything becomes caught in the - Canon imageFORMULA DR-2010M Workgroup Scanner | Reference Guide - Page 10
of the DR-2010M/DR-2510M Document Scanner The main features of the DR-2010M/DR-2510M document scanner are described below. ● Compact Size The dimensions of the scanner are as to the application software, without needing to scan the document again. ● Job Function The scanner includes three job - Canon imageFORMULA DR-2010M Workgroup Scanner | Reference Guide - Page 11
with an auto start function, which enables scanning to be automatically started when a document placed in the feeder is detected. ● Sleep Mode The scanner is designed to save energy by entering the sleep mode when it is not scanning documents. Hint Some functions may not be available depending on - Canon imageFORMULA DR-2010M Workgroup Scanner | Reference Guide - Page 12
document hangs over the edge of the document eject tray. Document Guides Adjust these guides to fit the width of the document. Document Eject Tray the scanner is linked to be automatically turned ON/OFF in accordance with the power of the computer. USB Connector Connect a USB cable that supports - Canon imageFORMULA DR-2010M Workgroup Scanner | Reference Guide - Page 13
at a time. • Scanning documents before the ink is dry can cause problems with the scanner. Always make sure that the ink on a document is dry before through. In this case, adjust the scanning intensity in the application software before scanning the document. • It is recommended that thin documents - Canon imageFORMULA DR-2010M Workgroup Scanner | Reference Guide - Page 14
stack slightly, so that the leading edge of the first page enters the scanner first. Insert the document with the reverse side facing you • Open the Multi-page documents will be fed one page at a time. Slide the document guides to match the sides of inserted document. IMPORTANT Do not stack - Canon imageFORMULA DR-2010M Workgroup Scanner | Reference Guide - Page 15
edge of a document is curled, it may cause a paper jam. • If feeding stops due to a system error or paper jam while the scanner is scanning, resolve the problem, make sure that the scanned image of the last page that was successfully fed has been stored, and then resume scanning the remaining - Canon imageFORMULA DR-2010M Workgroup Scanner | Reference Guide - Page 16
software using the Setup disc, the scanner driver is installed with CaptureOnTouch. The driver can be opened from TWAIN-compatible applications (e.g. the Mac OS X standard application, Image Capture) for use in scanning operations. For details on the scanner driver, see the User Manual (electronic - Canon imageFORMULA DR-2010M Workgroup Scanner | Reference Guide - Page 17
screen instructions. Save to folder Save to a specified folder. Print Print to a specified printer. Select Scan Job (Network) DR-2510M/DR-2010M [Select Scan Job] are pre-assigned to the three job buttons on the scanner, and you can start scanning by pressing one of these buttons after loading - Canon imageFORMULA DR-2010M Workgroup Scanner | Reference Guide - Page 18
Macintosh HD]), the [Applications] folder, [Canon DR-2510M], and then the [CaptureOnTouch DR-2510M] icon. The application no longer resides CaptureOnTouch again. Restarting CaptureOnTouch Press any job button on the scanner to restart CaptureOnTouch. CaptureOnTouch starts and the main screen appears - Canon imageFORMULA DR-2010M Workgroup Scanner | Reference Guide - Page 19
settings ▼ Output scanned images 1 Place the document in the scanner (See p. 10). 2 Click the [Scan First] tab. 3 Click [Scanner setting] to display the [Scanner setting] dialog box, and configure the scanner settings. For details on scanner setting items, refer to the Help. When you are finished - Canon imageFORMULA DR-2010M Workgroup Scanner | Reference Guide - Page 20
. (You can do this in [Scan First] and [Select Scan Job].) In such cases, a confirmation screen to continue appears after the documents placed in the scanner are scanned. Perform one of the following. • If you want to continue scanning another document, place the document in the - Canon imageFORMULA DR-2010M Workgroup Scanner | Reference Guide - Page 21
method is selected, you must configure settings for the image file to be attached. The supported e-mail applications are Mail (Mac OS X standard application) and Microsoft Entourage 2004 for Mac. [Send to application] Open scanned images with a specified application. When this method is selected - Canon imageFORMULA DR-2010M Workgroup Scanner | Reference Guide - Page 22
and white (binary)). [Page Size] Specify the page size of documents. [Orientation] Specify the orientation in which documents are fed into the scanner (portrait or landscape). [Dots per inch] Specify the scanning resolution. [Scanning Side] Specify whether to scan only one side of a document or - Canon imageFORMULA DR-2010M Workgroup Scanner | Reference Guide - Page 23
Select Scan Job Operation Flow Register jobs ▼ Select job ▼ Scan document ▼ Output scanned images Registering/Editing Jobs In CaptureOnTouch, you can register up to 10 jobs for use with [Select Scan Job]. 1 Click the [Select Scan Job] tab. 2 Click the [Register new job] button. The [Register new - Canon imageFORMULA DR-2010M Workgroup Scanner | Reference Guide - Page 24
settings to assign the job to a job button on the scanner. If [Assign scanner button 1 to Scan First] is selected in the main screen, assignment to job button 1 is not available. [Scanner setting] tab Configure scan conditions. 4 Click the [OK] button. The - Canon imageFORMULA DR-2010M Workgroup Scanner | Reference Guide - Page 25
in the [Job list]. The document is scanned. While scanning is in progress, the number of pages scanned is displayed in addition to the scanner settings. When all the pages of the document are scanned, the scanned images are output according to the registered job settings, and the completion screen - Canon imageFORMULA DR-2010M Workgroup Scanner | Reference Guide - Page 26
jobs are pre-assigned to the second and third job buttons on the scanner. Job button Select Scan Job (Color JPEG iPhoto) Select Scan Job (E-mail you press job button 2 or 3 after placing your document in the scanner, CaptureOnTouch starts up and scanning begins according to the assigned job settings - Canon imageFORMULA DR-2010M Workgroup Scanner | Reference Guide - Page 27
Troubleshooting Common Problems and Solutions This section provides recommended solutions to common problems. If you have a problem that is not solved by the following, contact your local authorized Canon dealer. Problem 1 Solutions Problem 2 Solutions Problem 3 Solutions The scanner will not - Canon imageFORMULA DR-2010M Workgroup Scanner | Reference Guide - Page 28
are saved. Solutions When Panel-Feeding is selected as the feeding method on the scanner driver's setting screen, after a document is fed, scanning does not occur until the scan button is clicked on the scan panel. Problem 11 Scanned images of multiple pages cannot be saved in a single JPEG or PICT - Canon imageFORMULA DR-2010M Workgroup Scanner | Reference Guide - Page 29
if the last page was scanned correctly, and then continue scanning. Hint If a paper jam occurs when [Rapid recovery system] is enabled in the scanner driver settings, the image data of the document is not saved and scanning stops. This allows you to continue scanning from the document that caused - Canon imageFORMULA DR-2010M Workgroup Scanner | Reference Guide - Page 30
kit and replace the consumables with those supplied in the kit (the two roller assemblies and the document pressure guide). When replacing the rollers, reset the Roller Count in the scanner. Opening and Closing the Front Unit 1 To open the front unit, squeeze the OPEN levers together and lift it - Canon imageFORMULA DR-2010M Workgroup Scanner | Reference Guide - Page 31
1 Spread the document guides all the way to the left and right, and open the roller cover. 4 Slide the roller fixing lever to lever down to secure the feed roller shaft. 2 Lift the roller fixing lever, and slide it to the left. 5 Close the roller cover firmly until the latch clicks. 3 Remove - Canon imageFORMULA DR-2010M Workgroup Scanner | Reference Guide - Page 32
roller shaft mates with the shaft in the Front Unit. 6 Clip the four mounting hooks on the new document holding guide up through the roller cover, and slide the guide toward the back. 4 Slide the roller fixing lever to the left so that it fits into the hole at the left side of the - Canon imageFORMULA DR-2010M Workgroup Scanner | Reference Guide - Page 33
the [Applications] folder, and then the [Image Capture] icon. 2 Click [Browse Devices] in the [Devices] menu. 3 Select the scanner you want to use, and select the [Use TWAIN software] check box. 4 Click [OK]. 5 Click [DR-2510M TWAIN] in the [Devices] menu. 6 Click [Scan]. The settings screen for the - Canon imageFORMULA DR-2010M Workgroup Scanner | Reference Guide - Page 34
mm) long by setting the scanner to the Long Document mode DR-2510M), 20 pages/min.(DR-2010M) 300 x 300 dpi 25 pages/min.(DR-2510M), 20 pages/min.(DR-2010M) Duplex 200 x 200 dpi 50 images/min.(DR-2510M), 40 images/min.(DR-2010M) 300 x 300 dpi 50 images/min.(DR-2510M), 40 images/min.(DR-2010M - Canon imageFORMULA DR-2010M Workgroup Scanner | Reference Guide - Page 35
kit (product code: 2445B001) This kit includes replacement feed and retard roller assemblies, and a replacement document pressure guide. • For details on replacing the parts, see "Replacing Consumables" on p. 26. • Contact your local authorized Canon dealer or service representative for detailed - Canon imageFORMULA DR-2010M Workgroup Scanner | Reference Guide - Page 36
SINGAPORE PTE. LTD. 1 HARBOUR FRONT AVENUE #04-01, KEPPEL BAY TOWER, SINGAPORE 098632 CANON HONGKONG COMPANY LTD. 19TH FLOOR, THE METROPOLIS TOWER, 10 METROPOLIS DRIVE, HUNGHOM, KOWLOON, HONG KONG. CANON KOREA BUSINESS SOLUTIONS INC. 168-12 SAMSEONG-DONG, GANGNAM-GU, SEOUL, KOREA PUB. CE-IE-745
-
 1
1 -
 2
2 -
 3
3 -
 4
4 -
 5
5 -
 6
6 -
 7
7 -
8
-
9
-
10
-
11
-
12
-
13
-
14
-
15
-
16
-
17
-
18
-
19
-
20
-
21
-
22
-
23
-
24
-
25
-
26
-
27
-
28
-
29
-
30
-
31
-
32
-
33
-
34
-
35
-
36
 |
 |
♦
Please read this manual before operating this scanner.
♦
After you finish reading this manual, store it in a safe place for
future reference.
Reference Guide (Mac OS X)