Canon imagePROGRAF PRO-300 PRO-300 Getting Started Guide - Page 5
Installing the Ink Tanks
 |
View all Canon imagePROGRAF PRO-300 manuals
Add to My Manuals
Save this manual to your list of manuals |
Page 5 highlights
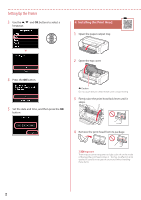
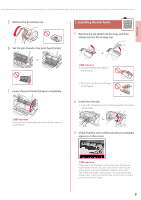
ENGLISH 5 Remove the protective cap. 6 Set the print head in the print head holder. 5. Installing the Ink Tanks 1 Remove the ink tank from the bag, and then slowly remove the orange cap. 7 Lower the print head lock lever completely. Important Once you have installed the print head, do not remove it unnecessarily. • Important Do not squeeze the sides of the ink tank. • Do not touch the areas shown in the figure. 2 Install the ink tank. • Insert the ink tank into the print head and press down until it clicks. 3 Check that the color of the ink tank you installed appears on the screen. Important If the color is not displayed on the screen even though you have installed the ink tank, the color of the ink tank may be wrong or you may have installed an ink tank, such as one with a different model number, that is not supported by this printer. Either install an ink tank for the correct color or use the provided ink tank for setup. 3
-
 1
1 -
 2
2 -
 3
3 -
 4
4 -
 5
5 -
 6
6 -
 7
7 -
 8
8 -
 9
9 -
 10
10 -
 11
11 -
12
-
13
-
14
-
15
-
16
-
17
-
18
-
19
-
20
 |
 |
