Canon imagePROGRAF TM-200 TM-305 / TM-300 / TM-205 / TM-200 Setup Guide
Canon imagePROGRAF TM-200 Manual
 |
View all Canon imagePROGRAF TM-200 manuals
Add to My Manuals
Save this manual to your list of manuals |
Canon imagePROGRAF TM-200 manual content summary:
- Canon imagePROGRAF TM-200 | TM-305 / TM-300 / TM-205 / TM-200 Setup Guide - Page 1
Introductory Information Setup Guide ENGLISH Read this manual before attempting to operate the printer. Keep this manual for future reference. • Instructions in this Setup Guide show the TM-305 printer. Note that your printer may look different from these illustrations in some cases. However, the - Canon imagePROGRAF TM-200 | TM-305 / TM-300 / TM-205 / TM-200 Setup Guide - Page 2
options. Electronic Manuals Quick Guide Contains information related to warnings for using this product safely and information related to replacing paper, ink tanks, and the print head. Online Manual The Online Manual describes all aspects of printer use from basic instructions for printing on - Canon imagePROGRAF TM-200 | TM-305 / TM-300 / TM-205 / TM-200 Setup Guide - Page 3
other injuries due to the weight of the printer. ∙ TM-305: Approx. 108 lb (49 kg) ∙ TM-300: Approx. 106 lb (48 kg) ∙ TM-205: Approx. 91 lb (41 kg) ∙ TM-200: Approx. 91 lb (41 kg) • When moving the printer, firmly grasp the carrying handles (A) under each side - Canon imagePROGRAF TM-200 | TM-305 / TM-300 / TM-205 / TM-200 Setup Guide - Page 4
down temporarily make sure to put the printer on a flat, stable surface. • Supporting only the center of the printer when carrying or setting the printer down may damage the printer. 4 Place the printer on the stand such that the rear bottom corners of the printer are aligned with the corners of - Canon imagePROGRAF TM-200 | TM-305 / TM-300 / TM-205 / TM-200 Setup Guide - Page 5
, and attach an earth wire to the earth terminal on the back of the printer using a screwdriver. 2 Plug the power cord into the outlet. 3 Turn on the printer. 4 When the language selection screen appears on the touch screen, select a language. Then, if the screen for selecting a time zone - Canon imagePROGRAF TM-200 | TM-305 / TM-300 / TM-205 / TM-200 Setup Guide - Page 6
tank installation are shown on the touch screen. Open the ink tank covers as instructed by grasping the handles. 2 While pushing the tip of the ink tank lock lever horizontally, open the ink tank lock lever upwards. 3 Shake each ink tank gently 1 or 2 times before opening its pouch. Important - Canon imagePROGRAF TM-200 | TM-305 / TM-300 / TM-205 / TM-200 Setup Guide - Page 7
top cover. A 2 Tilt the print head lock lever towards you. Instructions are now shown on the touch screen regarding print head installation. Important • cause damage to the print head or printing problems. • The print head is filled with ink. It is recommended that you remove the protective - Canon imagePROGRAF TM-200 | TM-305 / TM-300 / TM-205 / TM-200 Setup Guide - Page 8
6 Insert the print head into the carriage (B) with the ink holes (A) on the upper side and facing towards you as shown in the figure. Carefully push the print head firmly into the carriage (B), ensuring that - Canon imagePROGRAF TM-200 | TM-305 / TM-300 / TM-205 / TM-200 Setup Guide - Page 9
, high humidity, and direct sunlight. The touch screen shows instructions on how to load cut sheets. 4 Insert the paper straight into the feed slot, with the printed side facing up, so that the right edge of the paper is aligned with the paper alignment guide (A) on the right side of the roll - Canon imagePROGRAF TM-200 | TM-305 / TM-300 / TM-205 / TM-200 Setup Guide - Page 10
to "Connecting to the Printer" on p.12) Note • Charging the system with ink fills the system from the ink tanks to the print head ink tanks quickly. 8 When the print head adjustment is complete, the paper with the adjustment pattern printed on it is ejected. Instructions on how to remove paper - Canon imagePROGRAF TM-200 | TM-305 / TM-300 / TM-205 / TM-200 Setup Guide - Page 11
message about the connection method and select Yes if there are no problems. 4 Select OK. The paper starts feeding, and then the printer automatically starts charging the ink for the first time and adjusting the print head. Charging the ink for the first time and adjusting the print head for the - Canon imagePROGRAF TM-200 | TM-305 / TM-300 / TM-205 / TM-200 Setup Guide - Page 12
, click Continue and proceed to the next step. 4 Click Start Setup. Configure the settings by following the instructions on the screen. Note • A screen for selecting the printer connection method may be displayed in the middle of configuring the settings. If this happens, select the method you - Canon imagePROGRAF TM-200 | TM-305 / TM-300 / TM-205 / TM-200 Setup Guide - Page 13
the ink system. Cleaning... Configure the Wi-Fi settings by following the instructions on the screen. Note • Before using the printer, paper core attachment. • The accessory pocket is included with the stand. Refer to "Attach the Accessory Pocket" in the Printer Stand Setup Guide (separate manual - Canon imagePROGRAF TM-200 | TM-305 / TM-300 / TM-205 / TM-200 Setup Guide - Page 14
the remaining operations by following the instructions on the screen to display the Online Manual. Responding to Messages Error messages may appear on the touch screen of the operation panel when setting up printer. If so, it may not indicate a problem with the printer, and the issue may be easily
-
 1
1 -
 2
2 -
 3
3 -
 4
4 -
 5
5 -
 6
6 -
 7
7 -
8
-
9
-
10
-
11
-
12
-
13
-
14
 |
 |

1
QT6-2699-V01
PRINTED IN XXXXXXXX
XXXXXXXX
© CANON INC. 2018
QT62699V01
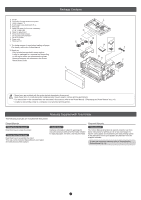
It is recommended that you reserve space of the following dimensions to allow you to work around the printer.
The images below show the space required to install each printer.
Before Setting Up the Printer
Read this manual before attempting to operate the printer.
Keep this manual for future reference.
Set up the printer using the following procedure.
• Windows is a trademark or registered trademark of Microsoft
Corporation in the U.S. and/or other countries.
TM-305/TM-300
Installation space (W x D x H)
∙ When using
SD-32
66.5 x 67.0 x 53.6 inches (1689 x 1700 x 1360 mm)
TM-205/TM-200
Installation space (W x D x H)
∙ When not using the
stand
54.5 x 53.5 x 29.1 inches (1382 x 1358 x 739 mm)
∙ When using
SD-23
54.5 x 67.0 x 53.6 inches (1382 x 1700 x 1360 mm)
Installation Space
Overview of Setup
Important
• The printer stand may not be included with your model.
• The space required in front of the printer differs on how the basket supplied with the printer stand is used. This shows the installation space when used in the
position in the illustration.
Important
• Instructions in this Setup Guide show the TM-305 printer. Note that your printer may look different from these illustrations in some cases. However, the basic
operations are the same.
If an error message appears during setup or other problems
occur, refer to "Responding to Messages" on p.14.
RMC (Regulatory Model Code): K10489
RMC (Regulatory Model Code): K10490
RMC (Regulatory Model Code): K10487
RMC (Regulatory Model Code): K10488
Setup Guide
Introductory Information
ENGLISH
In order to ensure that this product is used safely, be sure to read the precautions.
-> Quick Guide (separate manual)
∙ Check this also after setup is complete.
7.9 inches
(200 mm)
0.4 inches
(10 mm)
7.9 inches
(200 mm)
11.8 inches (300 mm)
0.4 inches
(10 mm)
7.9 inches
(200 mm)
23.6 inches
(600 mm)
23.6 inches
(600 mm)
23.6 inches
(600 mm)
(When not using
the stand)
(When using the stand)
(When using the stand)
7.9 inches
(200 mm)
11.8 inches (300 mm)
*
Assembling the Stand
(P.3)
*Refer to the
separate manual
Installing the Printer
(P.3)
Turning On the Printer
(P.5)
Installing the Ink Tanks
(P.6)
Installing the Print Head
(P.7)
Loading Paper
(P.9)
Printing From a Smartphone or Tablet
(P.13)
Storing Accessories
(P.13)
Loading Roll Paper After Setup
(P.13)
Displaying the Online Manual
(P.14)
∙ Performing
Print Head Adjustment and
Selecting the Connection Method
(on p.11 to p.13)
∙ Connecting to the
Printer