Canon imagePROGRAF TM-200 TM-305 / TM-300 / TM-205 / TM-200 Setup Guide - Page 6
Installing the Ink Tanks, Important
 |
View all Canon imagePROGRAF TM-200 manuals
Add to My Manuals
Save this manual to your list of manuals |
Page 6 highlights
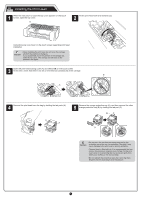
Installing the Ink Tanks Install the 5 ink tanks by following the instructions on the screen. 1 Instructions on ink tank installation are shown on the touch screen. Open the ink tank covers as instructed by grasping the handles. 2 While pushing the tip of the ink tank lock lever horizontally, open the ink tank lock lever upwards. 3 Shake each ink tank gently 1 or 2 times before opening its pouch. Important • Failure to shake the ink tanks may result in reduced print quality because ink ingredients have settled on the bottom of the tank. Note • If the ink tank is cold, allow it to adjust to room temperature before attaching it to the printer. 4 Open the pouch and remove the ink tank. BA 5 Insert the ink tank into the holder, with the ink holes facing downwards as shown in the figure. 6 Close the ink tank lock lever until it clicks. Important • Never touch the ink holes (A) or metal contacts (B). Touching these parts may cause stains, damage the ink tank, and affect print quality. • Avoid dropping the ink tank after removing it from the pouch. Otherwise, ink may leak and cause stains. • Do not remove ink tanks to shake them after they have been mounted. Doing so may cause ink to spill. Important • If the ink tank does not fit into the holder, check that the color on the ink tank label matches the color shown on the ink tank lock lever. Check also the orientation of the ink tank. 7 Repeat steps 2 to 6 to install each of the ink tanks. 8 Close the ink tank covers. 9 Check that the color of the ink tank that was set is displayed on the touch screen, and select OK. • If the touch screen does not show Important the color, repeat steps 2 and 6. 6
-
 1
1 -
 2
2 -
 3
3 -
 4
4 -
 5
5 -
 6
6 -
 7
7 -
 8
8 -
 9
9 -
 10
10 -
 11
11 -
 12
12 -
13
-
14
 |
 |
