Canon imagePROGRAF W2200S Setup Guide - Page 28
Re-attach the back upper cover., lock is released. Go on to the next step to install the ink tanks.
 |
View all Canon imagePROGRAF W2200S manuals
Add to My Manuals
Save this manual to your list of manuals |
Page 28 highlights
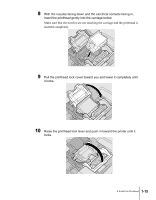
11 Re-attach the back upper cover. The right cover lock releases automatically. On the operation panel "Ins. Ink Tank OK" is displayed and the right cover lock is released. Go on to the next step to install the ink tanks. 1-16 Setting Up the Printer
-
 1
1 -
2
-
3
-
4
-
5
-
6
-
7
-
8
-
9
-
10
-
11
-
12
-
13
-
14
-
15
-
16
-
17
-
18
-
19
-
20
-
21
-
22
-
 23
23 -
 24
24 -
 25
25 -
 26
26 -
 27
27 -
 28
28 -
 29
29 -
 30
30 -
 31
31 -
 32
32 -
 33
33 -
34
-
35
-
36
-
37
-
38
-
39
-
40
-
41
-
42
-
43
-
44
-
45
-
46
-
47
-
48
-
49
-
50
-
51
-
52
-
53
-
54
-
55
-
56
-
57
-
58
-
59
-
60
-
61
-
62
-
63
-
64
-
65
-
66
-
67
-
68
-
69
-
70
-
71
-
72
-
73
-
74
-
75
-
76
-
77
-
78
-
79
-
80
-
81
-
82
-
83
-
84
-
85
-
86
-
87
-
88
-
89
-
90
-
91
-
92
-
93
-
94
-
95
-
96
-
97
-
98
-
99
-
100
-
101
-
102
-
103
-
104
-
105
-
106
-
107
-
108
-
109
-
110
-
111
-
112
-
113
-
114
-
115
-
116
-
117
-
118
-
119
-
120
-
121
-
122
-
123
-
124
-
125
-
126
-
127
-
128
-
129
-
130
-
131
-
132
-
133
 |
 |

Setting Up the Printer
1-16
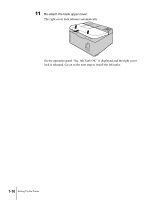
11
Re-attach the back upper cover.
The right cover lock releases automatically.
On the operation panel “Ins. Ink Tank OK” is displayed and the right cover
lock is released. Go on to the next step to install the ink tanks.