Casio CTK720AD User Guide - Page 11
Attachment of the Score Stand
 |
UPC - 079767343101
View all Casio CTK720AD manuals
Add to My Manuals
Save this manual to your list of manuals |
Page 11 highlights
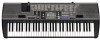
General Guide 1 MIC VOLUME slider 2 Power indicator 3 POWER/MODE switch 4 MAIN VOLUME slider G SONG BANK/PIANO BANK/RHYTHM CONTROLLER 5 FILL-IN button 6 SYNCHRO button 7 START/STOP button 8 TEMPO buttons 9 SETTING button 0 Percussion instrument list A CHORD root names B Speaker C Rhythm list D Tone list E Display F Song Bank list G Piano Bank list Rear Panel V H COUNT VOICE 1 to 5 I [+]/[-] buttons • Negative values can be changed only by using [+] and [-] to increase and decrease the displayed value. J Number buttons • For input of numbers to change displayed settings. K TONE button L RHYTHM button M SONG BANK button N PIANO BANK button G 3-STEP LESSON O STEP 1 button P STEP 2 button Q STEP 3 button R SCORING button S LEFT button T RIGHT button U SPEAK button WXY Z V USB port W SUSTAIN jack terminal X DC 9V terminal Y PHONES/OUTPUT terminal Z MIC IN jack *Attachment of the Score Stand Insert both ends of the music stand provided with the keyboard into the two holes on the top surface. NOTE • Display examples shown in this User's Guide are intended for illustrative purposes only. The actual text and values that appear on the display may differ from the examples shown in this User's Guide. • Viewing a liquid crystal display screen from an angle can change the appearance of display contrast. The display contrast of this keyboard is set to allow easy viewing for a person seated on a chair in front of the keyboard. Note that display contrast is fixed, and cannot be adjusted. 628A-E-011A E-9
-
 1
1 -
2
-
3
-
4
-
5
-
 6
6 -
 7
7 -
 8
8 -
 9
9 -
 10
10 -
 11
11 -
 12
12 -
 13
13 -
 14
14 -
 15
15 -
 16
16 -
17
-
18
-
19
-
20
-
21
-
22
-
23
-
24
-
25
-
26
-
27
-
28
-
29
-
30
-
31
-
32
-
33
-
34
-
35
-
36
-
37
-
38
-
39
-
40
-
41
-
42
-
43
-
44
-
45
-
46
-
47
-
48
 |
 |
