Celestron COSMOS 5 MP LCD Desktop Digital Microscope Instruction Manual - Page 11
Software Menu Introductions
 |
View all Celestron COSMOS 5 MP LCD Desktop Digital Microscope manuals
Add to My Manuals
Save this manual to your list of manuals |
Page 11 highlights
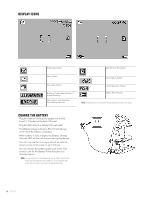
CONNECT TO TV • Insert the 1/8-inch plug on the end of the supplied video cable into the Cosmos Microscope's AV OUT port located on the back of the base. • Insert the yellow RCA plug on the video cable into one of your television's yellow video input connectors. NOTE: Refer to your television's manual to locate your TV's video connector. • Turn on the television. (Be sure your television is tuned to the appropriate input channel.) • You should now see an image of the specimen you are viewing on your television screen. Video-in on TV monitor Video-out 6. SOFTWARE MENU INTRODUCTIONS MAIN MENU • Press SETTINGS button to enter Main Menu 1. • The menu choices will vary depending on whether you are in still image or video mode. • When in still image mode, you will see: 1. Resolution 2. Time Lapse 3. Quality 4. Sharpness • There is only one setting in video mode: 1. Resolution RESOLUTION SETTING: • In still image mode, choices are: - 12.0 MP (interpolated*) - 9.0 MP (interpolated*) - 5.0 MP - 3.0 MP - 1.3 MP - VGA ENGLISH 11
-
 1
1 -
2
-
3
-
4
-
5
-
 6
6 -
 7
7 -
 8
8 -
 9
9 -
 10
10 -
 11
11 -
 12
12 -
 13
13 -
 14
14 -
 15
15 -
 16
16 -
17
-
18
-
19
-
20
-
21
-
22
-
23
-
24
-
25
-
26
-
27
-
28
-
29
-
30
-
31
-
32
-
33
-
34
-
35
-
36
-
37
-
38
-
39
-
40
-
41
-
42
-
43
-
44
-
45
-
46
-
47
-
48
-
49
-
50
-
51
-
52
-
53
-
54
-
55
-
56
-
57
-
58
-
59
-
60
-
61
-
62
-
63
-
64
-
65
-
66
-
67
-
68
-
69
-
70
-
71
-
72
-
73
-
74
-
75
-
76
-
77
-
78
-
79
-
80
-
81
-
82
-
83
-
84
 |
 |
