Cisco AIR-AP1020 Quick Start Guide - Page 28
Projection Wall Mount
 |
UPC - 882658025952
View all Cisco AIR-AP1020 manuals
Add to My Manuals
Save this manual to your list of manuals |
Page 28 highlights
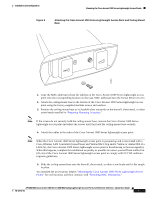
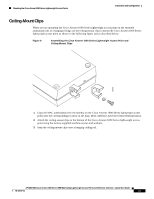
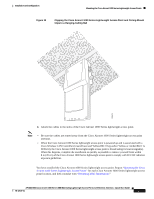
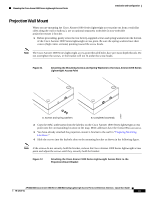
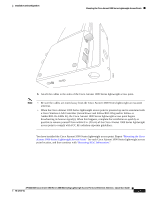
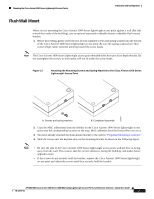
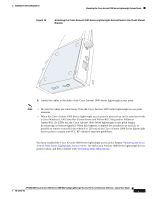
Mounting the Cisco Aironet 1000 Series Lightweight Access Points Installation and Configuration Projection Wall Mount When you are mounting the Cisco Aironet 1000 Series lightweight access point out from a wall (flat sides along the wall or hallway), use an optional separately orderable factory-orderable projection-mount L-bracket. 1. Before proceeding, gently screw the two factory-supplied screws and spring washers into the bottom of the Cisco Aironet 1000 Series lightweight access point. Be sure the spring washers have their convex (high center sections) pointing toward the screw heads. Note The Cisco Aironet 1000 Series lightweight access point threaded holes have precision-depth threads. Do not overtighten the screws, or the bracket will not fit under the screw heads. Figure 11 Attaching the Mounting Screws and Spring Washers to the Cisco Aironet 1000 Series Lightweight Access Point 135667 A. Screws and spring washers B. Completed assembly 2. Copy the MAC address(es) from the label(s) on the Cisco Aironet 1000 Series lightweight access point onto the corresponding location on the map. MAC addresses have the format 00xxxxxxxxxx. 3. You have already attached the projection-mount L-bracket to the wall in "Preparing Mounting Locations." 4. Slide the screws into the keyhole slots on the mounting bracket as shown in the following figure. Note If the screws do not securely hold the bracket, remove the Cisco Aironet 1000 Series lightweight access point and adjust the screws until they securely hold the bracket. Figure 12 Attaching the Cisco Aironet 1000 Series Lightweight Access Point to the Projection-Mount Bracket AP1020/1030 Cisco Aironet 1000 Series IEEE 802.11a/b/g Lightweight Access Points with External Antennas - Quick Start Guide 78-17147-01 18
-
 1
1 -
2
-
3
-
4
-
5
-
6
-
7
-
8
-
9
-
10
-
11
-
12
-
13
-
14
-
15
-
16
-
17
-
18
-
19
-
20
-
21
-
22
-
 23
23 -
 24
24 -
 25
25 -
 26
26 -
 27
27 -
 28
28 -
 29
29 -
 30
30 -
 31
31 -
 32
32 -
 33
33 -
34
-
35
-
36
-
37
-
38
-
39
-
40
-
41
-
42
-
43
-
44
 |
 |
