Cisco AIR-AP1231G-E-K9 Hardware Installation Guide - Page 32
Installation Summary, Connecting the 2.4-GHz Antennas
 |
UPC - 746320862644
View all Cisco AIR-AP1231G-E-K9 manuals
Add to My Manuals
Save this manual to your list of manuals |
Page 32 highlights
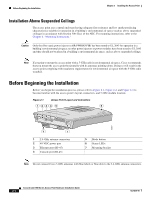
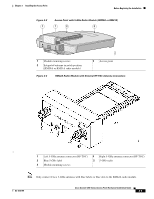
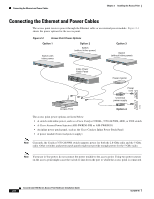
Installation Summary Chapter 2 Installing the Access Point Installation Summary While installing the access point, you must perform the following operations: • If you have a 2.4-GHz radio upgrade kit, refer to the "2.4-GHz Radio Upgrade" section on page 7-1. • If you have a 5-GHz radio module upgrade kit (RM20A, RM21A, or RM22A) refer to the "5-GHz Radio Module Upgrade" section on page 8-1. • If your access point has a built-in 2.4-GHz radio, connect a single antenna or dual diversity antennas (refer to the "Connecting the 2.4-GHz Antennas" section on page 2-6). • If your access point has an installed RM22A radio module, connect a single antenna or dual diversity antennas (refer to the "Connecting the 5-GHz External Antennas" section on page 2-7). • Connect Ethernet and power cables (refer to the "Connecting the Ethernet and Power Cables" section on page 2-8). • Configure basic settings (refer to Chapter 3, "Configuring the Access Point for the First Time"). • Configure security and other access point options. • Use the mounting kit to install the access point on a convenient flat horizontal or vertical surface such as a desktop, book shelf, file cabinet, wall, or ceiling. For additional information on mounting, refer to Chapter 6, "Mounting Instructions." Connecting the 2.4-GHz Antennas The access point supports a single antenna or dual diversity antennas. Two RP-TNC antenna connectors are provided on the back of the unit for the 2.4-GHz radio. Note RP-TNC antenna connectors are used for both the 2.4-GHz and 5-GHz radios. Do not connect Cisco 5-GHz antennas with blue labels or blue dots to the 2.4-GHz antenna connectors (refer to Figure 2-1 for connector locations). To attach your antenna or antenna cable to the access point, follow these steps: Step 1 Step 2 Step 3 Attach an antenna or antenna cable to the 2.4-GHz Right/Primary (RP-TNC) antenna connector on the back of the access point and hand tighten. If you are using two antennas for diversity coverage, attach the second antenna or antenna cable to the 2.4-GHz Left (RP-TNC) antenna connector. If you are using a Cisco Aironet 2 dBi antenna, orient the antenna depending on how you intend to mount the access point. • On a table or desk, orient the antenna straight up. • On a vertical surface, such as a wall, orient the antenna straight up. • On a ceiling, orient the antenna straight down. If you are using another Cisco Aironet antenna, refer to the antenna mounting instructions that came with your antenna. Cisco Aironet 1200 Series Access Point Hardware Installation Guide 2-6 OL-4310-05
-
 1
1 -
2
-
3
-
4
-
5
-
6
-
7
-
8
-
9
-
10
-
11
-
12
-
13
-
14
-
15
-
16
-
17
-
18
-
19
-
20
-
21
-
22
-
23
-
24
-
25
-
26
-
 27
27 -
 28
28 -
 29
29 -
 30
30 -
 31
31 -
 32
32 -
 33
33 -
 34
34 -
 35
35 -
 36
36 -
 37
37 -
38
-
39
-
40
-
41
-
42
-
43
-
44
-
45
-
46
-
47
-
48
-
49
-
50
-
51
-
52
-
53
-
54
-
55
-
56
-
57
-
58
-
59
-
60
-
61
-
62
-
63
-
64
-
65
-
66
-
67
-
68
-
69
-
70
-
71
-
72
-
73
-
74
-
75
-
76
-
77
-
78
-
79
-
80
-
81
-
82
-
83
-
84
-
85
-
86
-
87
-
88
-
89
-
90
-
91
-
92
-
93
-
94
-
95
-
96
-
97
-
98
-
99
-
100
-
101
-
102
-
103
-
104
-
105
-
106
-
107
-
108
-
109
-
110
-
111
-
112
-
113
-
114
-
115
-
116
-
117
-
118
-
119
-
120
-
121
-
122
-
123
-
124
-
125
-
126
-
127
-
128
-
129
-
130
-
131
-
132
-
133
-
134
-
135
-
136
-
137
-
138
-
139
-
140
-
141
-
142
-
143
-
144
-
145
-
146
-
147
-
148
-
149
-
150
-
151
-
152
-
153
-
154
-
155
-
156
-
157
-
158
-
159
-
160
 |
 |