Cisco AIR-AP1252AG-A-K9 Hardware Installation Guide - Page 77
Issuing the Cisco IOS Command Using the CLI
 |
View all Cisco AIR-AP1252AG-A-K9 manuals
Add to My Manuals
Save this manual to your list of manuals |
Page 77 highlights
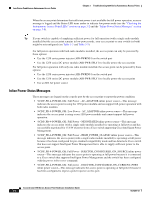
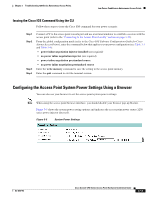
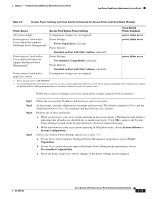
Chapter 3 Troubleshooting 1250 Series Autonomous Access Points Low Power Condition on Autonomous Access Points Issuing the Cisco IOS Command Using the CLI Follow these steps to issue the Cisco IOS command for your power scenario: Step 1 Step 2 Step 3 Step 4 Connect a PC to the access point console port and use a terminal emulator to establish a session with the access point (refer to the "Connecting to the Access Point Locally" section on page 3-22). From the global configuration mode (refer to the Cisco IOS Software Configuration Guide for Cisco Aironet Access Points), enter the command below that applies to your power configuration (see Table 3-3 and Table 3-4): • power inline negotiation injector installed (not required) • no power inline negotiation injector (not required) • power inline negotiation prestandard source • no power inline negotiation prestandard source Enter the write memory command to save the setting to the access point memory. Enter the quit command to exit the terminal session. Configuring the Access Point System Power Settings Using a Browser You can also use your browser to set the access point system power settings. Note When using the access point browser interface, you should disable your browser pop-up blocker. Figure 3-3 shows the system power setting options and indicates the access point power status (1250 series power injector detected). Figure 3-3 System Power Settings OL-8247-03 Cisco Aironet 1250 Series Access Point Hardware Installation Guide 3-13
-
 1
1 -
2
-
3
-
4
-
5
-
6
-
7
-
8
-
9
-
10
-
11
-
12
-
13
-
14
-
15
-
16
-
17
-
18
-
19
-
20
-
21
-
22
-
23
-
24
-
25
-
26
-
27
-
28
-
29
-
30
-
31
-
32
-
33
-
34
-
35
-
36
-
37
-
38
-
39
-
40
-
41
-
42
-
43
-
44
-
45
-
46
-
47
-
48
-
49
-
50
-
51
-
52
-
53
-
54
-
55
-
56
-
57
-
58
-
59
-
60
-
61
-
62
-
63
-
64
-
65
-
66
-
67
-
68
-
69
-
70
-
71
-
 72
72 -
 73
73 -
 74
74 -
 75
75 -
 76
76 -
 77
77 -
 78
78 -
 79
79 -
 80
80 -
 81
81 -
 82
82 -
83
-
84
-
85
-
86
-
87
-
88
-
89
-
90
-
91
-
92
-
93
-
94
-
95
-
96
-
97
-
98
-
99
-
100
-
101
-
102
-
103
-
104
-
105
-
106
-
107
-
108
-
109
-
110
-
111
-
112
-
113
-
114
-
115
-
116
-
117
-
118
-
119
-
120
-
121
-
122
-
123
-
124
-
125
-
126
-
127
-
128
-
129
-
130
-
131
-
132
-
133
-
134
-
135
-
136
-
137
-
138
-
139
-
140
-
141
-
142
 |
 |
