Clifford UltraCode Owners Guide - Page 4
Detuning, Opener's, Receiver
 |
View all Clifford UltraCode manuals
Add to My Manuals
Save this manual to your list of manuals |
Page 4 highlights
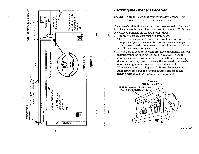
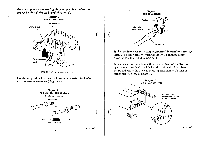
a) a) a C T0, ma CL a) ▪6 Oc C (1) -C fl 99 Old receiver m GARAGE FLOOR Garage door opener z a) E C 0as) a E O •3 Eus 2 C0 3 aO) = •aa) E -aooo) a) a 5 O CC 5, ct a a) .a0s E E .t>a5 o6) 6 0_ CC Chain or screw dri a) aE -0fO65 O 4- o 0 3N-a8, a) a) 5D m O OOOm)) HOOO 99VHVD 4 Detuning the Opener's Receiver NOTE: Skip this section if your garage door opener is not already controlled by a remote control. The opener's original receiver must be disconnected or "detuned" in order to make it impervious to electronic scanners. To detune the receiver, perform the following procedure: 1. Unplug the garage door opener's power cord. 2. There are two types of receivers: external and built-in. If your garage door opener uses an external receiver module, you should have already disconnected its terminals as part of the installation procedure (page 3, step #2). 3. If your garage door opener does not have an external receiver module, you must "detune" its built in-receiver. Near the garage door opener's antenna wire, you will find its tuning device(s). You may need to remove the garage door opener's outer housing in order to access the printed circuit board. 4. Most receivers use "tuning slugs." It may be necessary to poke through a decal in order to gain access to the tuning slug holes (as illustrated in diagram 2). Diagram 2 Control Panel View Tuning slugs accessible through holes (may be covered by sticker 00 00 00 continued 5
-
 1
1 -
 2
2 -
 3
3 -
 4
4 -
 5
5 -
 6
6
 |
 |
