Clifford XL100 Owners Guide - Page 6
Selectable, Features
 |
View all Clifford XL100 manuals
Add to My Manuals
Save this manual to your list of manuals |
Page 6 highlights
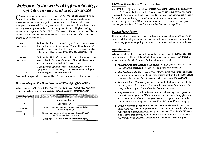
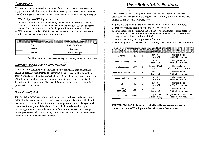
TotalRecallim The system's memory records the identity of the last activated or malfunctioning trigger or sensor, which allows your installer to instantly track down a malfunction. To identify the trigger or sensor held in the system's memory, use the following procedure: 1. With the ignition OFF, flip the valet switch. 2. Arm the system from your keyless entry remote and then disarm the system. 3. The LED will blink 1-3 times to indicate the most recently activated trigger or sensor. For your convenience, the blink cycle will repeat a total of 5 times. 4. Write down the number of blinks between pauses and refer to the chart below. 5. Flip the valet switch hack to its normal position. 1 blink 2 blinks 3 blinks a Duplex Piezo Sensor Door trigger* Hood or trunk trigger *If vehicle has factory delayed courtesy lights, door diagnostics arc not possible Normally Open/Closed Starter Interrupt • At the time of installation, you can select whether the XL100 uses its normally closed or normally open method to ensure that the engine cannot be started by a thief. Normally closed mode ensures that you will be able to start the engine even in the unlikely event of a system malfunction. Normally open mode prevents a thief from starting the engine even if he cuts all the wires or locates and removes the power to the control unit. SmartPowerUptm 11 If power to the system is ever removed, SmartPowerUp II ensures the system will automatically restore itself to its previous state when power is restored. So if a thief disconnects power and then restores it in an attempt to start the car, the system will re-arm and instantly sound the alarm. If your vehicle is to he serviced by a mechanic, just put the system in valet mode. If the mechanic needs to interrupt power, your system will automatically return to its valet mode state when power is restored. There will be no alarm activation. 10 User-Selectable Features You can easily toggle as many as eight selectable features to your own personal preferences. To change any of the original factory settings (or return them to their original setting), use the following steps: 1. Select the feature you wish from the table below. Note the number of flicks. 2. Turn your vehicle's ignition switch to its "ON" position. 3. Immediately flip the valet switch back and forth the number of times noted for the feature you wish to program (to help you count, you will hear a brief horn beep or siren chirp to confirm each flick). 4. Wait for the "Program completion confirmation." 5. Turn the ignition off. Repeat steps 1-4 for any other feature you wish to program. 7"; ..,.. AutoArm ON 4 Beep/Chirp Muting OFF 5 Horn/Siren Volume SOFT 6 AutoLock/AutoUnLock ON 7 AutoArm and Lock OFF 8 FACT AutoArming Entry Delay Alarm Duration ON 9 OFF 10 30 SEC 11 1 chirp = OFF 2 chirps = ON 1chirp = OFF 2 chirps = ON 1 chirp = NORMAL 2 chirps = SOFT 1 chirp = OFF 2 chirps = ON 1 chirp = OFF 2 chirps = ON 1 chirp = OFF 2 chirps = ON 1 chirp = OFF 2 chirps = ON 1 chirp = 60 SEC 2 chirps = 30 SEC Change state from PB ON to OFF or vice-versa Change state from ON to OFF or vice-versa Change state from NORMAL to SOFT or vice-versa Change state from ON to OFF or vice-versa Change state from ON to OFF or vice-versa Change state from OFF to ON or vice-versa Change state from ON to OFF or vice-versa Change state from 60 seconds to 30 seconds or vice-versa VERY IMPORTANT: To ensure critical installation parameters are not changed, he sure NOT to flip the valet switch more than 11 times. 11
-
 1
1 -
 2
2 -
 3
3 -
 4
4 -
 5
5 -
 6
6
 |
 |
