Clifford XL2000 Owners Guide
Clifford XL2000 Manual
 |
View all Clifford XL2000 manuals
Add to My Manuals
Save this manual to your list of manuals |
Clifford XL2000 manual content summary:
- Clifford XL2000 | Owners Guide - Page 1
- Clifford XL2000 | Owners Guide - Page 2
Table of Contents Standard Features 1 Using Your XL2000 Security System 3 4-Button/4-Channel Remote Control 3 How to Interpret the Chirps and Parking Light Flashes 4 How to Interpret the LED Status Indicator 4 Headlight Reminder 4 Protected Valet Mode 5 To turn ON - Clifford XL2000 | Owners Guide - Page 3
Remote remote q MultiRemote™ Recognition - useful for other drivers, since the system will ac- cept up to 4 Clifford remote Remote Controlled Chirp Muting q SmartDoors™ Remote Door Locking/Unlocking - lock/unlock the car doors with the remote Remote Keyless Entry in Valet Mode - remote q Remote Panic - Clifford XL2000 | Owners Guide - Page 4
. Use it to arm or disarm the system, lock or unlock the doors, activate its panic feature or control options such as headlight activation and remote trunk release. TO ARM THE SYSTEM. . . . . . Press button I (switch up) once. You will hear two chirps and the parking lights will flash twice. The - Clifford XL2000 | Owners Guide - Page 5
I-IV with the switch down, may ac- OPTION tivate another remote controlled option, such as the Clifford In- REGARDLESS OF telliStart™ (remote engine starter accessory), electric garage ALARM STATE . . . . . door or another Clifford-equipped vehicle. How to Interpret the Chirps and Parking Light - Clifford XL2000 | Owners Guide - Page 6
your car is either to be serviced by mechanics, handed over to car wash personnel activate other options. Enhanced AutoArming™ If you forget to remotely arm the system, it will arm itself automatically ("passively accidentally leave your vehicle unprotected. XL2000 includes all these Enhanced AutoArming - Clifford XL2000 | Owners Guide - Page 7
spend hours trying to determine where the problem is. Here's how it works: 1. You receive the 4-chirp/4-flash signal upon remote disarming. 2. The LED indicator inside your installer to instantly track down a malfunction and save you servicing costs. To identify the trigger or sensor held in the - Clifford XL2000 | Owners Guide - Page 8
FACT™- False Alarm Control and Test With FACT, you'll never experience repeated false alarms. If your six-sound siren goes off, DO NOT remotely disarm the system while the siren sounds; allow it to run for the full siren duration. Before sounding the siren a second time, the system automatically - Clifford XL2000 | Owners Guide - Page 9
its armed state (these features require optional wiring): 5 Remote Controlled Headlight Activation OR 5 Remote Controlled Window/Sunroof Closure (available only on certain vehicles) This requires installer-only programming. Changing the value will adversely effect operation and may cause damage. 8 - Clifford XL2000 | Owners Guide - Page 10
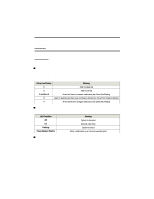
User-Selectable Features Your XL2000 vehicle security system allows you to set many of its features to your own personal preferences. We have made the programming procedures very simple: to make a change, you just flick the valet switch a few times. The system comes from the factory with all of its - Clifford XL2000 | Owners Guide - Page 11
Feature Factory setting # of flicks & chirps Secondary action Program completion confirmation Result Siren Duration 30 sec. 10 Tampering Warning OFF 11 FACT - False Alarm Control and ON 12 Test Add a New Remote to Channel 1 - 13 (arm/disarm) - 1 chirp 3 seconds after last step - Clifford XL2000 | Owners Guide - Page 12
use the Add a New Remote procedures noted in the User-Selectable Features section on pages 9-10 for a total of four times (e.g., if you have one remote control remaining, program it four times; if you have two remote controls, program each twice). © Copyright Clifford Electronics, Inc., 1994 31
-
 1
1 -
 2
2 -
 3
3 -
 4
4 -
 5
5 -
 6
6 -
 7
7 -
8
-
9
-
10
-
11
-
12
 |
 |