Clifford XL2000 Owners Guide - Page 7
Smart AutoTesting™, Automatic Malfunction Bypass, TotalRecall™
 |
View all Clifford XL2000 manuals
Add to My Manuals
Save this manual to your list of manuals |
Page 7 highlights
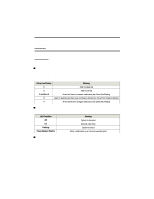
Smart AutoTesting™ Each time you remotely arm your vehicle, it will perform a series of tests on all triggers and sensors. If a trigger malfunction is found, you will be visually and audibly alerted immediately with 4 chirps and flashes instead of the usual 2. If a sensor is malfunctioning, you will receive the usual 2 chirps and flashes, then, a few seconds later, there will be 4 chirps and flashes. Specific Malfunction Identification: The system not only tells you if the problem is a trigger or sensor, but it can also indicate the specific trigger or sensor that is malfunctioning. This feature saves you time and money since your installer won't have to spend hours trying to determine where the problem is. Here's how it works: 1. You receive the 4-chirp/4-flash signal upon remote disarming. 2. The LED indicator inside the vehicle will be flashing, pause, then repeat. 3. Count the number of blinks in one cycle between pauses (for your conven- ience, the blink cycle repeats 5 times) and refer to the chart below: Number of LED blinks between pauses 1 blink 2 blinks 3 blinks Malfunction Vibration/impact sensor or optional sensor Door trigger Trunk or hood trigger Automatic Malfunction Bypass To provide the utmost protection even if a system component malfunctions, the system will automatically bypass the faulty point and arm all other triggers and sensors until you can have the system serviced by your local Authorized Dealer. TotalRecall™ The system's non-volatile memory records the identity of the last activated or malfunctioning trigger or sensor, which allows your installer to instantly track down a malfunction and save you servicing costs. To identify the trigger or sensor held in the system's non-volatile memory, simply perform the following procedure: 1. With the ignition OFF, flick the valet switch to one side. 2. Press button I to "arm" the system, then again to "disarm." 3. The LED will blink several times, pause, then repeat the blink cycle 4 times. 4. Count the number of blinks in one cycle and refer to the chart that follows: Number of LED blinks per cycle 1 blink 2 blinks 3 blinks Trigger/Sensor that Last Activated or Malfunctioned Magnetic Resonance Sensor Door trigger Trunk or hood trigger 6
-
 1
1 -
 2
2 -
 3
3 -
 4
4 -
 5
5 -
 6
6 -
 7
7 -
 8
8 -
 9
9 -
 10
10 -
 11
11 -
 12
12
 |
 |
