Coby CXCD410 Owners Manual - Page 3
Important, Safety, Instructions, Names, Control
 |
View all Coby CXCD410 manuals
Add to My Manuals
Save this manual to your list of manuals |
Page 3 highlights
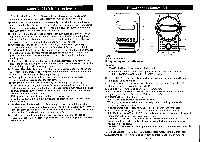
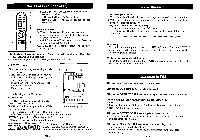
Important Safety Instructions 2 If the plug should still fail to fit, contact your electrician to replace your obsolete outlet. Do not defeat the safety purpose of the polarize plug. 9)Power- Cord or .Protection -- Power-supply cords should be routed so that they are not likely to be walked on or pinched by items placed upon or against them, paying particular attention to cords at plugs, convenience receptacles, and the point where they exit from the product. 10)Lighting -- For added protection for this product during a lighting storm, or when it is left unattended and unused for long periods of time, unplug it from the wall outlet and disconnect the antenna or cable system. This will prevent damage to the product due to lightning and power-line surges. 11)Overloding -- Do not overload wall outlets, extension cords, or integral convenience receptacles as this can result in risk of fire or electric shock. 12)Object and Liquid Entry -- Never push objects of any kind into this product through openings as they may touch dangerous voltage points or short-out parts that could result in a fire or electric shock. Never spill liquid of any kind on the product. 13)Servicing -- Do not attempt to service this product yourself as opening or removing covers may expose you to dangerous voltage or other hazards. Refer all servicing to qualified service personnel. 14)Damage Requiring Service -- Unplug this product from the wall outlet and refer servicing to qualified service personnel under the following conditions: a)when the power-supply cord or plug is damaged. b)if the liquid has been spilled, or objects have fallen into the product. c)if the product has been exposed to rain or water. d)if the product does not operate normally by following the operating instructions. Adjust only those controls that are covered by the operating instructions as an improper adjustment of other controls may result in damage and will often require extensive work by a qualified technician to restore the product to its normal operation. e) if the product has been dropped or damaged in any way. f) when the product exhibits a distinct change in performance _ this indicates a need for service. 15)Replacement Parts -- When replacement parts are required, be sure the service technician has use replacement parts specified by the manufacturer or have the same characteristics as the original part. Unauthorized substitutions may result in fire, electric shock, or other hazards. 16)Heat -- the product should be situated away from heat sources such as radiators, heat registers, stoves, or other products (including amplifiers ) that produce heat. EN-2 Names of Each Control (1) B 0 N D 0 E P Q R TOP A. Cassette holder I B. Tape transport control buttons FRONT C. POWER button -- Turns on and off this unit. The equipment draws nominal non-operating power from the AC outlet with its STANDBY/ON switch in the OFF position. D. TUNING/BAND button -- Use this button to select the tuner mode then to change AM'and FM bands. E. CD/PLAY/PAUSE button -- Use this button to select the CD mode, and start playing, press again to pause the CD. F. TAPE button -- Use this button to select TAPE mode. G. FM ST./MONO button -- In tuner mode, puts the tuner into mono mode typically to reduce noise in weak FM stereo signals. H. STOP button -- Stops the CD play. I . SKIP UP/ SKIP DOWN/ TUNING buttons When playing a CD, use this buttons to skip tracks. Holding down either button cue review functions. While in Tuner mode, these buttons are used to search for broadcasts. J. VOLUME button (+/-) -- Use this button to adjust the volume level. K. REPEAT button -- While in CD mode, this button is used to change the repeat mode, this button switches preset stations up. L. PROGRAM button -- This button is used for program playback of CD or to preset broadcasts. Also used to change between the hours and the minutes when setting a built-in clock. M. OPEN/CLOSE button -- This opens and closes the CD compartment lid while in CD mode. N. Remote Sensor -- To control the unit from there mote, point it at this spot. O. RANDOM button -- Use this button play all tracks on the CD at random. EN-3
-
 1
1 -
 2
2 -
 3
3 -
 4
4 -
 5
5 -
 6
6 -
 7
7 -
 8
8
 |
 |
