Coby TFTV3217 Instruction Manual - Page 4
Unit View - resolution
 |
UPC - 716829963210
View all Coby TFTV3217 manuals
Add to My Manuals
Save this manual to your list of manuals |
Page 4 highlights
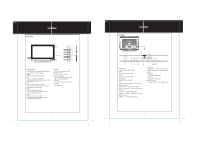
Front Panel Unit View nit ie 10 1 2 3 4 < 5 8 6 9 11 7 1. MODE/ENTER Press to shift modes. While working with the menu, press to confirm settings. 2. MENU Press to display the system menu. 3. CH+ Press to skip channels forward. It also works as the up direction button while working with the menu. 4. CHPress to skip channels backward. It also works as the down direction button while working with the menu. 5. VOL+ Press to increase the volume. It also works as the right direction button while working with the menu. 6. VOLPress to decrease the volume. It also works as the left direction button while working with the menu. 7. POWER Press to turn the power on/off. 8. Remote Sensor Sense the remote signal. 9. Power On Indicator Lights green during normal usage. Lights red during standby. 10. Screen Present the high resolution picture. 11. Speaker Output sound. 3 Rear Panel Unit View nit ie > 8 9 HDMI-2 HDMI-1 VIDEO-OUT AUDIO-R AUDIO-L Y Pb Pr VIDEO-1 AUDIO-R AUDIO-L S-VIDEO OPTICAL 1 2 34 5 6 1. Power Jack Connect with the power supply. 2. HDMI2 Input the audio/video signal. 3. HDMI1 Input the audio/video signal. 4. PC Audio In Input the PC audio signal. 5. VGA Connect with the VGA port on the computer. 6. Component Input YCb/Pb Cr/Pr - - Input the video signal. AUDIO-L, AUDIO-R - - Input the audio signal. 7. AV1 Input VIDEO-1 - - Input the video signal. AUDIO-L, AUDIO-R - - Input the audio signal. 8. AV2 Video Input VIDEO-2 - - Input the video signal. 7 10 11 12 9. AV Output VIDEO-OUT - - output the video signal. AUDIO-L, AUDIO-R - - Output the audio signal. 10. S-VIDEO Input the S-Video signal. 11. OPTICAL Output the audio signal. 12. Antennal Jack Connect with the TV RF signal source. 4
-
 1
1 -
 2
2 -
 3
3 -
 4
4 -
 5
5 -
 6
6 -
 7
7 -
 8
8 -
 9
9 -
 10
10 -
11
-
12
-
13
 |
 |
