Coby TFTV3217 Instruction Manual - Page 5
Remote Control
 |
UPC - 716829963210
View all Coby TFTV3217 manuals
Add to My Manuals
Save this manual to your list of manuals |
Page 5 highlights
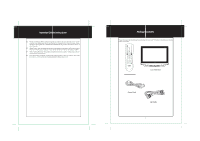
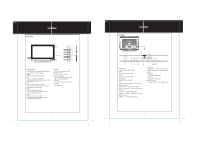
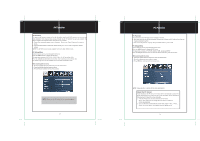
Remote Control e te ntr Remote Control Preparation - Remove the battery compartment cover located on the rear of the remote control. Insert 2 x "AAA" batteries, making sure to match their polarities (+/-) to the markings on the inside of the compartment. Replace the cover. - Batteries in the remote will last for approximately 6 months under normal use. Replace the batteries if the remote control does not work. Do not mix old with new batteries, or different types of batteries. - Remove the batteries from the remote if it will not be used for a long period of time. Warnings: The battery used in this device may present a fire or chemical burn if mistreated. Do not recharge, disassemble, incinerate, or heat the battery (~212ºF). Keep batteries away from children. Using the Remote Control To use the remote, point it at the remote sensor of the player. Operate the remote within 20 feet of the sensor and at an angle of ±30 degrees. 7 s The operating distance may vary depending on the brightness around. Notes: Do not point bright lights directly at the remote control sensor. Do not place objects between the remote control unit and the remote control sensor. Do not use this remote control unit while simultaneously operating the remote control unit of any other equipment. 6 Remote Control e te Remote Control Drawing 1. POWER button Press to turn the power on/off. 2. Numeric Keypad 1 Press to input data. 3. S.Mode Press to select the audio mode. 4. VOLUME +/- button Press to adjust the sound level. 2 5. MENU button Press to show the system menu. 3 6. Sleep button Press to access the sleep timer. 4 7. FAV + button Press to skip the favorite channels forward. 5 8. FAV button Press to display the favorite channel list. 9. FAV - button 6 Press to skip the favorite channels backward. 10. EPG button Access the Electronic Program Guide. 11. SCALE button FAV+ 7 8 FAV- 9 10 Adjust the display effect. 11 12. STILL button 12 Press to freeze the picture. 13. MODE button Press to select the working mode. 023 14. RETURN button Press to return to the previously viewed channel. 15. P.Mode Select the picture mode. 16. CHANNEL+/-button Press to skip channels. 17. Direction &OK While working with the system menu, press the direction buttons to move the cursor and press OK to confirm settings. 18. EXIT button Press to exit the system menu. 19. MTS button Set the ATV audio mode or the DTV audio language. 20. CH-LIST Press to display the channel list. 21. V-CHIP Access the LOCK menu. 22. CAPTION Select the closed caption mode. (CC Off, CC On, CC On Mute) 23. MUTE button Press to muffle/release sound. 24. INFO Press to show the current working information. ntr 13 14 15 16 17 18 19 20 21 22 23 24 5
-
 1
1 -
 2
2 -
 3
3 -
 4
4 -
 5
5 -
 6
6 -
 7
7 -
 8
8 -
 9
9 -
 10
10 -
 11
11 -
12
-
13
 |
 |
