Compaq Presario CQ71-200 Compaq Presario CQ71 Notebook PC and HP G71 Notebook - Page 78
built into the display enclosure
 |
View all Compaq Presario CQ71-200 manuals
Add to My Manuals
Save this manual to your list of manuals |
Page 78 highlights
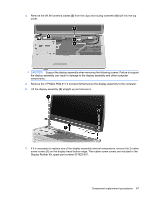
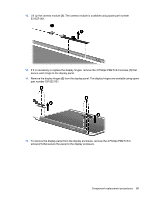
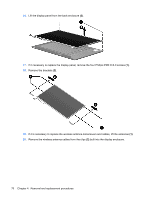
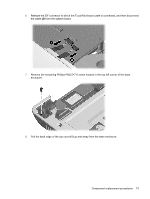
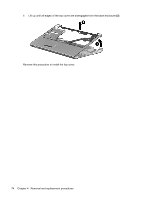
16. Lift the display panel from the back enclosure (2). 17. If it necessary to replace the display panel, remove the four Phillips PM2.0×3.0 screws (1). 18. Remove the brackets (2). 19. If it is necessary to replace the wireless antenna transceivers and cables, lift the antennas (1). 20. Remove the wireless antenna cables from the clips (2) built into the display enclosure. 70 Chapter 4 Removal and replacement procedures
-
 1
1 -
2
-
3
-
4
-
5
-
6
-
7
-
8
-
9
-
10
-
11
-
12
-
13
-
14
-
15
-
16
-
17
-
18
-
19
-
20
-
21
-
22
-
23
-
24
-
25
-
26
-
27
-
28
-
29
-
30
-
31
-
32
-
33
-
34
-
35
-
36
-
37
-
38
-
39
-
40
-
41
-
42
-
43
-
44
-
45
-
46
-
47
-
48
-
49
-
50
-
51
-
52
-
53
-
54
-
55
-
56
-
57
-
58
-
59
-
60
-
61
-
62
-
63
-
64
-
65
-
66
-
67
-
68
-
69
-
70
-
71
-
72
-
 73
73 -
 74
74 -
 75
75 -
 76
76 -
 77
77 -
 78
78 -
 79
79 -
 80
80 -
 81
81 -
 82
82 -
 83
83 -
84
-
85
-
86
-
87
-
88
-
89
-
90
-
91
-
92
-
93
-
94
-
95
-
96
-
97
-
98
-
99
-
100
-
101
-
102
-
103
-
104
-
105
-
106
-
107
-
108
-
109
-
110
-
111
-
112
-
113
-
114
-
115
-
116
-
117
-
118
-
119
-
120
-
121
-
122
-
123
-
124
-
125
-
126
-
127
-
128
-
129
-
130
-
131
-
132
-
133
-
134
-
135
-
136
-
137
-
138
-
139
-
140
-
141
-
142
-
143
-
144
 |
 |

16.
Lift the display panel from the back enclosure
(2)
.
17.
If it necessary to replace the display panel, remove the four Phillips PM2.0×3.0 screws
(1)
.
18.
Remove the brackets
(2)
.
19.
If it is necessary to replace the wireless antenna transceivers and cables, lift the antennas
(1)
.
20.
Remove the wireless antenna cables from the clips
(2)
built into the display enclosure.
70
Chapter 4
Removal and replacement procedures