Craftsman 10137 Operation Manual - Page 11
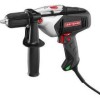
Installing, Installing, Drill, Chuck, Keyless, Button
 |
UPC - 033287137145
View all Craftsman 10137 manuals
Add to My Manuals
Save this manual to your list of manuals |
Page 11 highlights
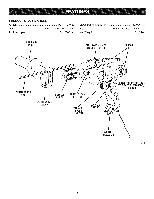
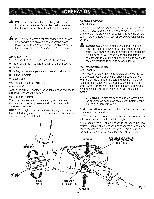
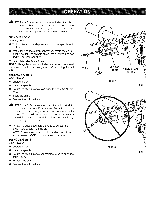
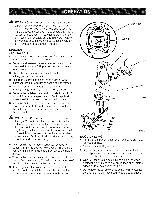
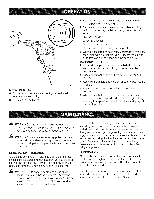
A WARNING: Always unplug the tool when installing or removing bits, adjusting settings, or when the tool is not in use. Failure to unplug the tool may result in accidental starting and serious personal injury. SPINDLE LOCK See Figure 3. [] To lock the spindle, depress and hold the spindle lock button. [] While keeping the button depressed, rotate the chuck clockwise until the spindle clicks into a locked position and will not rotate further. [] To unlock, release the button. NOTE: Always be sure the spindle lock button is released and the spindle lock is disengaged before turning the drill ON. INSTALLING BITS See Figure 3. [] Unplug the drill. [] Lock the spindle. [] Rotate the chuck sleeve clockwise to open the chuck jaws. [] Insert the drill bit. [] Release the spindle lock. A WARNING: Make sure to insert the drill bit straight into the chuck jaws. Do not insert the drill bit into the chuck jaws at an angle then tighten, as shown in figure 4. This could cause the drill bit to be thrown from the drill, resulting in possible serious personal injury or damage to the chuck. [] Rotate the chuck counterclockwise to tighten the chuck jaws securely on the bit. NOTE: Rotate the chuck body in the direction of the arrow marked LOCK to tighten the chuck jaws. REMOVING BiTS See Figure 3. [] Unplug the drill. [] Lock the spindle. [] Rotate the chuck sleeve counterclockwise chuck jaws. [] Remove the drill bit. to open the [] Release the spindle lock. DRILLBIT CHUCK JAWS KEYLESS CHUCK SPINDLELOCK BUTTON RIGHT Fig. 3 WRONG Fig. 4 11
-
 1
1 -
2
-
3
-
4
-
5
-
 6
6 -
 7
7 -
 8
8 -
 9
9 -
 10
10 -
 11
11 -
 12
12 -
 13
13 -
 14
14 -
 15
15 -
 16
16 -
17
-
18
 |
 |
