Craftsman 21514 Operation Manual
Craftsman 21514 - Belt & Disc Sander Manual
 |
View all Craftsman 21514 manuals
Add to My Manuals
Save this manual to your list of manuals |
Craftsman 21514 manual content summary:
- Craftsman 21514 | Operation Manual - Page 1
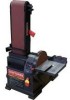
Operator's Manual CRRFISMRN ° 4 x 36" Belt 6" Disc SANDER Model No. 351.215141 CAUTION: Read and follow all Safety Rules and Operating Instructions before First Use of this Product. Keep this manual with tool. Sears, Roebuck and Co., Hoffman www.sears.com/craftsman 30657.00 Draft (04/07/09) - Craftsman 21514 | Operation Manual - Page 2
Troubleshooting Parts Illustration and List Espa_ol 2 2-3 3 3-4 4-5 5-8 8 9 10-13 14-22 ONE-YEAR FULL WARRANTY ON CRAFTSMAN TOOL If this Craftsman Sears, Roebuck and Co., Hoffman Estates, IL 60179 WARNING: For your own safety, read all of the instructions as defined in this manual even if you - Craftsman 21514 | Operation Manual - Page 3
required space to allow for table assembly and belt assembly in horizontal position. E _'B Figure 1 - Unpacking Sander 6" 24" Refer to Figures 2 - 6. CAUTION: Do not attempt assembly if parts are missing. Use this manual to order replacement parts. WARNING: Do not operate machine until completely - Craftsman 21514 | Operation Manual - Page 4
The included table is used with both the disc and belt. To use the table with the disc: ° Position table and 5. POWER SOURCE WARNING: Do not connect sander to the power source until all assembly steps have Check with a qualified electrician if grounding instructions are not understood or if in doubt - Craftsman 21514 | Operation Manual - Page 5
, have repaired by an authorized service facility. ° Green (or green 16. DESCRIPTION The Craftsman Belt and Disc Sander is constructed of guiding the workpiece at a desired angle while sanding. Back stop included for sanding long pieces on the belt. SPECIFICATIONS Belt size Belt platen area Belt - Craftsman 21514 | Operation Manual - Page 6
belt, disc and all moving parts. ° For optimum performance, do not stall motor or reduce speed. Do not force the work into the abrasive. ° Always support workpiece with table or back stop when sanding with belt Turn the switch to OFF position and disconnect sander from power source. • Pull the key - Craftsman 21514 | Operation Manual - Page 7
to Figure 12. • Table is used to support workpiece when sanding on the disc or on the belt, when the belt assembly is in the vertical position. • To with the abrasive belt in a vertical position. Position table on belt side of sander. Move work evenly across abrasive belt. For accuracy, use - Craftsman 21514 | Operation Manual - Page 8
clean. Dirt on drums will cause poor tracking and belt slippage. Periodically empty the dust collection bag. Be certain motor is kept clean and is frequently vacuumed free of dust. Use soap and water to clean painted parts, rubber parts and plastic guards. LUBRICATION The shielded ball bearings in - Craftsman 21514 | Operation Manual - Page 9
Incorrect fuses or circuit breakers in power line 4. Motor overload Machine slows down while operating Applying too much pressure to workpiece Abrasive belt runs off top Not tracking properly wheel CORRECTIVE ACTION 1. Check power line for proper voltage 2. Inspect all lead connections on motor - Craftsman 21514 | Operation Manual - Page 10
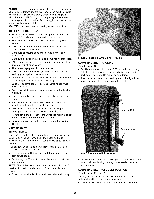
Model 351.2151 41 Figure 17 - Replacement Parts Illustration for Belt Housing 11 ,..b o 35 34 37 36 20 16 \ 39 - Craftsman 21514 | Operation Manual - Page 11
Dust Cover 5-0.8 x 15mm Socket Head Bolt 5-0.8 x 8mm Flat Head Bolt Belt Cover Base Plate Drive Shaft Base Cover Horizontal Stop 8-1.0mm Hex Nut* 5 1 2 1 1 1 1 1 1 1 1 2 2 1 1 8 1 2 KEY iiO. PART NO. 23 STD840508 24 STD870516 25 STD863510 26 N/A 27 23695.00 28 STD852005 29 STD863508 30 23696.00 31 - Craftsman 21514 | Operation Manual - Page 12
Model 351.21 5141 Figure 18 - Replacement Parts Illustration for Motor and Disc 8 ,,,,,.L 1 44 - Craftsman 21514 | Operation Manual - Page 13
Tube 1 36 N/A DusCt hute 10 37 23664.00 Wrench 10 38 STD8634104-0.7x 10ramPanHeadBolt* 4 39 STD8510044mmFlatWasher* 1 4O N/A BottomPlate 6 41 23676.00 V-Belt 2 42 23677.00 MotoPr ulley 2 43 23678.00 Nut 8 44 23679.00 Moto(rincludeKseyNo4. 8) 2 45 STD836025 10-1.x525ramHexHeadBolt* 1 46 - Craftsman 21514 | Operation Manual - Page 14
manual junto con la herramienta. Ingles Ilustraci6n y Lista de Partes Garant[a Reglas de Seguridad Desempaque Montaje Instalaci6n Operaci6n Mantenimiento Identificaci6n de Problemas 2-9 10-13 14 14-15 15 15-16 17-18 18-21 21 22 GARANTIA COMPLETA CRAFTSMAN a estado. Sears, Roebuck and - Craftsman 21514 | Operation Manual - Page 15
13mm. A.... C B Figura 1 - Desempaque de la Lijadora Consulte las Figuras 2-6. PRECAUCION: No intente hacer el montaje si hay partes que faltan. V_.lgase de este manual para solicitar partes de repuesto. ADVERTENClA: No opere la m_.quina hasta que est6 comple- tamente armada. No opere la m_ - Craftsman 21514 | Operation Manual - Page 16
DISCO ABRASIVO Consulte la Figure 4. • Retire la cubierta del disco. Para esto, afloje y extraiga cuatro tornillos. • Retire el recubrimiento de la parte posterior del disco abrasivo. • Coloque el disco abrasivo en el centro del disco de aluminio y presi6nelo con firmeza y de forma pareja. Vuelva - Craftsman 21514 | Operation Manual - Page 17
Consulte las Figuras 7, 8 y 9 en las p_.ginas 17 y 18. FUENTE DE ALIMENTAClON ADVERTENClA: No conecte la lijadora a la fuente de alimenta- ci6n hasta haber cumplido todos los pasos del ensamblaje. El motor ha sido diseSado para funcionar al voltaje y frecuencia especificados. Las cargas - Craftsman 21514 | Operation Manual - Page 18
las Figuras 9-16. DESCRIPClON La Lijadora de correa y disco de Craftsman est,. construida de aluminio fundido a presi6n y hierro forjado robusto .logo de Sears. PREOAUOION: precauciones. Tenga siempre en cuenta las siguientes PRECAUClONES DE SEGURIDAD • Cuando ajuste o cambie partes de la - Craftsman 21514 | Operation Manual - Page 19
. • Se ha suministrado topes positivos ajustables para las posiciones horizontal y vertical. AVISO" El tope limitador horizontal se encuentra ubicado en la parte superior de la base y el tope limitador vertical se encuentra ubicado debajo de la cubierta de la correa. ura 9 - Interruptor Enclavado - Craftsman 21514 | Operation Manual - Page 20
. Tenga mucho cuidado cuando acabe piezas muy delgadas. • Acabado de bordes curvos: Acabe las curvas exteriores en la parte plana de la correa abrasiva. Acabe las curvas interiores en la parte del tambor Ioco de la correa abrasiva. • Acabado del contrahilo: Es m_.s conveniente acabar los extremos de - Craftsman 21514 | Operation Manual - Page 21
polvo acumulado en el motor. Utilice jab6n y agua para limpiar partes pintadas, partes de goma y protectores pl_.sticos. LUBRICAClON Los rodamientos de bola El servicio de reparaci6n est,. disponible en su tienda Sears m_.s cercana. Figura 16 - Extraccibn de la Cubierta del Disco para Reemplazar el - Craftsman 21514 | Operation Manual - Page 22
SINTOMA El motor no arranca CAUSA(S) POSIBLE(S) 1. Voltaje bajo 2. Circuito abierto en el motor o conexiones sueltas El motor no arranca; los fusibles estan quemados o los cortacircuitos se han disparado 3. Interruptor defectuoso 4. Capacitor defectuoso 1. Cortocircuito en el cord6n de - Craftsman 21514 | Operation Manual - Page 23
NOTAS 23 - Craftsman 21514 | Operation Manual - Page 24
the replacement parts, accessories and owner's manuals that you need to do-it-yourself. For Sears professional sears.com www.sears.ca Our Home For repair of carry-in items like vacuums, lawn equipment, and electronics, call anytime for the location of your nearest Sears Parts & Repair Service
-
 1
1 -
 2
2 -
 3
3 -
 4
4 -
 5
5 -
 6
6 -
 7
7 -
8
-
9
-
10
-
11
-
12
-
13
-
14
-
15
-
16
-
17
-
18
-
19
-
20
-
21
-
22
-
23
-
24
 |
 |

Operator's
Manual
CRRFISMRN
°
4 x 36" Belt
6" Disc
SANDER
Model No.
351.215141
CAUTION:
Read and follow
all Safety
Rules and Operating
Instructions
before
First
Use
of this Product.
Keep this
manual
with tool.
Sears,
Roebuck
and
Co.,
Hoffman
Estates,
IL 60179
U.S.A.
www.sears.com/craftsman
30657.00
Draft (04/07/09)