Craftsman 88957 Operation Manual - Page 9
Positionthechuteassemblyoverthe base.See
 |
View all Craftsman 88957 manuals
Add to My Manuals
Save this manual to your list of manuals |
Page 9 highlights
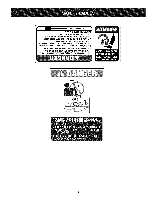
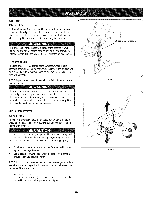
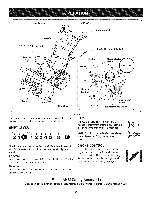
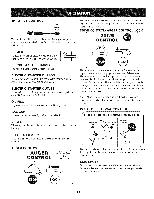
. Positionthechute assemblyoverthe base.See Figure3. 5. Closethe flangekeepersto securethechute assemblyto the chute base.See Figure4. The flangekeeperswill click intoplace whenproperlysecure. NOTE:If the flangekeeperswill noteasily clickinto place,usethe palmof yourhand to applyswift,firm pressureto the backof each. . a. Removetheflat washerand hairpinclip from the end of the chutedirectionalcontrol. b. Insertthe end of the chutedirectionalcontrolinto the lower bracketand securewith the flat washerand hairpinclipjust removed.See Figure5. If necessary,the lowerbracketcan be adjusted.Referto ChuteBracketAdjustmentin the Service& Maintenancesection. f F Figure4 Figure3 \ J Figure5 9
-
 1
1 -
2
-
3
-
 4
4 -
 5
5 -
 6
6 -
 7
7 -
 8
8 -
 9
9 -
 10
10 -
 11
11 -
 12
12 -
 13
13 -
 14
14 -
15
-
16
-
17
-
18
-
19
-
20
-
21
-
22
-
23
-
24
-
25
-
26
-
27
-
28
-
29
-
30
-
31
-
32
-
33
-
34
-
35
-
36
-
37
-
38
-
39
-
40
-
41
-
42
-
43
-
44
-
45
-
46
-
47
-
48
-
49
-
50
-
51
-
52
-
53
-
54
-
55
-
56
-
57
-
58
-
59
-
60
-
61
-
62
-
63
-
64
-
65
-
66
-
67
-
68
-
69
-
70
-
71
-
72
 |
 |

.
5.
Positionthechuteassemblyoverthe base.See Figure3.
Closethe flangekeepersto securethechuteassemblyto the
chute base.See Figure4. The flangekeeperswill click intoplace
whenproperlysecure.
NOTE:Iftheflangekeeperswillnoteasilyclickintoplace,usethe
palmofyourhandtoapplyswift,firmpressuretothebackofeach.
.
a.
b.
Removetheflatwasherand hairpinclip fromthe endof the
chutedirectionalcontrol.
Insertthe endof the chutedirectionalcontrolinto the lower
bracketandsecurewiththeflatwasherandhairpinclipjust
removed.See Figure5.If necessary,thelowerbracketcan
beadjusted.Referto ChuteBracketAdjustmentinthe
Service& Maintenancesection.
Figure4
f
F
Figure3
\
J
Figure5
9