Craftsman M2500R4 Operation Manual
Craftsman M2500R4 - 10 in. Compound Miter Manual
 |
View all Craftsman M2500R4 manuals
Add to My Manuals
Save this manual to your list of manuals |
Craftsman M2500R4 manual content summary:
- Craftsman M2500R4 | Operation Manual - Page 1
.212360 CAUTION: Before using this Miter Saw, read this manual and follow all its Safety Rules and Operating Instructions ● Safety Instructions ● Installation ● Operation ● Maintenance ● Parts List Customer Help Line For Technical Support 1-800-843-1682 Sears Parts & Repair Center 1-800-469-4663 - Craftsman M2500R4 | Operation Manual - Page 2
SECTION Know Your Compound Miter Saw .......... Glossary of Terms Assembly and Adjustments Operation Maintenance Troubleshooting Guide Parts List Repair Protection Agreement WARRANTY PAGE 10 11 12 18 23 24 25 28 CRAFTSMAN ONE YEAR FULL WARRANTY If this Craftsman tool fails due to a defect - Craftsman M2500R4 | Operation Manual - Page 3
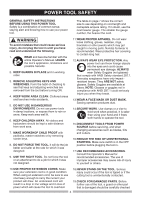
of injury, user and all bystanders must read and understand instruction manual before using this product. KEEP HANDS AWAY FROM BLADE: Failure to keep your hands away from the blade will result in serious personal injury. SUPPORT AND CLAMP WORK ! DANGER DANGER: indicates an imminently hazardous - Craftsman M2500R4 | Operation Manual - Page 4
INSTRUCTIONS with the entire Operator's Manual. LEARN the tool's application get caught in moving parts. Nonslip footwear is WEAR A FACE MASK OR DUST MASK. Sawing operation produces dust. 14.SECURE WORK. DISCONNECT TOOLS FROM POWER SOURCE before servicing, and when changing accessories such - Craftsman M2500R4 | Operation Manual - Page 5
parts, binding of moving parts, breakage of parts, mounting and any other conditions that may affect its operation. A guard or other part best and safest performance. Follow instructions for lubricating and changing accessories. to your health. Always operate saw in well-ventilated area and provide - Craftsman M2500R4 | Operation Manual - Page 6
adequate support to the sides of the saw table for long work pieces. 24. NEVER use the miter saw in an area with flammable liquids or gases. 25. NEVER use solvents to clean plastic parts. Solvents could possibly dissolve or otherwise damage the material. 26. SHUT OFF the power before servicing or - Craftsman M2500R4 | Operation Manual - Page 7
is necessary, do not connect the equipment grounding conductor to a live terminal. CHECK with a qualified electrician or service person if you do not completely understand the grounding instructions, or if you are not certain the tool is properly grounded. USE only three-wire extension cords that - Craftsman M2500R4 | Operation Manual - Page 8
RECOMMENDED ACCESSORIES ! WARNING ● Use only accessories recommended for this miter saw. Follow instructions that accompany accessories. Use of improper accessories may cause hazards. ● The use of any cutting tool except 10 in. saw blades which meet the requirements under recommended accessories is - Craftsman M2500R4 | Operation Manual - Page 9
not attempt to assemble the miter saw, or plug in the power cord until the missing or damaged part is correctly replaced. To avoid electric shock, use only identical replacement parts when servicing double insulated tools. Call 1-800-4-MY-HOME R for replacement parts. Miter Saw Hex Key Hold-Down - Craftsman M2500R4 | Operation Manual - Page 10
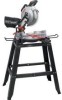
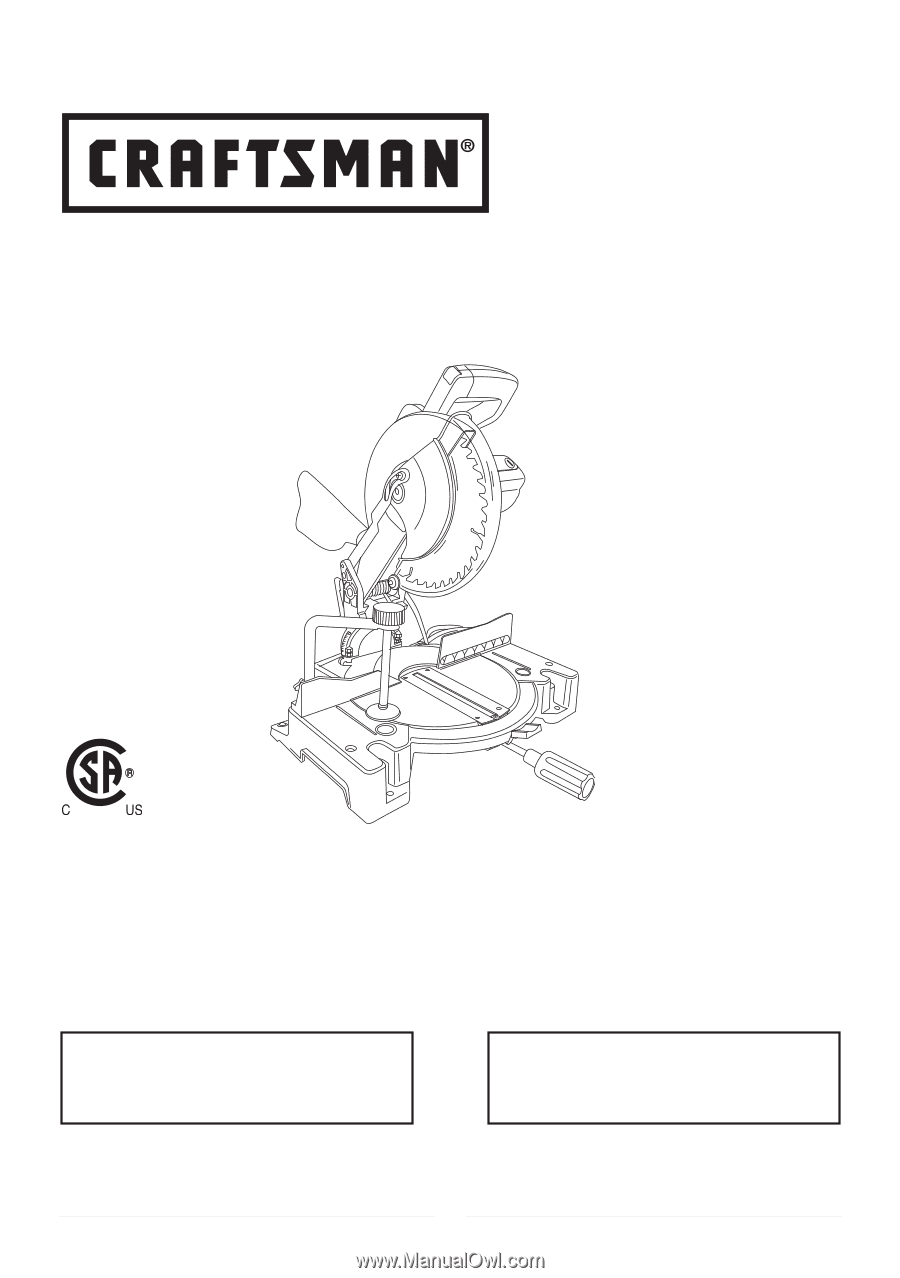
COMPOUND MITER SAW Safety Lock-Off Button Upper Plate Guard Cover Plate Dust Bag Hold-down Clamp Bevel Scale Motor Lower Blade Guard Base Hand Hold for Transportation Miter Angle Pointer Positive Stop Locking Lever Miter Lock Handle ON/OFF Trigger Switch Switch Handle Arbor Lock Laser Guide - Craftsman M2500R4 | Operation Manual - Page 11
top directly in line with the travel of the blade or the part of the workpiece which will be cut. STOP LATCH - Locks the miter saw in the lowered position for compact storage and transportation. SET - The distance between two saw blade tips, bent outward in opposite directions to each other. The - Craftsman M2500R4 | Operation Manual - Page 12
base (2). 2. Place the rear extension stay (3) into the holes provided in the miter saw base. Make sure the angle of stay is in the down position (as shown in Fig. D) for maximum support. 3. Insert the extension stay locking screw back to hole and tighten to hold the extension. Fig. D 2 3 Locking - Craftsman M2500R4 | Operation Manual - Page 13
AND REPLACING THE LASER BATTERIES (FIG. F) • Unplug your miter saw. ! WARNING Failure to unplug your tool could result in connected to the power source outlet. Removing Blade (Fig. G, H, I) 1. Unplug the saw from the outlet. 2. Allow the cutting head to rise to the upright position. Raise the - Craftsman M2500R4 | Operation Manual - Page 14
table and check for any contact with the metal base or the turn table. ADJUSTMENT INSTRUCTIONS Fig. I 6 7 8 6 7 8 Installing Blade (Fig. G, H, 12 1 MITER SCALE (FIG. K) The miter scale assists the user in setting the desired miter angles from 45° left to 45° right. The miter saw table has - Craftsman M2500R4 | Operation Manual - Page 15
(clockwise) to increase the cutting depth. 4. Carefully rotate the blade manually to check for contact. Avoid touching blade points or edges. 5. on the miter table with the rule against the table and the heel of the square against the saw blade. 3. If the blade is not 90° square with the miter table, - Craftsman M2500R4 | Operation Manual - Page 16
holes (10). (Fig. P) Mounting instructions 1. For stationary use, place the saw in the desired location, directly on a workbench where there is room for handling and proper support of the workpiece. The base of the saw has four mounting holes. Bolt the base of the miter saw (1) to the work surface - Craftsman M2500R4 | Operation Manual - Page 17
service center. NOTE: All the adjustments for the operation of this machine have been completed at the factory. Your tool is equipped with the Laser Guide using a Class III laser beam. The laser beam will enable you to preview the saw blade path on the stock to be cut before starting the miter saw - Craftsman M2500R4 | Operation Manual - Page 18
latch, bevel lock handle and cover plate screws. ● Review and understand all safety instructions and operating procedures in this Operator's Manual. (SAFETY & OPERATIONS) ● Review the MAINTENANCE and TROUBLESHOOTING GUIDE for your miter saw. ● To avoid injury or possible death from electrical shock - Craftsman M2500R4 | Operation Manual - Page 19
support for a workpiece that is longer or wider than the basic miter saw table, or to help feed, support, or pull the workpiece. ● Do not use this saw avoid injury, follow all applicable safety instructions, when cutting non-ferrous metals: ● Use only saw blades specifically recommended for non- - Craftsman M2500R4 | Operation Manual - Page 20
blade doesn't stop within 6 seconds, unplug the saw and follow the instructions in TROUBLESHOOTING GUIDE section. Before freeing jammed material: ● Release trigger switch. ● Wait for all moving parts to stop. ● Unplug the miter saw. Fig. S 1 TURNING SAW ON (FIG. T) To reduce the likelihood of - Craftsman M2500R4 | Operation Manual - Page 21
the support of the fence. This will cause the blade to bind and could result in personal injury. NOTE: Always perform a dry run cut so you can determine if the operation being attempted is possible before power is applied to the saw. CUTTING CROWN MOLDING (FIG. Z, AA ) Your compound miter saw is - Craftsman M2500R4 | Operation Manual - Page 22
that the settings are interdependent; changing one changes the other, as well. Fig. Z F e n c e Miter Saw Table Bevel/Miter Settings Fig. AA Settings for standard crown molding lying flat on compound miter saw table Inside Corner OL OR NOTE: The chart below references a compound cut for crown - Craftsman M2500R4 | Operation Manual - Page 23
solvents to clean the miter saw. ! WARNING To avoid injury from unexpected starting or electrical shock, unplug the power cord before working on the saw. ! WARNING For your safety, this saw is double-insulated. To avoid electrical shock, fire or injury, use only parts identical to those identi - Craftsman M2500R4 | Operation Manual - Page 24
section. 2. Contact Sears Service Center. TROUBLESHOOTING GUIDE - SAW OPERATION PROBLEM PROBLEM CAUSE SUGGESTED CORRECTIVE ACTION Blade blade guard after service. 2. Contact Sears Service Center. won't fully close. 3. Sawdust build-up. 3. Clean and lubricate moving parts. Blade binds, - Craftsman M2500R4 | Operation Manual - Page 25
LIST 10 in. COMPOUND MITER SAW MODEL NO. 137.212360 ! WARNING When servicing use only CRAFTSMAN replacement parts. Use of any other parts many create a HAZARD or cause product damage. Any attempt to repair or replace electrical parts on this Miter Saw may create a HAZARD unless repair is done - Craftsman M2500R4 | Operation Manual - Page 26
10 in. COMPOUND MITER SAW SCHEMATIC FOR SAW X3T6 MOAPNEURAALTOR'S X3W2 X3P3 X3P4 2 X3T1 MODEL NO. 137.212360 X3P9 X3TA X3PA X3TA X3PG X3TB2 X3PE X3TC2 X3P2 X3P1 X3PD X3TB 6 X3PC X3TG X3R7X3PH - Craftsman M2500R4 | Operation Manual - Page 27
10 in. COMPOUND MITER SAW MODEL NO. 137.212360 PARTS LIST AND SCHEMATIC FOR MOTOR I.D. Description 1 1 1 1 1 1 1 1 4 1 1 1 1 I.D. Description Size X3QJ LABEL X3QK BRUSH ASS'Y X3QL FLOW GUIDE X3QM CR. RE. PAN HD. TAPPING SCREW ST5*65 X3QN FIELD ASS'Y X3QU HEX. SOC. HD. CAP SCREW M6*25 - Craftsman M2500R4 | Operation Manual - Page 28
Craftsman 10% from regular price of service and related installed parts not covered by the agreement; support from a Sears representative. Think of us as a "talking owner's manual." Once you purchase the Repair Protection Agreement, a simple phone call is all that it takes for you to schedule service - Craftsman M2500R4 | Operation Manual - Page 29
expert troubleshooting and home solutions advice: www.managemyhome.com For repair - in your home - of all major brand appliances, lawn and garden equipment, or heating and cooling systems, no matter who made it, no matter who sold it! For the replacement parts, accessories and owner's manuals that
-
 1
1 -
 2
2 -
 3
3 -
 4
4 -
 5
5 -
 6
6 -
 7
7 -
8
-
9
-
10
-
11
-
12
-
13
-
14
-
15
-
16
-
17
-
18
-
19
-
20
-
21
-
22
-
23
-
24
-
25
-
26
-
27
-
28
-
29
 |
 |
1
Operator’s Manual
10 in. COMPOUND MITER SAW
WITH LASER TRAC
®
Model No. 137.212360
CAUTION:
Before using this Miter Saw,
read this manual and follow
all its Safety Rules and
Operating Instructions
●
Safety Instructions
●
Installation
●
Operation
●
Maintenance
●
Parts List
Sears, Roebuck and Co., Hoffman Estates, IL60179 USA
Visit our Craftsman website: www.sears.com/craftsman
Part No. 13721236001
Printed in China
Customer Help Line
For Technical Support
1-800-843-1682
Sears Parts &
Repair Center
1-800-469-4663