Creative T6 Series II Creative T6 Series II Asia_Americas - Page 1

Creative T6 Series II Manual

Page 1 highlights

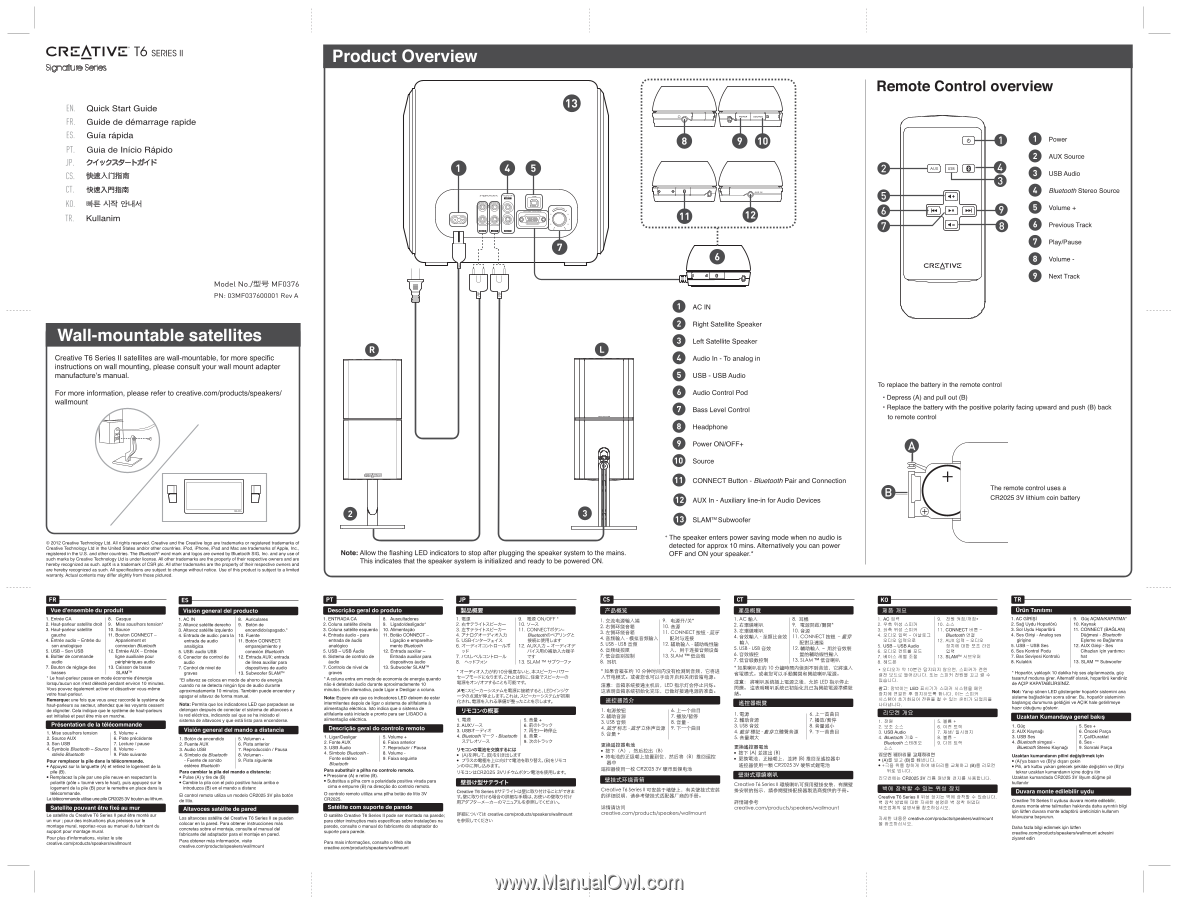
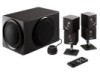
CREATIVE° T6 SERIES II Signature Series EN. Quick Start Guide FR. Guide de demarrage rapide ES. Guia rapida PT. Guia de 'nick) Rapid° JP. CS. 4961A film CT. IMARAM KO. EIHE, TR. Kullanim Model No./ 1.-'4 MF0376 PN: 03MF037600001 Rev A Wall-mountable satellites Creative T6 Series II satellites are wall-mountable, for more specific instructions on wall mounting, please consult your wall mount adapter manufacture's manual. For more information, please refer to creative.com/products/speakers/ wallmount LJ J Oa 2012 Creative Technology Ltd. All rights reserved. Creative and the Creative logo are trademarks or registered trademarks of Creative Technology Ltd in the United States and/or other countries. iPod, iPhone, iPad and Mac are trademarks of Apple, Inc., registered in the U.S. and other countries. The Bluetooth word mark and logos are owned by Bluetooth SIG, Inc. and any use of such marks by Creative Technology Ltd is under license. All other trademarks are the property of their respective owners and are hereby recognized as such. aptX is a trademark of CSR plc. All other trademarks are the property of their respective owners and are hereby recognized as such. All specifications are subject to change without notice. Use of this product is subject to a limited warranty. Actual contents may differ slightly from those pictured. Vue d'ensemble du produit 1. Entrée CA 8. Casque 2. Haut-parleur satellite droll 9. Mise sous/hors tension* 3. Haut-parleur satellite 10. Source gauche 11. Bouton CONNECT - 4. Entrée audio - Entrée du Appariement et son analogique connexion Bluetooth 5. USB - Son USB 12. Entrée AUX - Entrée 6. Boitier de commande ligne auxiliaire pour audio paripheriques audio 7. Bouton de reglage des 13. Caisson de basse basses SLAM'. Le haut-parleur passe en mode economie d'energie lorsqu'aucun son nest atm* pendant environ 10 minutes. Vous pouvez egalement author et desactiver vous-meme votre haut-parleur. Remarque: une fois que vous avez raccorde le systeme de haut-parleurs au secteur, attendez que les voyants cessent de clignoter. Cela indique que le systeme de haut-parleurs est initialise et peut etre mis en marche. Presentation de la telecommande 1. Miss sous/hors tension 2. Source AUX 3. Son USB 4. Symbole Bluetooth - Source stereo Bluetooth 5. Volume + 6. Piste precedents 7. Lecture / pause 8. Volume 9. Piste suivante Pour remplacer la pile dans la telecommande. • Appuyez sur la languette (A) et retirez le logement de la pile (B). • Remplacez la pile par une pile neuve en respectant la polarite (pale + bourne vers le haut), puis appuyez sur le logement de la pile (B) pour le remettre en place dans la telecommande. La telecommande utilise une pile CR2O25 3V bouton au lithium. Satellite pouvant etre lize au mur Le satellite du Creative T6 Series II peut etre monte sur un mur ; pour des instructions plus precises sur le montage mural, reportez-vous au manuel du fabricant du support pour montage mural. Pour plus d'informations, visitez le site creafive.00m/products/speakers/wallmount Vision general del producto 1. AC IN 2. Altavoz satelite derecho 3. Altavoz satelite izquierdo 4. Entrada de audio: para la entrada de audio anal6gica 5. USB: audio USB 6. Conector de control de audio 7. Control de nivel de graves 8. Auriculares 9. Bot6n de encendido/apagado.* 10. Fuente 11. Bot6n CONNECT: emparejamiento y conexion Bluetooth 12. Entrada AUX: entrada de lines auxiliar para dispositivos de audio 13. Subwoofer SLAM"' *El altavoz se coloca en modo de ahorro de energia cuando no se detecta ningCn tipo de audio durante aproximadamente 10 minutos. Iambi& puede encender y apagar el altavoz de forma manual. Note: Permits que los indicadores LED qua parpadean se detengan despues de conectar el sistema de altavoces a la red electrica, indicando sal que se ha iniciado el sistema de altavoces y que café listo para encenderse. Vision general del mando a dlstancla 1. Bot6n de encendido 2. Fuente AUX 3. Audio USB 4. Simbolo de Bluetooth Fuente de sonido estereo Bluetooth 5. Volumen + 6. Pista anterior 7. Reproduccien / Pause 8. Volumen 9. Piste siguiente Para camblar la plla del mando a distends: • Pulse (A) y tire de (B) • Cambie la pile con el polo positivo hacia arriba e introduzca (B) en el mando a distant El control remoto utiliza un modelo CR2O25 3V pile bot6n de litio. Altavoces satelite de pared Los altavoces satelite del Creative T6 Series II se pueden colocar en la pared. Para obtener instrucciones mss concretas sobre el montaje, consults el manual del fabricante del adaptador para el montaje en pared. Para obtener mss information, visite creative.com/products/speakers/wallmount Product Overview CTO O O = I I Fel eo 17r 0 Cl=ijir= Note: Allow the flashing LED indicators to stop after plugging the speaker system to the mains. This indicates that the speaker system is initialized and ready to be powered ON. 0 o of AC IN Right Satellite Speaker Left Satellite Speaker O Audio In - To analog in USB - USB Audio O Audio Control Pod O Bass Level Control 0 Headphone O Power ON/OFF+ O Source CONNECT Button - Bluetooth Pair and Connection AUX In - Auxiliary line-in for Audio Devices SLAMTM Subwoofer The speaker enters power saving mode when no audio is detected for approx 10 mins. Alternatively you can power OFF and ON your speaker.* CEI Descried° geral do produto 1. ENTRADA CA 2. Coluna satelite direita 8. Auscultadores 9. Ligado/desligado* 3. Coluna satelite esquerda 10. Alimentagao 4. Entrada audio - para 11. Botao CONNECT- entrada de audio analOgico 5. USB - USB Audio Ligacao a emparelhamento Bluetooth 12. Entrada auxiliar - 6. Sistema de controlo de Entrada auxiliar para audio dispositivos audio 7. Controlo de nivel de 13. Subwoofer graves *A coluna entra em modo de economia de energia quando nao a detetado audio durante aproximadamente 10 minutos. Em altemativa, pode Ligar e Desligar a coluna. Nota: Espere ate que os indicadores LED deixem de ester intermitentes depois de ligar o sistema de altifalante alimentacao electrica. Isto indica que o sistema de altifalante esta iniciado a pronto para ser LIGADO alimentacao electrica. Descrieao geral do controlo remoto 1. Ligar/Desligar 2. Fonts AUX 3. USB Audio 4. Sfmbolo Bluetooth - Fonte estereo Bluetooth 5. Volume + 6. Faixa anterior 7. Reproduzir / Pausa 8. Volume 9. Faixa seguinte Para substItulr a pllha no controlo remoto. • Pressione (A) e retire (B). • Substitua a piths com a polaridade positiva virada para cima e empurre (B) na direcolo do controlo remoto. O controlo remoto utiliza uma piths botao de Iftio 3V CR2O25. Satelite corn suporte de parede O satelite Creative T6 Series II pode ser montado na parede; para obter instrugoes mais especificas sobre instalao5es na parede, consulte o manual do fabricante do adaptador do suporte para parede. Para mais informagffes, consults o Web site creative.com/products/speakers/wallmount 1. IBS 2. t75 -7-fF•Ae-h- 3. 4. 7/ -la7z1"-F-rztAt 5. USB-f 6. 2t-F-r2I- ::, I, I=I-114 iF 7. I 8. 's•% 9. IBM ON/OFF • 10. V-7, 11. CONNECTitt9SY- BruetoothO),N:7, EAM(Ettlgur 12. AUXAt /C f7~o(1~RbA)jltP 13. SLAM TM #1', - 77 • 2I-- 742I-Atet61031- AgralAL,2lKXe -)3 -/ C7- lEfw.DI„Z".ttLitRIIIE.4.12-eXe-t -o eMe2rypr7vzzLtung-ct. e-t )( :A -=AT-14VeggiztONT6L,LED-r:, gh- -5'0)APIe141.EL, -„ -1/75-.409NE tan, ittlEV14/.tLWASefe.,tcZ:L7Txl..1-,, !J•EM:./01tiE 1.22 2. AUXY-A 3. USBA-- T-x71 4. Bluetooth - Bluetooth AT-L.,7111-A • (A)CtittiC - ,(B)tglgffil,g, • 7 - xoletiffCB,4- ,1uo- cle1evaDVA.,(B)©')₹ 9 '•., L#CR2025 3V9 /Azi(.5,:y2iifft2PHL, a-. 112 1294 h Creative T6 Series ii#7,-rt-itgizewttuzzLe-rg tofficleOilit6Ceog tcg*lilit,8t0Aogl&04,10flq7975,-x -I3- 07=J7n, e011RLC

  • 1
  • 2

CREATIVE°
T6
SERIES
II
Signature
Series
EN.
FR.
ES.
PT.
JP.
CS.
CT.
KO.
TR.
Quick
Start
Guide
Guide
de
demarrage
rapide
Guia
rapida
Guia
de
'nick)
Rapid°
4961A
film
IMARAM
EIHE,
Kullanim
Model
No./
.
1
-'4
MF0376
PN:
03MF037600001
Rev
A
Creative
T6
Series
II
satellites
are
wall
-mountable,
for
more
specific
instructions
on
wall
mounting,
please
consult
your
wall
mount
adapter
manufacture's
manual.
For
more
information,
please
refer
to
creative.com/products/speakers/
wallmount
LJ
J
Oa
2012
Creative
Technology
Ltd.
All
rights
reserved.
Creative
and
the
Creative
logo
are
trademarks
or
registered
trademarks
of
Creative
Technology
Ltd
in
the
United
States
and/or
other
countries.
iPod,
iPhone,
iPad
and
Mac
are
trademarks
of
Apple,
Inc.,
registered
in
the
U.S.
and
other
countries.
The
Bluetooth
word
mark
and
logos
are
owned
by
Bluetooth
SIG,
Inc.
and
any
use
of
such
marks
by
Creative
Technology
Ltd
is
under
license.
All
other
trademarks
are
the
property
of
their
respective
owners
and
are
hereby
recognized
as
such.
aptX
is
a
trademark
of
CSR
plc.
All
other
trademarks
are
the
property
of
their
respective
owners
and
are
hereby
recognized
as
such.
All
specifications
are
subject
to
change
without
notice.
Use
of
this
product
is
subject
to
a
limited
warranty.
Actual
contents
may
differ
slightly
from
those
pictured.
Vue
d'ensemble
du
produit
1.
Entrée
CA
8.
Casque
2.
Haut-parleur
satellite
droll
9.
Mise
sous/hors
tension*
3.
Haut-parleur
satellite
10.
Source
gauche
11.
Bouton
CONNECT
4.
Entrée
audio
Entrée
du
Appariement
et
son
analogique
connexion
Bluetooth
5.
USB
-
Son
USB
12.
Entrée
AUX
Entrée
6.
Boitier
de
commande
ligne
auxiliaire
pour
audio
paripheriques
audio
7.
Bouton
de
reglage
des
13.
Caisson
de
basse
basses
SLAM'.
Le
haut-parleur
passe
en
mode
economie
d'energie
lorsqu'aucun
son
nest
atm*
pendant
environ
10
minutes.
Vous
pouvez
egalement
author
et
desactiver
vous-meme
votre
haut-parleur.
Remarque:
une
fois
que
vous
avez
raccorde
le
systeme
de
haut-parleurs
au
secteur,
attendez
que
les
voyants
cessent
de
clignoter.
Cela
indique
que
le
systeme
de
haut-parleurs
est
initialise
et
peut
etre
mis
en
marche.
Presentation
de
la
telecommande
1.
Miss
sous/hors
tension
2.
Source
AUX
3.
Son
USB
4.
Symbole
Bluetooth
Source
stereo
Bluetooth
Pour
remplacer
la
pile
dans
la
telecommande.
Appuyez
sur
la
languette
(A)
et
retirez
le
logement
de
la
pile
(B).
Remplacez
la
pile
par
une
pile
neuve
en
respectant
la
polarite
(pale
+
bourne
vers
le
haut),
puis
appuyez
sur
le
logement
de
la
pile
(B)
pour
le
remettre
en
place
dans
la
telecommande.
La
telecommande
utilise
une
pile
CR2O25
3V
bouton
au
lithium.
5.
Volume
+
6.
Piste
precedents
7.
Lecture
/
pause
8.
Volume
-
9.
Piste
suivante
Satellite
pouvant
etre
lize
au
mur
Le
satellite
du
Creative
T6
Series
II
peut
etre
monte
sur
un
mur
;
pour
des
instructions
plus
precises
sur
le
montage
mural,
reportez-vous
au
manuel
du
fabricant
du
support
pour
montage
mural.
Pour
plus
d'informations,
visitez
le
site
creafive.00m/products/speakers/wallmount
Vision
general
del
producto
1.
AC
IN
2.
Altavoz
satelite
derecho
3.
Altavoz
satelite
izquierdo
4.
Entrada
de
audio:
para
la
entrada
de
audio
anal6gica
5.
USB:
audio
USB
6.
Conector
de
control
de
audio
7.
Control
de
nivel
de
graves
*El
altavoz
se
coloca
en
modo
de
ahorro
de
energia
cuando
no
se
detecta
ningCn
tipo
de
audio
durante
aproximadamente
10
minutos.
Iambi&
puede
encender
y
apagar
el
altavoz
de
forma
manual.
Note:
Permits
que
los
indicadores
LED
qua
parpadean
se
detengan
despues
de
conectar
el
sistema
de
altavoces
a
la
red
electrica,
indicando
sa
l
que
se
ha
iniciado
el
sistema
de
altavoces
y
que
café
listo
para
encenderse.
8.
Auriculares
9.
Bot6n
de
encendido/apagado.*
10.
Fuente
11.
Bot6n
CONNECT:
emparejamiento
y
conexion
Bluetooth
12.
Entrada
AUX:
entrada
de
lines
auxiliar
para
dispositivos
de
audio
13.
Subwoofer
SLAM"'
Vision
general
del
mando
a
dlstancla
1.
Bot6n
de
encendido
5.
Volumen
+
2.
Fuente
AUX
6.
Pista
anterior
3.
Audio
USB
7.
Reproduccien
/
Pause
4.
Simbolo
de
Bluetooth
8.
Volumen
Fuente
de
sonido
9.
Piste
siguiente
estereo
Bluetooth
Para
camblar
la
plla
del
mando
a
distends:
Pulse
(A)
y
tire
de
(B)
Cambie
la
pile
con
el
polo
positivo
hacia
arriba
e
introduzca
(B)
en
el
mando
a
distant
El
control
remoto
utiliza
un
modelo
CR2O25
3V
pile
bot6n
de
litio.
Altavoces
satelite
de
pared
Los
altavoces
satelite
del
Creative
T6
Series
II
se
pueden
colocar
en
la
pared.
Para
obtener
instrucciones
mss
concretas
sobre
el
montaje,
consults
el
manual
del
fabricante
del
adaptador
para
el
montaje
en
pared.
Para
obtener
mss
information,
visite
creative.com/products/speakers/wallmount
CTO
O O
=
Fel
eo
I
I
17r
0
Cl=ijir=
0
o
o
f
Note:
Allow
Allow
the
flashing
LED
indicators
to
stop
after
plugging
the
speaker
system
to
the
mains.
This
indicates
that
the
speaker
system
is
initialized
and
ready
to
be
powered
ON.
CEI
Descried°
geral
do
produto
1.
ENTRADA
CA
8.
Auscultadores
2.
Coluna
satelite
direita
9.
Ligado/desligado*
3.
Coluna
satelite
esquerda
10.
Alimentagao
4.
Entrada
audio
-
para
11.
Botao
CONNECT—
entrada
de
audio
Ligacao
a
emparelha-
analOgico
mento
Bluetooth
5.
USB
-
USB
Audio
12.
Entrada
auxiliar
6.
Sistema
de
co
ntrolo
de
Entrada
auxiliar
para
audio
dispositivos
audio
7.
Controlo
de
nivel
de
13.
Subwoofer
graves
*A
coluna
entra
em
modo
de
economia
de
energia
quando
nao
a
detetado
audio
durante
aproximadamente
10
minutos.
Em
altemativa,
pode
Ligar
e
Desligar
a
coluna.
Nota:
Espere
ate
que
os
indicadores
LED
deixem
de
ester
intermitentes
depois
de
ligar
o
sistema
de
altifalante
alimentacao
electrica.
Isto
indica
que
o
sistema
de
altifalante
esta
iniciado
a
pronto
para
ser
LIGADO
alimentacao
electrica.
Descrieao
geral
do
controlo
remoto
1.
Ligar/Desligar
2.
Fonts
AUX
3.
USB
Audio
4.
Sfmbolo
Bluetooth
-
Fonte
estereo
Bluetooth
Para
substItulr
a
pllha
no
controlo
remoto.
Pressione
(A)
e
retire
(B).
Substitua
a
piths
com
a
polaridade
positiva
virada
para
cima
e
empurre
(B)
na
direcolo
do
controlo
remoto.
O
controlo
remoto
utiliza
uma
piths
botao
de
Iftio
3V
CR2O25.
5.
Volume
+
6.
Faixa
anterior
7.
Reproduzir
/
Pausa
8.
Volume
-
9.
Faixa
seguinte
Satelite
corn
suporte
de
parede
O
satelite
Creative
T6
Series
II
pode
ser
montado
na
parede;
para
obter
instrugoes
mais
especificas
sobre
instalao5es
na
parede,
consulte
o
manual
do
fabricante
do
adaptador
do
suporte
para
parede.
Para
mais
informagffes,
consults
o
Web
site
creative.com/products/speakers/wallmount
1.
IBS
2.
t75
-
7-f
F•Ae—h
3.
4.
7/
-
la7z1"
F-rztAt
5.
USB-f
6.
2t-F-r2I
-
::
, I,
I=I-114
iF
7.
I
8.
's•%
9.
IBM
ON/OFF
10.
V-7,
11.
CONNECTitt9SY-
BruetoothO)
,
N:7
,
EAM(Ettlgur
12.
AUXAt
-
/C
f7~o(1~RbA)jltP
13.
SLAM
TM
#1',
-
77
2I
--
742I
-
Atet6103
-
1AgralAL,2lKX
e
)3
/
C7
lEfw.DI„Z".ttLitRIIIE.4.12
-
eXe—t
—o
eMe2rypr7vzzLtung
-
ct.
)(
:A
=AT
-
14VeggiztONT6L,LED-r:
,
gh
-
-5'0)APIe
1
41.EL,
-
e
-t
—1/75
-
.409NE
tan,
ittlEV
1
/
4
.tLWASefe
.
,tcZ:L7Txl..1
-
,,
!J•EM:./01tiE
1.22
2.
AUXY—A
3.
USBA
--
T-x71
4.
Bluetooth
-
Bluetooth
AT
-
L.
,
7111
A
(A)Ctitti
-
C,(B)tglgffil,g,
• 7
-
xoletiffCB
,-
4
,1
uo
-
cle1evaDVA.,(B)©')₹
9
'.
,
L#CR2025
3V9
/Azi(
.
5
,
:y2iifft2PHL,
a
-
.
112
12
94
h
Creative
T6
Series
ii#7,-rt-itgizewttuzzLe
-
rg
tofficleOilit6Ceog
tcg*lilit,8t0Aogl&04
,
10
-
flq7975
,—
x
I3
-
07=J7n
,
e011RLC<tc.'
1
,
‘„
15
creative.com/products/speakers/wallmount
cs
O
O
O
0
O
O
AC
IN
Right
Satellite
Speaker
Left
Satellite
Speaker
Audio
In
-
To
analog
in
USB
-
USB
Audio
Audio
Control
Pod
Bass
Level
Control
Headphone
Power
ON/OFF+
Source
CONNECT
Button
-
Bluetooth
Pair
and
Connection
AUX
In
-
Auxiliary
line
-in
for
Audio
Devices
SLAMTM
Subwoofer
The
speaker
enters
power
saving
mode
when
no
audio
is
detected
for
approx
10
mins.
Alternatively
you
can
power
OFF
and
ON
your
speaker.*
7
2
`6"offit
9.
15
1
/)c
11.
CONNECT
ism
-..ty
12.
4attetA
-
SUMItilk
A,
111±AlCitffilat•
13.
SLAM
TM
ef.-,*y.
54A,$MN
1
0
3Aii
,
fttriEl
P4
,
8141
AVEtrili
ViTFP,f11
1ditiO.
112:
,
LED
#N7T4(1*
.
f
iEN:lg.
3AV,IJIMASVAIt5M,
1.
itogip
2.15
fli1,2g
3.
USB
15
15
4
..iff
t.
-
/f
.tf4EM=,21i
5.115+
6.
7.
4U1515
8.
'Mt
-
9.
Odientigiik
15
12
(A)
,
15
11515
(B)
4FIliitMESCUIRM,
/X€154
(B)
*I=IMPI
ggrVi
iaitMgitpq—a
CR2025
3V
1EMMWEI15
.
'th
ellit.gsefrit
Creative
T6
Series
TiJ"VR
ek,
1
erlevR
AtiT
1.-1V4AMEtIFtitilt
ilii.
iTidieZfq
creative.com/products/speakers/wallmount
Remote
Control
overview
AUX
0
I.
II
CREATIVE
O
O
O
O
0
O
Power
AUX
Source
USB
Audio
Bluetooth
Stereo
Source
Volume
+
Previous
Track
Play/Pause
Volume
-
Next
Track
To
replace
the
battery
in
the
remote
control
Depress
(A)
and
pull
out
(B)
Replace
the
battery
with
the
positive
polarity
facing
upward
and
push
(B)
back
to
remote
control
The
remote
control
uses
a
CR2025
3V
lithium
coin
battery
1.
AC
eilA
2
. t
3.
&IIINTOIDA
4
.
-
NAtt,§1
5.
USB
-
USB
6.
'tea
7.
IE,Nallttig
PnARIODA/S3
10
3
-
AINItLIJKAAJTEliM,
811431A
14MfA
.
44/01
-
1(*MINFAlftINVOlollalg.
1101411AIM_MOVA,
5t
LED
15
1541E
IIV)IATRAriltEVJfeit.ELEADOMMSV
8.$A
9.
marmovemm.
10.15115
11.
CONNECT
jP
-,C4f
REPI0.1110
12
.
*EMMA
-
1Elltt,tM
NNOIftet
.
±0A
13.
SLAM
TM
&VANIER
1
.
MN
6.
IMAM
7
.
3.
USB
-osz
8.
fl,RM/J
4
.
&Vela
-
IfInziklaftga
9
.T
-
15
15
01
E.
1151
511€1111,
4P7
(A)
AktiM
(
8
)
RAW&
(B)
svaitfg-E
CR2025
3V
IMANE5t,
Creative
T6
Series
gtetejaRITTMEM***,
15
6615
el.11iVIIREAffitafgeetilWE.
4.
10,1M4
creative.com/products/speakers/wallmount
KO
kla
J).
1.
ACS
2.
15
3.
It
4.
2012
501
-
2012
1s.M2
5.
USB-USB
Audio
6.
2012
2.1515
2E
7.
t111O1
-
2,
,
E
8.
0155
9.
51
5
315/55.
10.
11.
CONNECT
HIS
-
Bluetooth
al
4
12.
AUX
al
-2012
?.'15
Oil
al al
13.
SLAM.
/r1
-`?-11
-
1
*2LI2D1
F4XISIXI
21't,
_^
II
I317I
zX
1
5?EEz01151-101.2t
-L
•11.13I
112
2
,`
LED
RAI717t
L-
-1931
Al
-!
,
g2
01121
Fiaff
1*
-
x18155
eLi
EL
cot
L-
,
11[Ial
S
g`d
LEEEW
212t )(.2
1.
LI
2.
25 55
3.
USB
Audio
4.
Bluetooth
715
-
Bluetooth
L-
HI
212
2.125
H/H2.1z
2X116)21
(A)5
52
(B)5
fIUlLICE.
*IS
20511
8101
HA
Ei
al
a
,2XII
6t2
(B)15
21251
E.1.
al25OIIt
CR2O25
3V
all
mgeLiEl.
5.
Ng
+
6.
Ola
5
2
4
7.
T.Illg/
UAlg
Xl
8.
aff
-
9.
Clg
EL,"
1
4
Oil
g•Itt
T
c
.;',)„
Creative
T6
Series
II
gIl
t
'
1
,
4
011g
24
-
au
'al
gat
WgIO11
2/412
oo@
gat
NE
El
AU54121
tgkIE
5501d
Al2.
701412
1
LNo~
creative.com/products/speakers/wallmount
to
g2,S81NAI2.
El
Oran
Tanitimi
1.
AC
GIRO
2.
Sag
Uydu
HoparlOrO
3.
Sol
Uydu
Hopedale
4.
Sex
Girigi
-
Analog
ses
girigine
5.
USB
-
USB
Ses
6.
Ses
Kontrol
Podu
7.
Bas
Seviyesi
Kontrolit
8.
Kulaklik
9.
Giic
AQMA/KAPATMA*
10.
Kaynak
11.
CONNECT
(BAOLAN)
DO§mesi
-
Bluetooth
Egleme
ve
Ba§lanma
12.
AUX
Girigi
-
Ses
CihazIan
igin
yardimci
hat
13.
SLAM
Subwoofer
HoparlOr,
yaklagik
10
da.kika
hip
ses
algilanmazda,
gup
tasanuf
moduna
girer.
Alternatif
olarak,
hoparlorO
kendiniz
de
ACIP
KAPATABILIRSINIZ.
Not:
Yanip
sOnen
LED
gOstergeler
hoparlOr
sistemini
ana
sisteme
ba§ladiktan
sonra
saner.
Bu,
hoparlOr
sisteminin
baglangig
durumuna
geldi§ini
ye
AcIK
hale
getirilmeye
hazir
oldu§unu
gasterir.
Uzaktan
Kumandaya
gene!
baluq
1.
Gtig
2.
AUX
Kaynagi
3.
USB
Ses
4.
Bluetooth
simgesi
-
Bluetooth
Stereo
Kayna§i
5.
Ses
+
6.
Onceki
Parga
7.
cal/Duraklat
8.
Ses
-
9.
Sonraki
Parga
Uzaktan
kumandanin
pIllnl
de§latIrmek
'gin
(A)'ya
basin
ve
(B)'yi
differ'
Pekin
Pili,
art
kutbu
yukan
gelecek
gekilde
deNtirin
ve
(B)'yi
tekrar
uzaldan
kumandanin
igine
do§ru
itin
Uzaktan
kumandada
CR2O25
3V
lityum
dtigme
pit
kullanilir
Duvara
monte
edilebilir
uydu
Creative
T6
Series
II
uydusu
duvara
monte
edilebilir,
duvara
monte
etme
talimatlan
hakkinda
daha
ayrintili
bilgi
igin
'Offen
duvara
monte
adaptOrU
Oreticinizin
kullanim
kilavuzuna
bagvurun.
Daha
fazla
bilgi
edinmek
igin
laden
creative.com/products/speakers/wallmount
adresini
ziyaret
edin