Cub Cadet CSV 070 Operation Manual
Cub Cadet CSV 070 Manual
 |
View all Cub Cadet CSV 070 manuals
Add to My Manuals
Save this manual to your list of manuals |
Cub Cadet CSV 070 manual content summary:
- Cub Cadet CSV 070 | Operation Manual - Page 1
Safe Operation Practices • Assembly & Set-Up • Controls & Operation • Product Care Operator's Manual Yard Vacuum/Chipper/Shredder with Vacuum/Hose CSV Models 020, 050, 060, 070 Record Product Information Before setting up and operating your new equipment, please locate the model plate and record - Cub Cadet CSV 070 | Operation Manual - Page 2
and follow all instructions on the machine and in the manual(s) before 1. Do not put hands and feet near rotating parts or in the feeding are not covered in this manual, use care and good judgement. Contact Customer Support for assistance and the name of the nearest service dealer. 17. Never run - Cub Cadet CSV 070 | Operation Manual - Page 3
parts have stopped. Disconnect the spark plug wire and ground it against the engine to prevent unintended starting. 4. Keep all guards, deflectors and safety devices in place and operating properly. 5. Maintain or replace safety and instruction labels, as necessary. 6. Follow this manual service - Cub Cadet CSV 070 | Operation Manual - Page 4
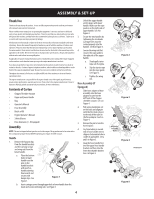
problems or questions concerning the machine, phone an authorized service dealer or contact us directly. Customer Support instructed in the accompanying engine manual BEFORE operating your chipper shredder vacuum aligns with lower handle. Make sure the rope guide is on the right side of upper handle. - Cub Cadet CSV 070 | Operation Manual - Page 5
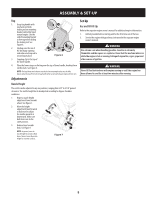
2. Service the engine with gasoline as instructed in the separate engine owner's manual. WARNING nozzle height has to be adjusted according to chipper shredder conditions. 1. Depress nozzle height adjustment lever the nozzle height to vacuum a thick layer of leaves. Lower the nozzle height for - Cub Cadet CSV 070 | Operation Manual - Page 6
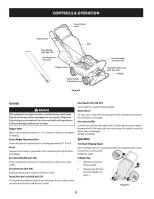
Vac Lever (050, 060, 070) The nozzle/hose vac handle is located on top of the nozzle. Use it to switch vacuum suction between the nozzle and the hose assembly. Hose Handle (050, 060, 070) Used to guide hose assembly when vacuuming manual packed with your chipper/shredder vacuum for instructions on - Cub Cadet CSV 070 | Operation Manual - Page 7
dried out. Materials such as stalks or heavy branches up to 1 1/2" in diameter may be fed into the chipper chute. 1. Place nozzle/hose vac Figure 11 lever in the top position on the nozzle to vacuum through nozzle. See Figure 11. 2. The spring loaded pin must be in the first hole (closest to - Cub Cadet CSV 070 | Operation Manual - Page 8
to the Engine Operator's Manual packed with your chipper/shredder vacuum for all engine maintenance. WARNING Before performing any type of maintenance on the machine, wait for all parts to stop moving and disconnect the spark plug wire. Failure to follow this instruction could result in personal - Cub Cadet CSV 070 | Operation Manual - Page 9
Service Blade Care WARNING Before performing any type of maintenance on the machine, wait for all parts to stop moving and disconnect the spark plug wire. Failure to follow this instruction three hex cap screws holding the chipper chute to the upper housing. Carefully tilt and support the unit up - Cub Cadet CSV 070 | Operation Manual - Page 10
storing the chipper/shredder vacuum in an unventilated or metal create a spark. storage shed, care should be taken to rustproof the non-painted surfaces. Using a light oil or silicone, coat the equipment, especially any springs, bearings, and cables. Troubleshooting Problem Engine fails to - Cub Cadet CSV 070 | Operation Manual - Page 11
Medidas de seguridad • Montaje y Configuración • Controles y Funcionamiento • Cuidado del Producto Manual del operador Aspiradora Para Patios Modelo CSV 020, 050, 060, 070 Registro de información de producto Antes de configurar y hacer funcionar su equipo nuevo, por favor localice la placa de - Cub Cadet CSV 070 | Operation Manual - Page 12
seguridad contenidas en este manual. Al igual que con cualquier tipo de equipo motorizado, un descuido o error por parte del operador puede producir cortadora, la toma de alimentación y la cámara de corte están vacías y sin desechos. 3. Inspeccione minuciosamente todo el material que desea triturar - Cub Cadet CSV 070 | Operation Manual - Page 13
de agua, hornos, secadores de ropa, etc. 8. Deje que la máquina se enfríe por lo menos 5 minutos antes de guardarla. 9. Consulte siempre el manual del operador para conocer las instrucciones adecuadas para el almacenamiento fuera de temporada. 10. Si debe vaciar el tanque de combustible, hágalo al - Cub Cadet CSV 070 | Operation Manual - Page 14
si se la opera y mantiene correctamente. Por favor lea todo este manual antes de operar el equipo. Le indica cómo configurar, operar y y aceite como se indica en las instrucciones que se incluyen en el manual de motor adjunto ANTES de poner en funcionamiento su aspiradora para patios. Manija - Cub Cadet CSV 070 | Operation Manual - Page 15
bolsa a presión con la parte superior de la manija inferior. Figura 6 4. Coloque las tiras inferiores de la bolsa por encima de la parte superior de la manija inferior òn Llenado de gasolina y aceite Refiérase a las instrucciones del manual del motor para la información de motor. 1. Añadir el - Cub Cadet CSV 070 | Operation Manual - Page 16
y Parada del Motor Consulte el manual incluido con su Chipper El operador del motor de vacío / máquina destructora de documentos pico / manguera de la aspiradora (050, 060, 070) La manija del pico / manguera de la aspiradora está situada en la parte superior del pico. Utilícela para alternar la - Cub Cadet CSV 070 | Operation Manual - Page 17
parte posterior de la bolsa para abrirla y vaciar el Figura 10 contenido. Vea la Figura 10. Sostenga la manija y el broche de la bolsa mientras vacía ni aspirar material de mayor tamaño al especificado en la máquina o en este manual. Se podrían producir lesiones o daños a la máquina. IMPORTANTE: - Cub Cadet CSV 070 | Operation Manual - Page 18
el motor Consulte el Manual del operador del motor es se embarcó con su astilladora / desintegradora de vacío para todo el la misma. Vea la Figura 15. 5. Saque el tornillo de cabeza hexagonal de la parte superior de la caja posterior cerca del soporte de montaje, y la tuerca de seguridad - Cub Cadet CSV 070 | Operation Manual - Page 19
herida personal o el daño a la propiedad. NOTA: Cuando incline la unidad, vacíe el depósito de combustible y aceite, y mantenga el lado de la buj Es posible alcanzar las tuercas de los tornillos de cabeza plana desde la parte inferior, mediante una llave universal de 1/2 pulg. con extensión. Vea la - Cub Cadet CSV 070 | Operation Manual - Page 20
bujía es muy pequeña. 2. Ajuste de la mezcla del carburador mal realizada. 1. Hay partes que están flojas o el motor está dañado. 1. El área de descarga limpia y fresca. 4. Vacíe el tanque del combustible. Vuelva a llenarlo con combustible limpio. 5. Consulte el manual del motor. 6. Siempre accione
-
 1
1 -
 2
2 -
 3
3 -
 4
4 -
 5
5 -
 6
6 -
 7
7 -
8
-
9
-
10
-
11
-
12
-
13
-
14
-
15
-
16
-
17
-
18
-
19
-
20
 |
 |

Safe Operation Practices • Assembly & Set-Up • Controls & Operation • Product Care
O
PERATOR
’
S
M
ANUAL
Record Product Information
Before setting up and operating your new equipment, please locate the model plate
and record the information in the area provided to the right. You can locate the
model plate by looking on the top of the drive housing. The model plate contains the
unit’s model and serial numbers. This information will be necessary, should you seek
technical support via our web site, Customer Support Department, or with a local
authorized service dealer.
M
ODEL
N
UMBER
S
ERIAL
N
UMBER
Form No. 769-21550
(May 15, 2019)
WARNING
Read and follow all safety rules and instructions in this manual before attempting to operate this machine. Failure to comply with these instructions
may result in personal injury.
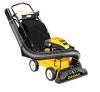
Yard Vacuum/Chipper/Shredder with Vacuum/Hose
CSV Models 020, 050, 060, 070
Safe Operation Prac
tices
..........................................................
2
Assembly & Set-Up
...................................................................
4
Controls & Operation
...............................................................
6
Product Care
...........................................................................
8
español
..................................................................................
11
Replacement Parts
..............................
See Separate Supplement
Warranty
............................................
See Separate Supp
lement
Table of Contents
NOTE:
This Operator’s Manual covers several models. Features may vary by model. Not all features in this manual are applicable to all models and the model depicted may differ from yours.
WARNING
California Proposition 65
This product contains a chemical(s) known to the State of California to cause cancer, birth defects or other reproductive harm.