Cub Cadet CSV 070 Operation Manual - Page 9
Service
 |
View all Cub Cadet CSV 070 manuals
Add to My Manuals
Save this manual to your list of manuals |
Page 9 highlights
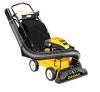
PRODUCT CARE 4. There is now sufficient slack in the drive control cable to grasp the z-fitting with your hand and move it from the front hole to the rear hole of the drive control. See Figure 19. IMPORTANT: Make sure to insert the z-fitting into the rear hole as it was inserted in the front hole, that is from the outside of the drive control. 5. You may now carefully reinstall the drive control by performing the previous steps in the opposite order and manner of removal. Figure 19 IMPORTANT: Once assembled and prior to restarting, make sure that the cable is properly adjusted. With the drive control disengaged, the unit should freely pull in reverse. Service Blade Care WARNING Before performing any type of maintenance on the machine, wait for all parts to stop moving and disconnect the spark plug wire. Failure to follow this instruction could result in personal injury or property damage. NOTE: When tipping the unit, empty the oil and fuel tank and keep engine spark plug side up. 1. Disconnect and ground the spark plug wire to retaining post. 2. Remove bag assembly or blower chute. 3. Remove the three hex cap screws holding the chipper chute to the upper housing. See Figure 20. 4. Remove the flange lock nuts (a), front wheels, and wave washers (b) that attach to the pivot arm assemblies. See Figure 21. 5. Remove the shoulder screws (c), thrust washers (d), and bell washers (e) that go through the pivot arms to the front support brace. The front support brace and lock nut can be removed at this time as well. Figure 20 Bell Washer Front Support Brace/Lock Nut Pivot Arm Assembly Thrust Washer Shoulder Screw Wave Washer (e) (d) (c) (b) Wheel Flange (a) Lock Nut Figure 21 6. Remove the four screws on the upper housing that secure the nozzle cover. See Figure 22. 7. Carefully tilt and support the unit up to provide access underneath to the nozzle mounting hardware and impeller. Remove the three shoulder bolts (a) securing the black plastic lower flail housing to the lower housing. Refer to Figure 23. 8. Tilt top of black plastic lower flail housing toward the engine to remove. 9. Using a 3/16" allen wrench, remove the flat head cap screws (a) that hold the chipper blade to the impeller. These screws are accessible through the opening created when the chipper chute was removed earlier. See Figure 24. 10. The nuts (a) on the flat head cap screws can be reached from underneath using a 1/2-inch socket, universal and extension. See Figure 25. 11. Replace or sharpen chipper blade. The blade can be sharpened with a file or on a grinding wheel. Figure 22 (a) (a) (a) Figure 23 Flat Head Cap Screws (a) Chipper Blade Figure 24 Nuts Impeller (a) (a) Figure 25 WARNING The chipper blade is sharp. When sharpening blade, wear leather work gloves to protect your hands and follow the original angle of grind. 9
-
 1
1 -
2
-
3
-
 4
4 -
 5
5 -
 6
6 -
 7
7 -
 8
8 -
 9
9 -
 10
10 -
 11
11 -
 12
12 -
 13
13 -
 14
14 -
15
-
16
-
17
-
18
-
19
-
20
 |
 |
