Cub Cadet CSV 070 Operation Manual - Page 7
Using The Nozzle Vacuum, Using The Hose Assembly
 |
View all Cub Cadet CSV 070 manuals
Add to My Manuals
Save this manual to your list of manuals |
Page 7 highlights
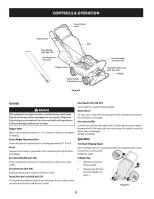
CONTROLS & OPERATION 3. Grasp bag handle with one hand and pull lock rod on mounting bracket with other hand toward engine to release. 4. Lift bag off back of unit. 5. Twist the two buttons on the back of the bag Outer Flap to unlock and empty contents. See Figure 10. Figure 10 Hold bag handle and bag clip while emptying the contents. Buttons Inner Flap 6. Compress bag opening and fold inner flap over opening. 7. Fold outer flap over inner flap and insert buttons on the bag through metal outlets. See Figure 10. 8. Twist the buttons to lock bag. Place bag back onto unit as instructed in Assembly & Set-Up. WARNING Do not at any time make any adjustments without first stopping engine and disconnecting spark plug wire. Using The Nozzle Vacuum Yard waste such as leaves and pine needles can be vacuumed up through the nozzle for shredding. After material has been shredded by the flail blades on the impeller assembly, it will be discharged into catcher bag. Do not attempt to shred or chip any material other than vegetation found in a normal yard (i.e. branches, leaves, twigs, etc.) Avoid fibrous plants such as tomato vines until they are thoroughly dried out. Materials such as stalks or heavy branches up to 1 1/2" in diameter may be fed into the chipper chute. 1. Place nozzle/hose vac Figure 11 lever in the top position on the nozzle to vacuum through nozzle. See Figure 11. 2. The spring loaded pin must be in the first hole (closest to the end of the tube) of the hose adapter to operate the nozzle vac. See Figure 11. 3. Place both hands on top of upper handle to push unit over yard waste. Using The Hose Assembly 1. Place nozzle/ hose vac lever in the bottom position on the nozzle to redirect vacuum to the hose assembly. See Figure 12. 2. The spring loaded pin must be in the second hole of the Figure 12 hose adapter to operate the hose assembly. See Figure 12. 3. Unhook the hose from upper and lower hose handle brackets and grasp the hose handle to guide the hose while vacuuming yard waste such as leaves or pine needles. 4. If necessary, attach the hose extension to vacuum in hard to reach places as follows: a. Insert round end of hose extension into end of hose assembly. b. Secure strap on hose extension to pin on hose assembly. See Figure 13. a b Figure 13 WARNING Do not attempt to shred, chip or vacuum any material larger than specified on the machine or in this manual. Personal injury or damage to the machine could result. IMPORTANT: The flail screen is located inside the housing in the discharge area. If the flail screen becomes clogged, remove and clean as instructed in Product Care. For best performance, it is also important to keep the chipper blade sharp. 7
-
 1
1 -
 2
2 -
 3
3 -
 4
4 -
 5
5 -
 6
6 -
 7
7 -
 8
8 -
 9
9 -
 10
10 -
 11
11 -
 12
12 -
13
-
14
-
15
-
16
-
17
-
18
-
19
-
20
 |
 |
