Cub Cadet PRO X 660 Operation Manual - Page 13
Driving the Mower
 |
View all Cub Cadet PRO X 660 manuals
Add to My Manuals
Save this manual to your list of manuals |
Page 13 highlights
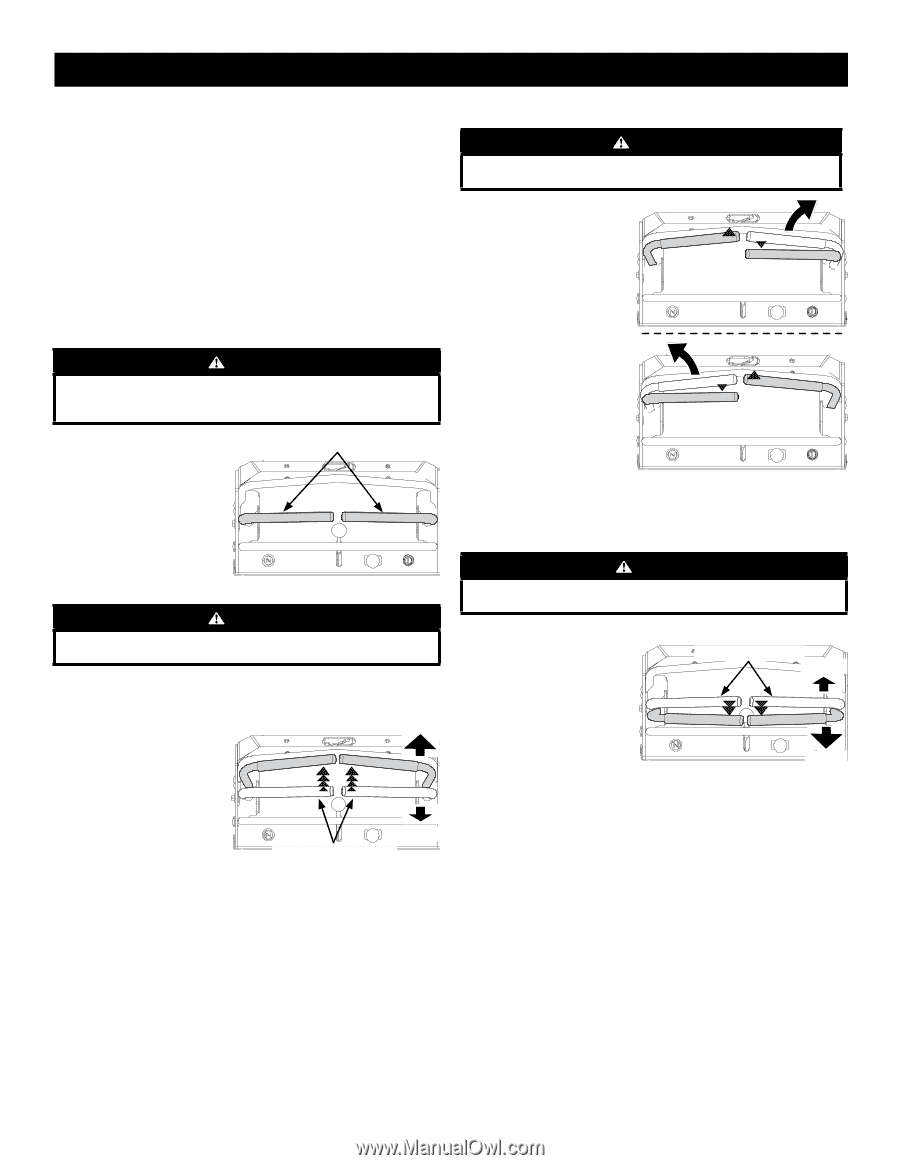
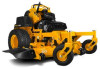
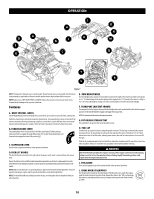
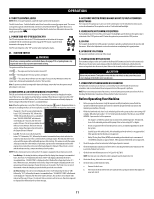
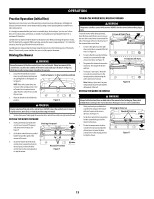
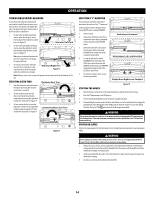
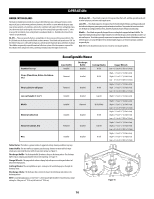
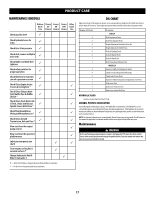
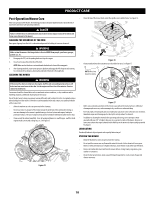
OPERATION Practice Operation (Initial Use) Operating a zero-turn mower is not like operating a conventional type riding mower. Although and because a zero turn mower is more maneuverable, getting used to operating the drive control levers takes some practice. It is strongly recommended that you locate a reasonably large, level and open "practice area" where there are no obstructions, pedestrians, or animals. You should practice operating the mower for a minimum of 30 minutes. Carefully move (or have moved) the mower to the practice area. When performing the practice session, the PTO should not be engaged. While practicing, operate the mower at approximately 1⁄2-3⁄4 throttle and at less than full speed in both forward and reverse. Carefully practice maneuvering the mower using the instructions in the following section "Driving the Mower." Practice until you are confident that you can safely operate the mower. Driving the Mower WARNING Keep all movement of the drive control levers slow and smooth. Abrupt movement of the control levers can affect the stability of the mower and could cause the mower to flip over, which may result in serious injury or death to the operator. 1. Ensure the RH and LH drive control levers are in the neutral position and Control Levers in the neutral position the parking brake is disengaged. See to Figure 8. NOTE: If the drive control levers are not even in the neutral position, refer to Product Care for instructions to adjust the drive control levers so that they are even. 2. Move the throttle to the full throttle position. Figure 8 WARNING Always maintain a firm grip on the control levers. DO NOT release the control levers to slow or stop the mower; move levers to neutral position using your hands. 3. To drive the mower, firmly grasp the respective drive control levers with your right and left hands. DRIVING THE MOWER FORWARD 4. Slowly and evenly move both drive control levers forward. The mower will start to move forward. See Figure 9. Driving Forward Faster 5. As the drive control levers are pushed farther forward the speed of the mower will increase. 6. To slow the mower move the drive controls lever rearward to attain the desired speed, or move the drive control levers to the neutral position to stop the mower. Neutral Position Figure 9 Slower TURNING THE MOWER WHILE DRIVING FORWARD WARNING Sharp turns can affect control of the mower. ALWAYS slow the mower before making sharp turns. To turn the mower while driving forward, move the drive control levers as necessary so that one drive control lever is rearward of the other. The mower will turn in the direction of the rearward drive control lever. Forward Right Turn 1. To turn to the right, move the right drive control lever rearward of the left lever. See Figure 10. 2. To turn to the left, move the left drive control lever rearward of the right drive control lever. See Figure 10. Forward Left Turn 3. The greater the distance between the two levers, the sharper the mower will turn. 4. To execute a "pivot turn," move the turn side drive control lever to the neutral position, while moving the other control lever forward. Note: Making a "pivot turn" on grass will greatly increase the potential for defacement of the turf. Figure 10 DRIVING THE MOWER IN REVERSE WARNING Always look behind and down on both sides of the mower before backing up. Always look behind while traveling in the reverse direction. Mowing in reverse is not recommended. 1. Slowly and evenly move both drive control levers rearward. The mower will start to move in the reverse direction. See Figure 11. Driving in Reverse Neutral Position Slower 2. As the drive control levers are pushed farther rearward the speed of the mower will increase. 3. To slow the mower move the drive control levers forward to attain the desired speed, or move the drive control levers to the neutral position to stop the mower. Figure 11 Faster 13
-
 1
1 -
2
-
3
-
4
-
5
-
6
-
7
-
 8
8 -
 9
9 -
 10
10 -
 11
11 -
 12
12 -
 13
13 -
 14
14 -
 15
15 -
 16
16 -
 17
17 -
 18
18 -
19
-
20
-
21
-
22
-
23
-
24
-
25
-
26
-
27
-
28
-
29
-
30
-
31
-
32
 |
 |