Cub Cadet PRO X 660 Operation Manual - Page 19
Engine Care, Battery Information
 |
View all Cub Cadet PRO X 660 manuals
Add to My Manuals
Save this manual to your list of manuals |
Page 19 highlights
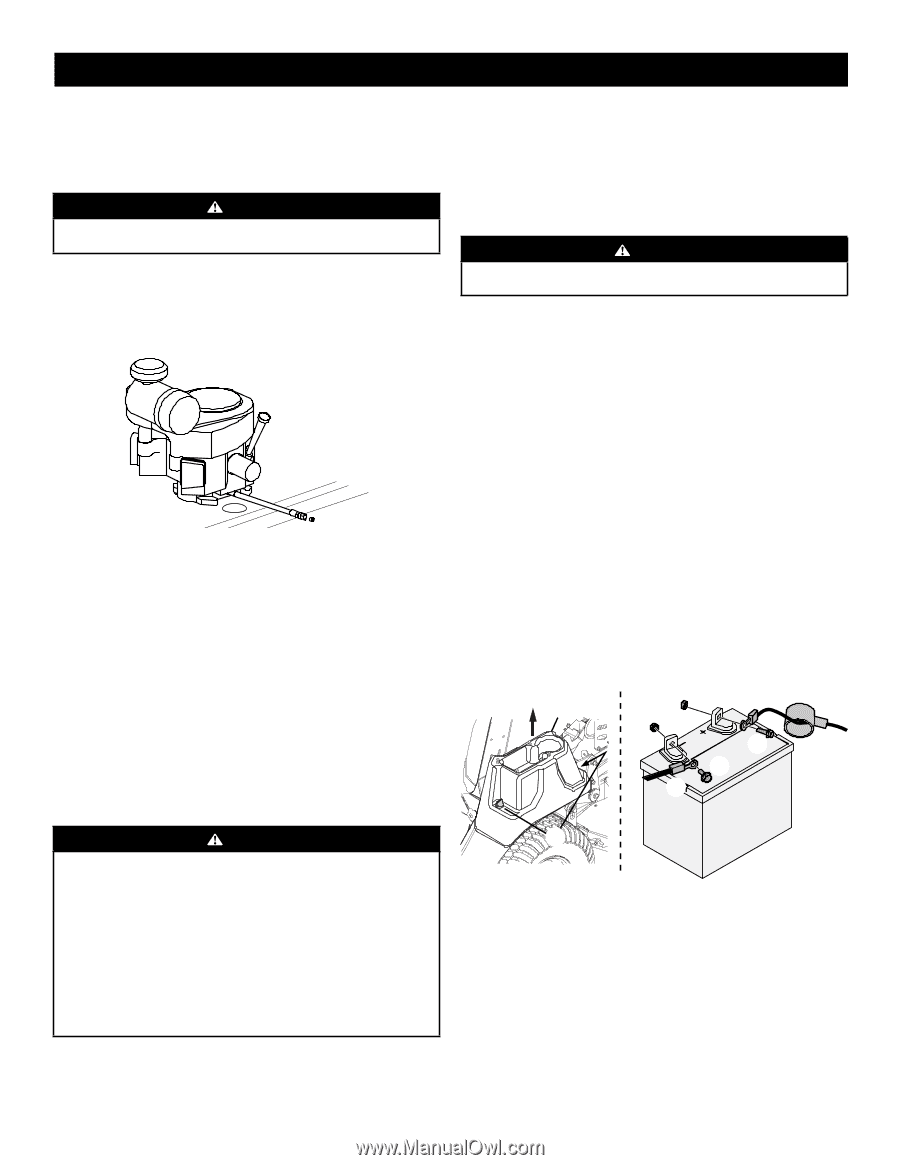
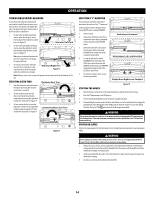
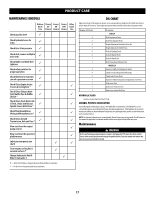
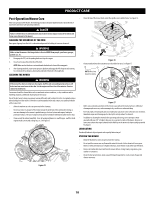
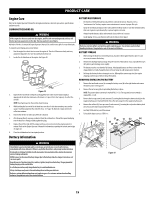
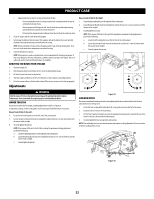
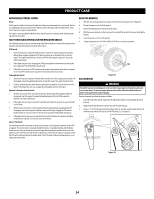
PRODUCT CARE Engine Care Refer to the Engine Operator's Manual for all engine maintenance intervals, procedures, specifications and instructions. CHANGING THE ENGINE OIL WARNING If the engine has been recently run, the engine, muffler and surrounding metal surfaces will be hot and can cause burns to the skin. Exercise caution to avoid burns. Maintain oil level as instructed in Engine Operator's Manual. Be careful not to spill oil on any of the belts. To complete an oil change, proceed as follows: 1. Run the engine for a short time to warm the engine oil. The oil will flow more freely and carry away more impurities. Use care to avoid burns from hot oil. 2. Locate the oil drain hose on the engine. See Figure 18. Figure 18 3. Route the free end of the oil drain hose through the hole in the mower frame toward an appropriate oil collection container with at least a 2.5 quart (2.65 Liter) capacity, to collect the used oil. NOTE: Avoid getting oil on the muffler when draining. 4. While holding the free end of the oil drain hose over the oil collection container, unscrew the square-head hose plug from the end of the hose. See Figure 18. Drain the engine oil into the collection container. 5. Remove the oil filter to make sure all the oil is drained. 6. After draining the oil, wipe any residual oil from the oil drain hose. Thread the square head plug into the drain hose fitting and fully tighten the plug. 7. Replace the oil filter and refill the engine with new oil as instructed in the engine operator's manual. Refer to the Engine Operator's Manual for information regarding the volume and weight of engine oil. 8. Place the oil drain hose back in original position. Battery Information BATTERY MAINTENANCE • The battery is filled with battery acid and then sealed at the factory. However, even a "maintenance free" battery requires some maintenance to ensure its proper life cycle. • Spray the terminals and exposed wire with a battery terminal sealer, or coat the terminals with a thin coat of grease or petroleum jelly, to protect against corrosion. • Always keep the battery cables and terminals clean and free of corrosion. • Avoid tipping. Even a sealed battery will leak electrolyte when tipped. WARNING Batteries contain sulfuric acid and may emit explosive gases. Use extreme caution when handling batteries. Keep batteries out of the reach of children. BATTERY STORAGE 1. When storing the mower for extended periods, disconnect the negative battery cable. It is not necessary to remove the battery. 2. All batteries discharge during storage. Keep the exterior of the battery clean, especially the top. A dirty battery will discharge more rapidly. 3. The battery must be stored with a full charge. A discharged battery can freeze sooner than a charged battery. A fully charged battery will store longer in cold temperatures than hot. 4. Recharge the battery before returning to service. Although the mower may start, the engine charging system may not fully recharge the battery. REMOVING/INSTALLING THE BATTERY 1. Remove the two thumb screws (a) securing the battery cover (b) to the right fender and remove the battery cover. See Figure 19. 2. Remove the nut securing the strap holding the battery in place. NOTE: The positive battery terminal is marked POS. (+) (c). The negative battery terminal is marked NEG. (-) (d). 3. Remove the hex cap screw (e) and sems nut (f) securing the black negative battery lead (g) to the negative battery post (marked NEG) (d). Move the cable away from the negative battery post. 4. Remove the red boot (h), hex cap screw (i) and sems nut (j) securing the red positive battery lead (k) to the positive battery post (marked POS) (c). 5. Carefully lift the battery out of the mower. 6. To Install the battery reverse STEPS 1-5. (j) (c) (k) (h) (b) (f) (d) (i) (e) (g) WARNING Should battery acid accidentally splatter into the eyes or onto the skin, rinse the affected area immediately with clean cold water. If there is any further discomfort, seek prompt medical attention. If acid spills on clothing, first dilute it with clean water, then neutralize with a solution of ammonia/ water or baking soda/water. NEVER connect (or disconnect) battery charger clips to the battery while the charger is turned on, as it can cause sparks. Keep all sources of ignition (cigarettes, matches, lighters) away from the battery. The gas generated during charging can be combustible. As a further precaution, only charge the battery in a well ventilated area. Always shield eyes and protect skin and clothing when working near batteries. Batteries contain sulfuric acid and may emit explosive gases. Use extreme caution when handling batteries. Keep batteries out of the reach of children. (a) Figure 19 19
-
 1
1 -
2
-
3
-
4
-
5
-
6
-
7
-
8
-
9
-
10
-
11
-
12
-
13
-
 14
14 -
 15
15 -
 16
16 -
 17
17 -
 18
18 -
 19
19 -
 20
20 -
 21
21 -
 22
22 -
 23
23 -
 24
24 -
25
-
26
-
27
-
28
-
29
-
30
-
31
-
32
 |
 |