Cub Cadet TANK SZ 60 TANK SZ 48 Operator's Manual - Page 13
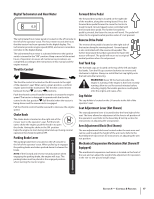
Steering Wheel Column
 |
View all Cub Cadet TANK SZ 60 manuals
Add to My Manuals
Save this manual to your list of manuals |
Page 13 highlights
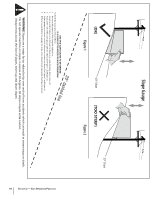
8. Move the upper ROPS section to the upright position, and insert the locking pins with their retainer hairpin clips. See Fig. 3-6. 3. Place the belleville washer over the steering wheel and secure with the hex lock screw. See Fig. 3-8. Locking Pin Steering Wheel Cover Retainer Hairpin Clips Hex Lock Screw Belleville Washer Locking Pin Figure 3-6 Steering Wheel Column The steering wheel column is tilted all the way back for shipping purposes. To tilt the column forward, rotate the steering column adjustment lever down, place the column in the desired position and then rotate the lever up to secure the column in place. See Fig. 3-7. Figure 3-8 4. Place the steering wheel cover over the center of the steering wheel and push downward until it "clicks" into place. Proper steering column and seat adjustment will result in the following (to adjust the seat see below): In the neutral position with hands on the steering wheel, • Operator's upper arms should be relaxed and approximately vertical. • Operator's forearms should be approximately horizontal. • Operator's back should stay in contact with the seat back. • Steering column should not contact operator's legs. Check the results of any adjustments to the conditions described above. Repeat any adjustment procedures as required until all conditions are met. Steering Column Adjustment Lever Figure 3-7 NOTE: Be sure that the steering column adjustment lever is tight to prevent the column from moving when operating the machine. Steering Wheel 1. Remove the hardware for attaching the steering wheel from beneath the steering wheel cap. Carefully pry off the steering wheel cover to remove the hardware. 2. With the wheels of the machine pointing straight forward, place the steering wheel over the steering shaft. Section 2 - Assembly & Set-Up 13
-
 1
1 -
2
-
3
-
4
-
5
-
6
-
7
-
 8
8 -
 9
9 -
 10
10 -
 11
11 -
 12
12 -
 13
13 -
 14
14 -
 15
15 -
 16
16 -
 17
17 -
 18
18 -
19
-
20
-
21
-
22
-
23
-
24
-
25
-
26
-
27
-
28
-
29
-
30
-
31
-
32
-
33
-
34
-
35
-
36
-
37
-
38
-
39
-
40
-
41
-
42
-
43
-
44
 |
 |
