Cub Cadet TANK SZ 60 TANK SZ 48 Operator's Manual - Page 32
Brakes, Removing/Installing the Inner Baffle
 |
View all Cub Cadet TANK SZ 60 manuals
Add to My Manuals
Save this manual to your list of manuals |
Page 32 highlights
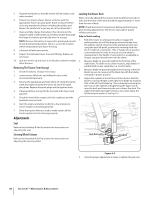
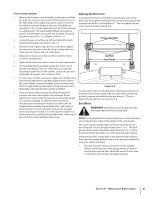
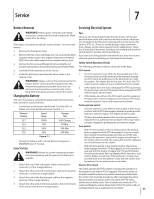
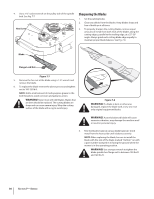
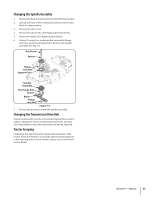
2. Remove the flange lock nut and carriage bolt securing the front deck wheel and spacer to the deck. Remove the wheel and carriage bolt. Refer to Fig. 6-5. 2. Adjust the cable housing nuts one full turn and check parking capacity. Repeat if parking brake does not hold. See Fig. 6-6. Flange Lock Nut Handbrake Bracket Carriage Bolt Spacer Deck Wheel Cable Housing Nut Left Transmission Right Transmission Figure 6-5 3. Determine which index hole will give the deck wheel a 1⁄4" to 1⁄2" clearance with the ground. 4. Insert the carriage bolt through the appropriate index hole in the deck wheel bracket, through the spacer, the deck wheel and out the other side of the bracket. 5. Note the index hole of the just adjusted wheel, and adjust the other deck wheel to the same height as instructed in step 3. Brakes The parking brake handle should engage with moderate force. The brake cable should not require adjustment, but if necessary proceed as follows: 1. Flip up the seat and secure in place with the seat prop. Remove the battery as instructed in the Service section. NOTE: There is a cable for each of the transmissions, be sure to adjust both cables. Figure 6-6 NOTE: To adjust the right transmission cable, it is recommended that you remove the left transmission cable by loosening it until Z-fitting can be removed from the handbrake bracket. After adjusting the right brake cable, re-install the left brake cable and adjust as necessary. Removing/Installing the Inner Baffle The inner flow-control baffle can be removed depending on the mowing conditions. The baffle controls discharge and can be removed for high-volume grasses and installed for precision cutting. 1. Remove the carriage bolts, push nuts and flange lock nuts that secure the baffle to the deck to mow high-volume grasses. See Fig. 6-7. Carriage Bolts Push Nut Inner Baffle 32 Section 6- Maintenance & Adjustments Push Nut Flange Lock Nuts Figure 6-7 2. Re-install the inner baffle for precision cutting and make sure the baffle is properly secured.
-
 1
1 -
2
-
3
-
4
-
5
-
6
-
7
-
8
-
9
-
10
-
11
-
12
-
13
-
14
-
15
-
16
-
17
-
18
-
19
-
20
-
21
-
22
-
23
-
24
-
25
-
26
-
 27
27 -
 28
28 -
 29
29 -
 30
30 -
 31
31 -
 32
32 -
 33
33 -
 34
34 -
 35
35 -
 36
36 -
 37
37 -
38
-
39
-
40
-
41
-
42
-
43
-
44
 |
 |
