Cuisinart MG-100 User Manual - Page 5
To Make Sausages
 |
View all Cuisinart MG-100 manuals
Add to My Manuals
Save this manual to your list of manuals |
Page 5 highlights
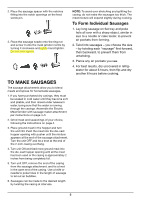
2. Place the sausage spacer with the notches fitting into the notch openings on the feed screw pin. 3. Place the sausage nozzle onto the ring nut and screw it onto the meat grinder nozzle by turning it clockwise and lightly hand tighten. Do not over tighten. NOTE: To avoid over-stretching and splitting the casing, do not make the sausages too thick. The meat mixture will expand slightly during cooking. To Form Individual Sausages 1. Lay long sausage on flat tray and poke hole all over with a sharp object, similar in size to a needle or cake tester, to prevent air pockets from forming. 2. Twist into sausages - you choose the size - by twisting each "sausage" first forward, then backward, to prevent them from untwisting. 3. Pierce any air pockets you see. 4. For best results, dry uncovered in refrigerator for about 6 hours, then flip and dry another 6 hours before cooking. TO MAKE SAUSAGES The sausage attachments allow you to blend meats and spices for homemade sausages. 1. If you have purchased dry casings, they must be soaked in cold water until they become soft and pliable, and then rinsed under lukewarm water, being sure that the water is running through the casings. Assemble the Electric Meat Grinder with sausage maker attachment per instructions on page 4-5. 2. Grind meat and seasonings of your choice, following the instructions on page 4. 3. Place ground meat in the hopper and turn the unit ON. Push the meat into the die-cast hopper opening with pusher until the mixture appears at the end of the sausage attachment. Turn the unit OFF and tie a knot at the end of the 2-inch casing overhang. 4. Turn unit ON and feed more ground meat into the die-cast hopper opening until all the meat has been used or the casing is approximately 2 inches from being completely full. 5. Turn unit OFF, remove the end of the casing from the sausage attachment, and tie a knot in the open end of the casing. Use a knife or needle to poke holes in the length of sausage to let out air bubbles. 6. Sausages can be made to the desired length by twisting the casing at intervals. 5
-
 1
1 -
 2
2 -
 3
3 -
 4
4 -
 5
5 -
 6
6 -
 7
7 -
 8
8 -
 9
9 -
 10
10 -
 11
11 -
12
-
13
-
14
-
15
-
16
 |
 |
