Cuisinart SM-50 Quick Reference - Page 1
Cuisinart SM-50 Manual
 |
View all Cuisinart SM-50 manuals
Add to My Manuals
Save this manual to your list of manuals |
Page 1 highlights
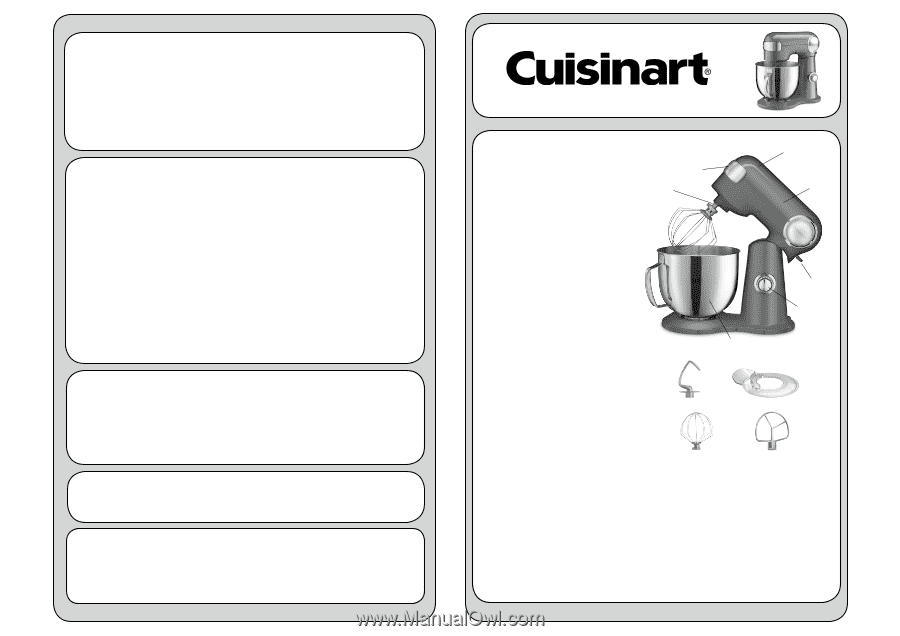
OPERATION Position the Stand Mixer The logo plate that covers the attachment port should face you. To Turn Stand Mixer On Turn control dial to desired speed - 1 through 12 (see Speed Control Guide on page 6). To Turn Stand Mixer Off Turn the dial to "0" OFF position. Mixing process stops and unit shuts off. ASSEMBLY INSTRUCTIONS 1. Raise Mixer Head - Push down the head-lift release lever and raise the stand mixer head until it locks into place. 2. Attach Accessory - Place flat mixing paddle, chef's whisk or dough hook into the accessory port. Push up and turn counterclockwise until it locks. Turn clockwise to remove. 3. Place Bowl on Base - Turn clockwise to secure. 4. Lower Mixer Head - Holding the stand mixer head, push down the head-lift lever again and fully lower the mixer head. 5. To Attach Splash Guard with Pour Spout - After attaching the accessory and lower- ing the stand mixer head, slide the splash guard onto the bowl. Attach the pour spout by placing it into the tabs on the splash guard ring and slide it into place. The splash guard ring can rotate in any direction to more easily add ingredients. To remove: Remove the pour spout from the splash guard and slide splash guard off the bowl. MAXIMUM CAPACITIES • Yeast doughs (most breads, pizza) - 6 cups white flour • Cookie dough - 5 dozen cookies • Whipping cream - 6 cups liquid (12 cups whipped) • Egg whites - 12 large Refer to Page 5 of Instructional Manual for Cleaning and Maintenance. Refer to Page 6 of Instructional Manual for Suggested Speed Control Guide. IMPORTANT! Do not discard. Read before operating your new Precision Master™ Stand Mixer. Keep for further reference. These helpful hints are intended to be a supplement to the Instruction Booklet. In order to ensure proper operation and optimum performance, please read the entire Instruction Booklet. GUÍA DE REFERENCIA RÁPIDA Batidora de pie Precision Master™ PIEZAS Y 1. CARACTERÍSTICAS 3. 1. Motor de 500 vatios Suficiente potente para las recetas 4. 2. grandes y las tareas difíciles. 2. Cabezal inclinable Permite instalar/retirar los accesorios y raspar el bol con facilidad. 3. Puerto de conexión para aditamentos Permite conectar el aditamento moledor de carne y los aditamentos para hacer pasta (vendidos por separado) a la batidora. Nota: el puerto de conexión se encuentra 6. atrás del panel delantero. Un tornillo hace que sea fácil instalar y retirar los aditamentos. 4. Puerto de conexión para accesorios 7, 8 Permite conectar el batidor de alambre, el batidor plano, el gancho amasador y una cubierta antisalpicaduras. 5. 5. Bol de 5.5 cuartos de galón (5.2 L) con asa El asa hace que sea fácil alzar, sostener, raspar y retirar el bol. El bol de alta capacidad permite mezclar cantidades más grandes. 6. Palanca de liberación del cabezal 11. 12. Permite inclinar el cabezal y antenerlo en posición inclinada de manera segura. También se usa para regresar el cabezal a su posición original. 7. Perilla de encendido/apagado/control de velocidad 9. 10. 12 velocidades, para resultados precisos. 8. Aro luminoso azul Se enciende durante el funcionamiento. Se apaga cuando el aparato está apagado. 9. Batidor de alambre Incorpora aire a las mezclas. Ideal para batir huevos, claras o crema líquida y preparar recetas tales como pastel de ángel, torta "chiffon", merengue y malvaviscos. También es perfecto para preparar puré de papas rápidamente. 10. Batidor plano Revuelve, mezcla y bate. Ideal para preparar galletas, pastel, mezclas y glaseados/coberturas. También es perfecto para hacer fondos de tarta, bollos y "shortcakes", así como para mezclar los ingredientes del pan de carne o de las albóndigas. 11. Gancho amasador Especialmente diseñado para mezclar y amasar masa de levadura para hacer pan, panecillos, pizza/focaccia, pasta y "coffee cakes" de masa fermentada. 12. Cubierta antisalpicaduras con pico vertedor Evita las salpicaduras durante la mezcla y al agregar ingredientes. Guía los ingredientes hacia el bol. PG-35382-ESP
-
 1
1 -
 2
2
 |
 |