Cuisinart SM-50 Quick Reference - Page 2
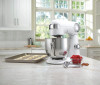
Precision Master, Stand Mixer
 |
View all Cuisinart SM-50 manuals
Add to My Manuals
Save this manual to your list of manuals |
Page 2 highlights
INSTRUCCIONES DE OPERACIÓN Ubique la batidora La placa que cubre el puerto de conexión para aditamentos debería hacerle frente. Para encender la batidora Gire la perilla de control de velocidad al nivel deseado, desde 1 hasta 12 (véase la guía de velocidad en la página 6). Para apagar la batidora Ponga la perilla en la posición de apagado "0"; la unidad se apagará. INSTRUCCIONES DE ENSAMBLAJE 1. Incline el cabezal hacia atrás - Presione la palanca de liberación del cabezal y alce el cabezal hasta que se bloquee. 2. Instale el accesorio deseado - Conecte el batidor plano, el batidor de alambre o el gancho amasador al puerto de conexión para accesorio. Empuje y gire en sentido anti horario hasta que se bloquee. Gire en sentido horario para retirarlo. 3. Coloque el bol sobre la base - Gire en sentido horario para sujetarlo. 4. Baje el cabezal - Sosteniendo el cabezal con una mano, presione la palanca de liberación otra vez y baje completamente el cabezal. 5. Instale la cubierta antisalpicaduras Después de haber conectado el accesorio y bajado el cabezal, deslice la cubierta sobre el bol e instale el pico vertedor, introduciéndolo entre las patas de la cubierta. Nota: la cubierta antisalpicaduras gira en ambas direcciones, lo que permite agregar ingredientes fácilmente. Para retirarla: primero retire el pico vertedor, y luego deslice la cubierta antisalpicaduras fuera del bol. CAPACIDADES MÁXIMAS • Masa de levadura (pan, pizza) - 6 tazas (750 g) de harina blanca • Masa de galletas - 5 docenas de galletas • Crema batida - 6 tazas (1.4 L) de crema líquida (rinde el doble de crema batida) • Claras de huevo - 12 claras de huevo grande Véase las instrucciones de limpieza y mantenimiento en la página 5 del manual de instrucciones. Véase la guía de velocidad en la página 6 del manual de instrucciones. ¡IMPORTANTE! No tire este folleto a la basura. Lea esta información antes de usar su nueva Batidora de pie Precision Master™. Guarde esta información para futura referencia. Estos útiles consejos complementan el manual de Instrucciones. Para lograr un rendimiento óptimo y una operación segura, lea el manual de instrucciones. QUICK REFERENCE GUIDE Precision Master™ Stand Mixer FEATURES AND COMPONENTS 1. 1. 500 Watt Motor Plenty of power for double 3. recipes and heavy mixing tasks. 2. Tilt-Back Head 4. 2. Makes it easy to attach accessories and scrape sides and bottom of bowl. 3. Attachment Port Large Meat Grinder and Pasta Maker attachments (sold separately) connect to the port located behind the port cover on the front of the stand mixer head. A locking screw makes attach- ments easy to put on, secure and take off. 6. 4. Accessory Port Chef's whisk, flat mixing paddle and dough hook connect to this port. 7, 8 5. 5.5 Quart (5.2L) Stainless Steel Bowl with Handle Handle makes the bowl easy to lift, 5. hold, scrape and remove. Large capacity bowl lets you mix larger quantities. 6. Head-Lift Release Lever Securely locks stand mixer head into raised, tilt-back position. Used to return mixer head to mixing position. 11. 12. 7. On/Off and Speed Control Dial 12 speeds for precision mixing. 8. Blue Light Ring 9. Illuminates when mixer is operating. Turns off in OFF position. 10. 9. Chef's Whisk Incorporates air into ingredients/mixtures. Ideal for whipping eggs, egg whites or heavy cream. Used in recipes for angel food cake, chiffon cake, meringue, some types of candy, such as marshmallows, and quickly whips potatoes. 10. Flat Mixing Paddle Used for stirring, mixing and beating ingredients/mixtures. Best accessory for mixing cookies, cakes and batters, and for frostings. Also use for making pie crusts, biscuits and shortcakes, and combining ingredients for meatloaf or meatballs. 11. Dough Hook Used for the mixing and kneading of yeast dough for breads, rolls, pizza/focaccia, pasta dough and yeast-raised coffee cakes. 12. Splash Guard with Pour Spout Prevents splattering when mixing and adding ingredients. Guides ingredients into the bowl. PG-35382-ESP
-
 1
1 -
 2
2
 |
 |
